看了Angular官网动态组件的内容,相信很多朋友都是一脸懵逼进去,一脸懵逼出来,当然包括笔者。
官网以投放广告为例,每一则广告为一个独立组件,广告面板会动态切换不同的广告,即动态显示不同的组件,而不是同一个广告组件显示不同的广告内容。
1. 定义一个容器视图指令
组件是特殊的指令,组件可以作为动态组件的视图容器,指令同样可以。
定义一个广告容器的指令,该指令作为锚点来告诉 Angular 要把这些广告(即动态组件)插入到什么地方。
// ad.directive.ts
import { Directive, ViewContainerRef } from '@angular/core';

@Directive({
  selector: '[adContainer]',
})
export class AdDirective {
  // 注入了 ViewContainerRef 来获取对容器视图的访问权
  constructor(public viewContainerRef: ViewContainerRef) { }
}
2.定义广告基类组件
定义一个AdComponent组件作为广告基类,所有广告类型的组件将继承该基类组件,用于限制广告内容或其他功能。
// ad.component.ts
import { Component, OnInit } from '@angular/core';
export interface AdData {
	headline: string,   // 广告标题
	content: string,	// 广告内容
}

@Component({
  selector: 'ad',
  templateUrl: './ad.component.html',
  styleUrls: ['./ad.component.less']
})
export class AdComponent implements OnInit {
  data: AdData
  constructor() { }

  ngOnInit(): void {
  }
}
3.定义多种类型的广告组件
定义一个招聘广告组件
// job-ad.component.ts
import { Component, OnInit } from '@angular/core';
import { AdComponent, AdData } from '../ad/ad.component';

@Component({
  selector: 'job-ad',
  template: `
		<div>
		    <h3>工作招聘广告</h3>
		    <h4>{{data.headline}}</h4>
		    <h4>{{data.content}}</h4>
		</div>`,
  styleUrls: ['./job-ad.component.less']
})
export class JobAdComponent implements AdComponent, OnInit {
  data: AdData;
  constructor() { }

  ngOnInit(): void {
  }
}
定义一个其他类型的广告组件
// other-ad.component.ts
import { Component, OnInit } from '@angular/core';
import { AdComponent, AdData } from '../ad/ad.component';

@Component({
  selector: 'other-ad',
  template: `
		<div>
		    <h3>其他类型广告</h3>
		    <h4>{{data.headline}}</h4>
		    <h4>{{data.content}}</h4>
		</div>`,
  styleUrls: ['./job-ad.component.less']
})
export class OtherAdComponent implements AdComponent, OnInit {
  data: AdData;
  constructor() { }

  ngOnInit(): void {
  }
}
4.定义广告服务
定义一个广告服务,用于提供广告数据
// ad.service.ts
import { Injectable } from '@angular/core';
import { JobAdComponent } from '../components/job-ad/job-ad.component';
import { OtherAdComponent } from '../components/other-ad/other-ad.component';
@Injectable({
providedIn: 'root'
})
export class AdService {
adList = [
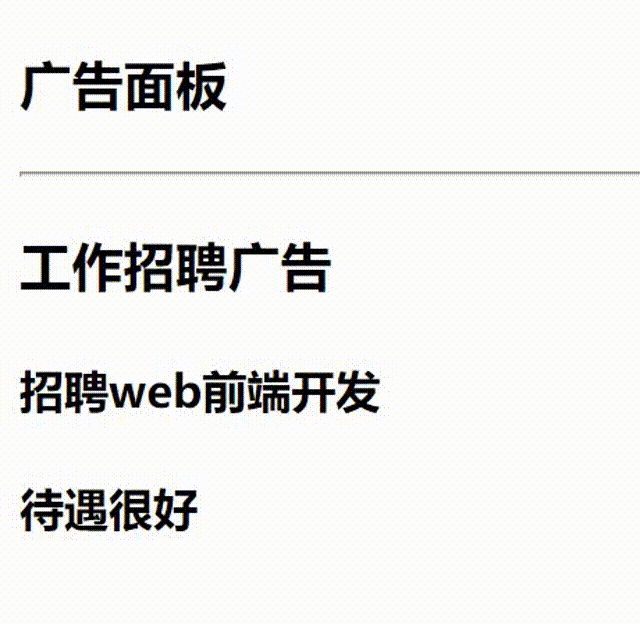
{component: JobAdComponent, data: {headline: '招聘web前端开发', content: '待遇很好'}},
{component: JobAdComponent, data: {headline: '招聘算法工程师', content: '六险一金'}},
{component: OtherAdComponent, data: {headline: '金融广告', content: '理财保险'}},
{component: OtherAdComponent, data: {headline: '汽车广告', content: '宝马奔驰'}},
]
constructor() { }
}
5.定义广告面板组件
ng-template标签运用刚刚创建的容器视图adContainer,作为锚点来告诉 Angular 要把动态组件加载到这个位置。
<!-- ad-panel.component.html -->
<div>
    <h3>广告面板</h3>
    <hr/>
    <ng-template adContainer></ng-template>		<!-- 广告容器 -->
</div>
import { Component, OnInit, Input, ViewChild, ComponentFactoryResolver, ComponentFactory } from '@angular/core';
import { AdDirective } from '../../directives/ad.directive';
import { AdComponent } from '../ad/ad.component';

@Component({
  selector: 'ad-panel',
  templateUrl: './ad-panel.component.html',
  styleUrls: ['./ad-panel.component.less']
})
export class AdPanelComponent implements OnInit {
  @Input() ads: any[] = [];		// ads广告列表作为输入,数据来源于广告服务AdService
  currentAdIndex = -1;			// 记录广告列表的下标
  @ViewChild(AdDirective, {static: true}) adContainer!: AdDirective;
  interval: any;				// 定时器
  constructor(private componentFactoryResolver: ComponentFactoryResolver) { }

  ngOnInit(): void {
    this.loadComponent();
    this.getAds();
  }

  loadComponent() {
    this.currentAdIndex = this.ads.length ? (this.currentAdIndex + 1) % this.ads.length : 0; // 循环选取下标算法
    const adItem = this.ads[this.currentAdIndex];	// 当前的广告数据,包含广告组件模型和广告内容
    const componentFactory: ComponentFactory<AdComponent> = this.componentFactoryResolver.resolveComponentFactory(adItem.component);	// 调用resolveComponentFactory方法传入组件模板生成对应的组件工厂
    const viewContainerRef = this.adContainer.viewContainerRef;	 // 获取容器视图
    viewContainerRef.clear();	// 清空容器视图所有内容
    const componentRef = viewContainerRef.createComponent<AdComponent>(componentFactory); // 调用createComponent方法根据组件工厂创建对应的组件实例,并渲染在容器视图上
    componentRef.instance.data = adItem.data;	// 将广告内容的数据赋值给创建的组件实例

  }

  getAds() {
  	// 每3秒调用一次loadComponent方法来加载新的组件
    this.interval = setInterval(() => {
      this.loadComponent();
    }, 3000);
  }
}
效果图: