前言
这周学习尼恩编著的《Netty、Redis、ZooKeeper高并发实战》, 这本书写的很不错,通过十几个例子带领大家去体会高并发如何实现, 这周我看了最基础的JavaNOI部分,读书的时候好像明白了作者写的内容,但是又体会不深,非得自己动手写一些书上得例子,有时候还要改动下例子,才能体会深刻,得出自己得结论。下面我们进入例子演示。
Blocking IO
首先我们会来一个Blocking IO的例子,也就是同步阻塞方式,在Java中,默认创建的socket都是阻塞的。
先来看Server端代码, 写一个继承ServerSocket的类
@Slf4j
public class BlockReceiveServer  extends ServerSocket {
    public BlockReceiveServer() throws Exception
    {
        super(SERVER_PORT);
    }

    public void startServer() throws Exception
    {
        while (true)
        {
            // server尝试接收其他Socket的连接请求,server的accept方法是阻塞式的

            log.debug("server listen at:" + SERVER_PORT);
            Socket socket = this.accept();
            /**
             * 我们的服务端处理客户端的连接请求是同步进行的, 每次接收到来自客户端的连接请求后,
             * 都要先跟当前的客户端通信完之后才能再处理下一个连接请求。 这在并发比较多的情况下会严重影响程序的性能,
             * 为此,我们可以把它改为如下这种异步处理与客户端通信的方式
             */
            // 每接收到一个Socket就建立一个新的线程来处理它
            new Thread(new Task(socket)).start();
        }
    }
this.accept()是阻塞的,也就是说没有请求来的时候,它是停在这里的,有请求来了后,我们起一个新的线程来出来它。 这里定义了一个Task来出来客户端请求。
 class Task implements Runnable
    {

        private Socket socket;

        private DataInputStream dis;

        public Task(Socket socket)
        {
            this.socket = socket;
        }

        @Override
        public void run()
        {
            try
            {
                dis = new DataInputStream(socket.getInputStream());
                log.debug("start receive");
                for (int i = 0;i < 1000 ;i++)
                {
                    dis.readUTF();
                }

                log.debug("finish receive" );
            } catch (Exception e)
            {
                e.printStackTrace();
            } finally
            {

                IOUtil.closeQuietly(dis);
                IOUtil.closeQuietly(socket);

            }
        }
    }
书中的例子是传送文件,我这里把它改为接收客户端传过来的文本,就是客户端写一千次,服务端读一千次,这个也是写死的,因为阻塞,没有读完,你是不能进入下一个环节的,不然会出错。
客户端代码
@Slf4j
public class BlockSendClient extends Socket
{
    private Socket client;
    private DataOutputStream outputStream;

    /**
     * 构造函数<br/>
     * 与服务器建立连接
     *
     * @throws Exception
     */
    public BlockSendClient() throws Exception
    {
        super(SOCKET_SERVER_IP
                , SERVER_PORT);
        this.client = this;
    }

    /**
     * 向服务端传输文件
     *
     * @throws Exception
     */
    public void sendFile() throws Exception
    {
        try
        {
            outputStream = new DataOutputStream(client.getOutputStream());

            for (int i = 0;i < 1000 ;i++)
            {
                outputStream.writeUTF(String.valueOf(i));
                outputStream.flush();
                Thread.sleep(1000);
            }
            log.debug("======== file transfer success ========");
        } catch (Exception e)
        {
            e.printStackTrace();
        } finally
        {
            IOUtil.closeQuietly(outputStream);
            IOUtil.closeQuietly(client);

        }
    }
客户端就是继承了socket,然后往socket里面发送1000次数字。
为了体现效果,我把客户端也让它多线程的去和服务端连接。 这里启动50个线程去和服务端连接,如果启动100个,会报“java.net.ConnectException: Connection refused: connect”, 但是你多启动几个客户端去连接,是不会有问题的。
 public static void main(String[] args)
    {
        for(int i =0;i<50;i++){
            new Thread(new Task()).start();
        }
    }

class Task  implements Runnable
{

    @Override
    public void run() {
        try
        {
            BlockSendClient client = new BlockSendClient(); // 启动客户端连接
            client.sendFile();
        } catch (Exception e)
        {
            e.printStackTrace();
        }
    }
}
我们可以看到服务端的输出
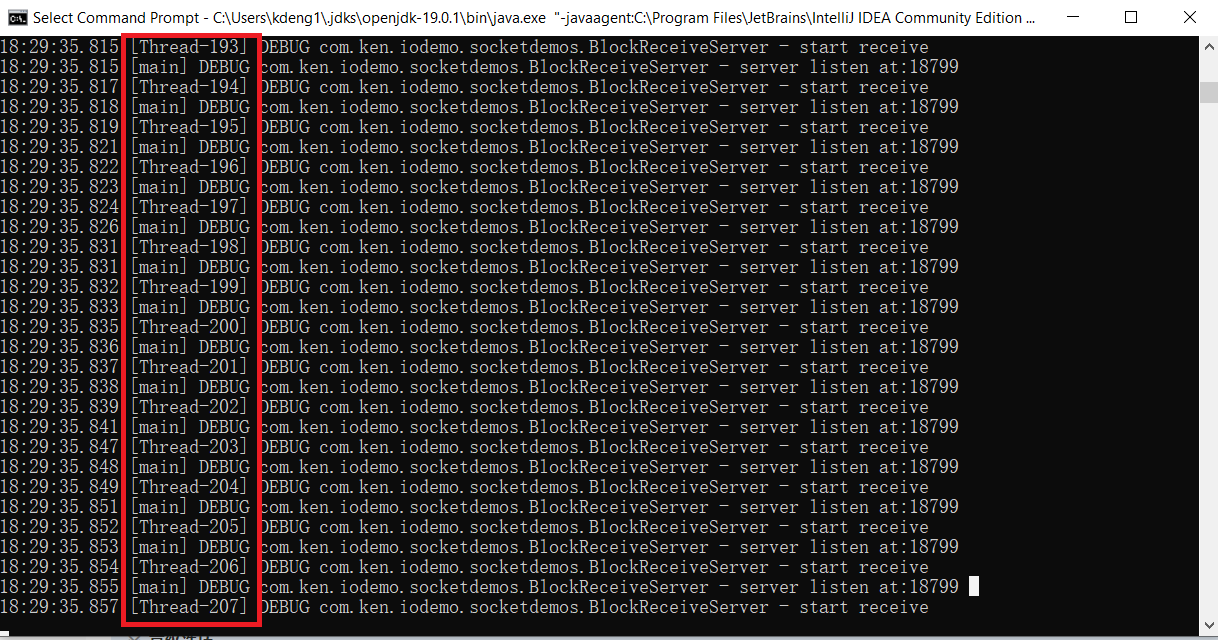
我们打开多少客户端,那么服务端就必须要打开50倍的线程数来连接。 而线程能开的数量是有限制的,一个Java线程大约占1M的空间。 对于高并发,这种方式肯定是不可取的。
Java NIO
我们来看下如何用Java NOI 来写一个和上面一样的功能。先来看下服务端代码
@Slf4j
public class NioDiscardServer {

    public static void startServer() throws IOException {

        // 1、创建一个 Selector选择器
        Selector selector = Selector.open();

        // 2、获取通道
        ServerSocketChannel serverSocketChannel = ServerSocketChannel.open();
        ServerSocket serverSocket = serverSocketChannel.socket();
        // 3.设置为非阻塞
        serverSocketChannel.configureBlocking(false);
        // 4、绑定监听端口
        serverSocket.bind(new InetSocketAddress(SERVER_PORT));
        log.info("server start success");

        // 5、将通道注册到选择器上,并注册的IO事件为:“接收新连接”
        SelectionKey sk = serverSocketChannel.register(selector, SelectionKey.OP_ACCEPT);

        //  sk.interestOps(SelectionKey.OP_ACCEPT) ;

        // 6、轮询感兴趣的I/O就绪事件(选择键集合)
        while (selector.select() > 0) {
            // 7、获取选择键集合
            Iterator<SelectionKey> selectedKeys = selector.selectedKeys().iterator();

            while (selectedKeys.hasNext()) {
                // 8、获取单个的选择键,并处理
                SelectionKey selectedKey = selectedKeys.next();

                // 9、判断key是具体的什么事件
                if (selectedKey.isAcceptable()) {
                    log.info("new connection coming" + selectedKey.channel());
                    ServerSocketChannel server = (ServerSocketChannel) selectedKey.channel();
                    SocketChannel socketChannel = server.accept();
                    // 10、若选择键的IO事件是“连接就绪”事件,就获取客户端连接

                    // 11、切换为非阻塞模式
                    socketChannel.configureBlocking(false);
                    socketChannel.setOption(StandardSocketOptions.TCP_NODELAY, true);

                    // 12、将该通道注册到selector选择器上
                    SelectionKey channleSk=        socketChannel.register(selector,
                            SelectionKey.OP_READ | SelectionKey.OP_WRITE  | SelectionKey.OP_CONNECT);


                }
                if (selectedKey.isWritable()) {
                    //log.info("write ready:" + selectedKey.channel());
                }
                if (selectedKey.isConnectable()) {
                    log.info("client connect success:" + selectedKey.channel());

                }
                if (selectedKey.isReadable()) {
                    log.info("read ready:" + selectedKey.channel());

                    // 13、若选择键的IO事件是“可读”事件,读取数据
                    SocketChannel socketChannel = (SocketChannel) selectedKey.channel();

                    // 14、读取数据
                    ByteBuffer byteBuffer = ByteBuffer.allocate(1024);
                    int length = 0;
                    while ((length = socketChannel.read(byteBuffer)) > 0) {

                        byteBuffer.flip();

                        log.info(new String(byteBuffer.array(), 0, length));

                        byteBuffer.clear();

                    }

                    if(length == -1)
                    {
                        socketChannel.close();
                    }
                }

                // 15、移除选择键
                selectedKeys.remove();
            }
        }
        // 7、关闭连接
        serverSocketChannel.close();
    }

    public static void main(String[] args) throws IOException {
        startServer();
    }
}
客户端代码如下
@Slf4j
public class NioDiscardClient {
    public  void startClient(int clientNum) throws IOException {
        InetSocketAddress address =
                new InetSocketAddress(SOCKET_SERVER_IP,
                        SERVER_PORT);

        // 1、获取通道(channel)
        SocketChannel socketChannel = SocketChannel.open(address);
        // 2、切换成非阻塞模式
        socketChannel.configureBlocking(false);
        //不断的自旋、等待连接完成,或者做一些其他的事情
        while (!socketChannel.finishConnect()) {

        }

        log.info("client connect success");
        for(int i = 0;i<1000;i++) {
            // 3、分配指定大小的缓冲区
            ByteBuffer byteBuffer = ByteBuffer.allocate(1024);
            byteBuffer.put((clientNum + "hello" + i).getBytes());
            byteBuffer.flip();
            socketChannel.write(byteBuffer);

            ThreadUtil.sleepSeconds(1);
        }
        log.info("client write success");

        socketChannel.shutdownOutput();
        socketChannel.close();
    }

    public static void main(String[] args) throws IOException {
        for(int i =0;i<50;i++){
            new Thread(new NoiTask(i)).start();
        }
    }

}

class NoiTask  implements Runnable
{
    private int clientNum;
    public NoiTask(int clientNum)
    {
        this.clientNum = clientNum;
    }

    @Override
    public void run() {
        try
        {
            NioDiscardClient client = new NioDiscardClient(); // 启动客户端连接
            client.startClient(clientNum); // 传输文件
        } catch (Exception e)
        {
            e.printStackTrace();
        }
    }
}
代码这里不解释了。 这里服务端和客户端不需要约定多少内容要发送,
服务端有段代码需要注意
while ((length = socketChannel.read(byteBuffer)) > 0),这段很容易就退出循环,因为read是异步的,很容易就返回0, 让循环中断, 开始的时候socketChannel.close()没有加上条件,服务端打印出几次后,就close了,客户端就再写不进去了。报“java.io.IOException: An established connection was aborted by the software in your host machine”,因为服务端关闭了。
服务端的输出我们可以看出,它只启动了一个main线程,不论多少个客户端连接过来。
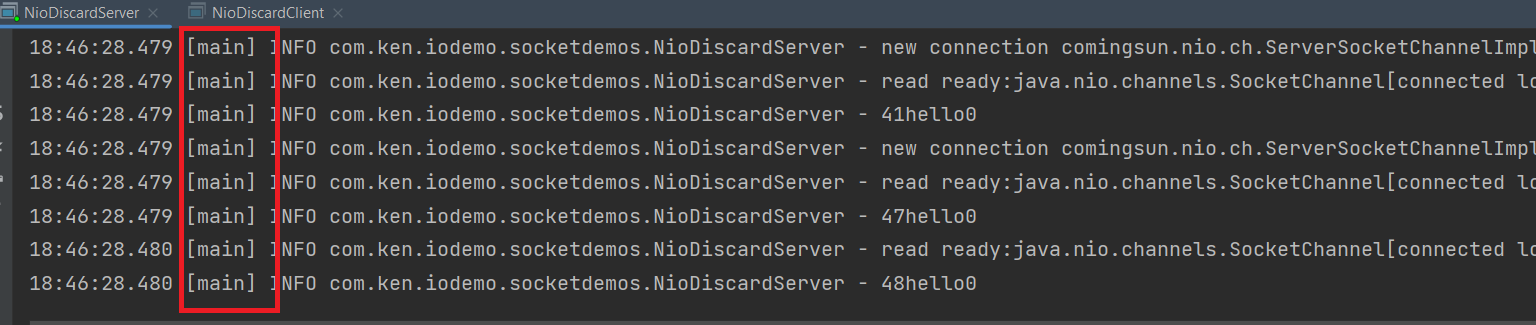
我再用CMD启动多个进行客户端进行测试的时候,发现它会启用300多M的内存,后面多加几个客户端,它也不会增长,保持再这个数字上面。 前面的例子中,内存使用的要小,但是增加客户端后,内存使用量会增加,但是也不是很明显。 这里面为什么会用这么多内存,我不是太明白,也许代码有什么缺陷在这里,暂时不细究了。
总结
我在使用NIO的时候,发现它在单机测试性能的时候不比传统的阻塞式的优秀,甚至还慢一些。它的应用场景是在量大的时候,高并发的时候。具体NIO的原理我也解释不清楚,只能从应用的层面来用例子实践一下,后面看能不能再深入下它的原理,书中讲述的很好,但是我只能说大致理解,谈不上深入。