引言
什么是事务?
在理解事务之前,我们要先了解事务的基本作用
比如在生活中有这样一个场景————取钱,每个人应该都干过的事
在ATM机上取钱,1.输入密码————2.输入金额————3.银行扣钱————4.ATM出钱
以上几个步骤中,3和4就是必须是一个事务,因为它们之间,要么都完成,要么都不完成
事务其实就是用来解决这种类似的问题
想象一理,如果第3步成功了,第4步失败(报错)了,这将会导致非常严重的后果,对于普通人而言,钱被扣了,但ATM机没出钱,肯定会发飙的吧。哈哈
所以第3步和第4步,必须要全部被执行完成,这样才能保证最后数据的一致性。
对应到业务开发过程中,第3步和第4步,我们把它认为是一个执行单元,但在代码里面它是一条条的代码,所以必须要有一种机制能够保证它们要么全部执行成功,要么全部执行失败。
在企业级应用程序开发中,事务管理是必不可少的技术,用来确保数据的完整性和一致性。
Spring事务是建立在持久层的基础之上的,要理解Spring事务,就必须要先了解事务的相关特性
事务特性
1. 原子性(Atomicity)
事务是一个原子操作,由一系列动作组成。事务的原子性确保动作要么全部完成,要么完全不起作用。
2. 一致性(Consistency)
一旦事务完成(不管成功还是失败),系统必须确保它所建模的业务处于一致的状态,而不会是部分完成部分失败。在现实中的数据不应该被破坏。
3. 隔离性(Isolation)
可能有许多事务会同时处理相同的数据,因此每个事务都应该与其他事务隔离开来,防止数据损坏。
4. 持久性(Durability)
一旦事务完成,无论发生什么系统错误,它的结果都不应该受到影响,这样就能从任何系统崩溃中恢复过来。通常情况下,事务的结果被写到持久化存储器中。
Mysql事务实现
1.获取连接
2.关闭自动提交功能(SET AUTOCOMMIT = FALSE)
3.开启事务
4.业务SQL语句
5.提交事务
6.打开自动提交功能(SET AUTOCOMMIT = TRUE)
7.关闭连接
Mysql(InnoDB)实现
源码
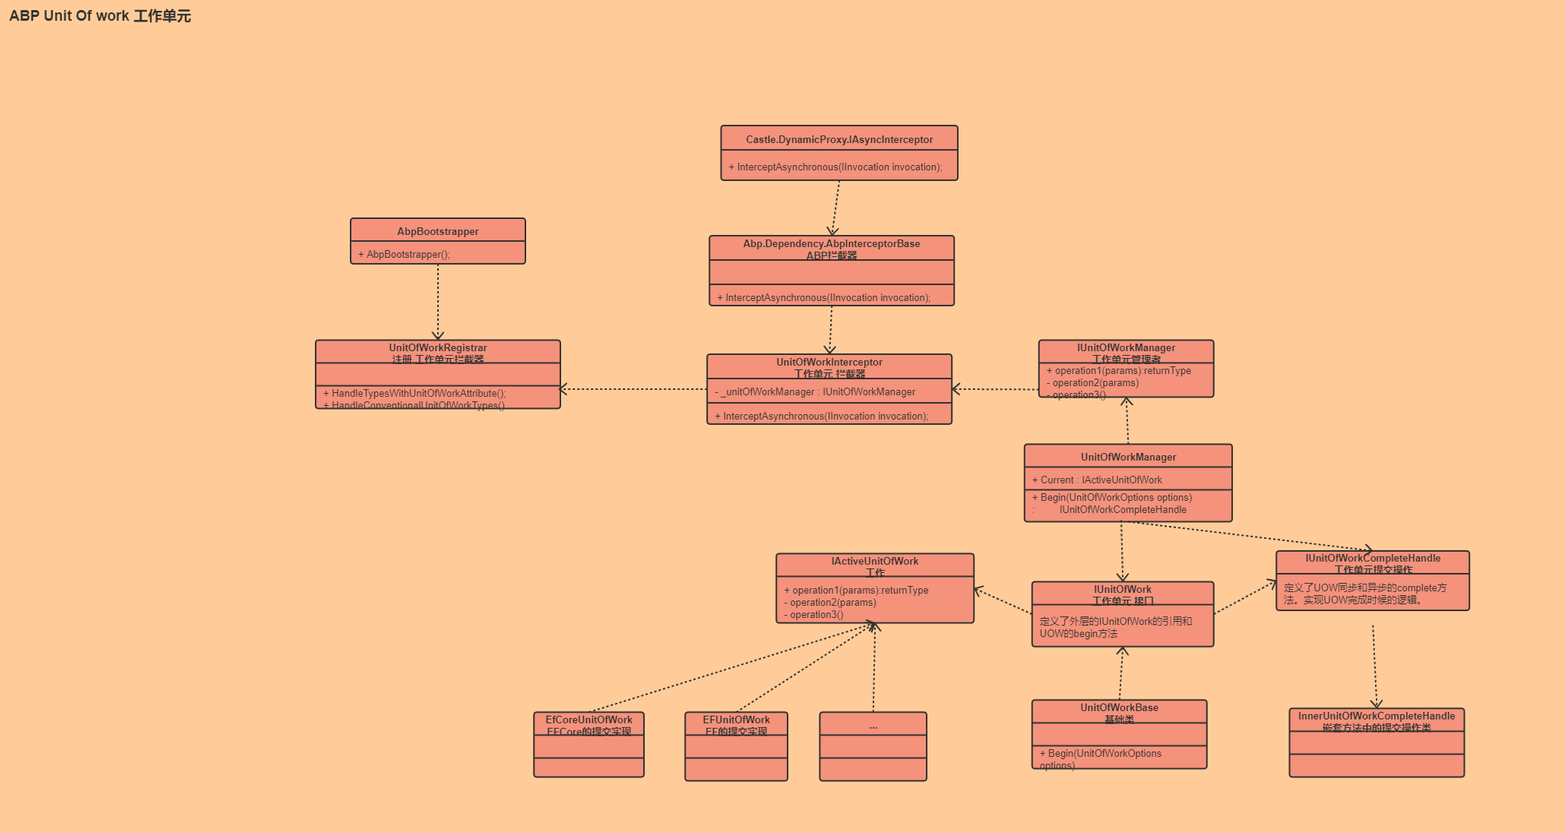
Spring事务实现原理
Spring支持编程式事务管理以及声明式事务管理两种方式。
1. 编程式事务管理
编程式事务管理是侵入性事务管理,使用TransactionTemplate或者直接使用PlatformTransactionManager,对于编程式事务管理,Spring推荐使用TransactionTemplate。
2. 声明式事务管理
声明式事务管理建立在AOP之上,其本质是对方法前后进行拦截,然后在目标方法开始之前创建或者加入一个事务,执行完目标方法之后根据执行的情况提交或者回滚。
Spring AOP请阅读笔者另一篇———Spring源码——AOP实现原理
编程式事务每次实现都要单独实现,但业务量大功能复杂时,使用编程式事务无疑是痛苦的,而声明式事务不同,声明式事务属于无侵入式,不会影响业务逻辑的实现,只需要在配置文件中做相关的事务规则声明或者通过注解的方式,便可以将事务规则应用到业务逻辑中
显然声明式事务管理要优于编程式事务管理,这正是Spring倡导的非侵入式的编程方式。唯一不足的地方就是声明式事务管理的粒度是方法级别,而编程式事务管理是可以到代码块的,但是可以通过提取方法的方式完成声明式事务管理的配置。
本文重点讲解声明式事务
在Spring中要使用事务,在注解启动Spring的情况下,需要使用到@EnableTransactionManagement注解
@Target(ElementType.TYPE)
@Retention(RetentionPolicy.RUNTIME)
@Documented
@Import(TransactionManagementConfigurationSelector.class)
public @interface EnableTransactionManagement {
TransactionManagementConfigurationSelector类属性ImportSelector(关于@Import注解的使用参考另外一篇Spring扩展——Import注解)
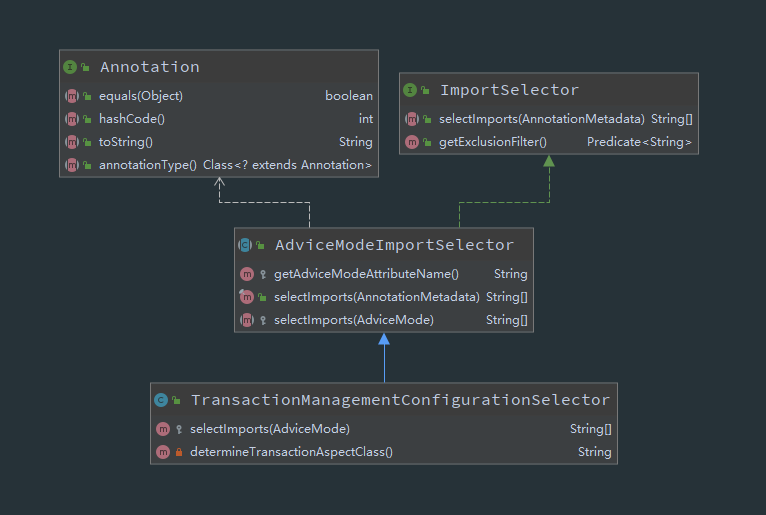
TransactionManagementConfigurationSelector源码内容
public class TransactionManagementConfigurationSelector extends AdviceModeImportSelector<EnableTransactionManagement> {

	/**
	 * 此处是AdviceMode的作用,默认是用代理,另外一个是ASPECTJ
	 *
	 * Returns {@link ProxyTransactionManagementConfiguration} or
	 * {@code AspectJ(Jta)TransactionManagementConfiguration} for {@code PROXY}
	 * and {@code ASPECTJ} values of {@link EnableTransactionManagement#mode()},
	 * respectively.
	 */
	@Override
	protected String[] selectImports(AdviceMode adviceMode) {
		switch (adviceMode) {
			case PROXY:
				return new String[] {AutoProxyRegistrar.class.getName(),
						ProxyTransactionManagementConfiguration.class.getName()};
			case ASPECTJ:
				return new String[] {determineTransactionAspectClass()};
			default:
				return null;
		}
	}
	private String determineTransactionAspectClass() {
		return (ClassUtils.isPresent("javax.transaction.Transactional", getClass().getClassLoader()) ?
				TransactionManagementConfigUtils.JTA_TRANSACTION_ASPECT_CONFIGURATION_CLASS_NAME :
				TransactionManagementConfigUtils.TRANSACTION_ASPECT_CONFIGURATION_CLASS_NAME);
	}
}
通过以上源码我们发现,这个类实际上是引入了两个BeanDefinition,这两个类的Class Type 是AutoProxyRegistrar 和 ProxyTransactionManagementConfiguration
AutoProxyRegistrar
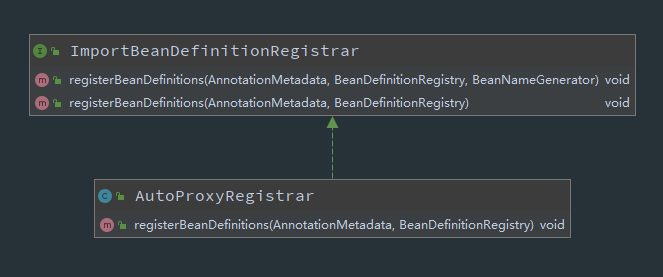
AutoProxyRegistrar类是ImportBeanDefinitionRegistrar的实现类,它会在ConfigurationClassPostProcessor对象执行postProcessBeanDefinitionRegistry方法的时候,执行到AutoProxyRegistrar里面的实现方法registerBeanDefinitions
在AutoProxyRegistrar的registerBeanDefinitions方法里面又向容器中注册了几个类
/**
	 * 注册AOP处理器InfrastructureAdvisorAutoProxyCreator
	 *
	 * Register, escalate, and configure the standard auto proxy creator (APC) against the
	 * given registry. Works by finding the nearest annotation declared on the importing
	 * {@code @Configuration} class that has both {@code mode} and {@code proxyTargetClass}
	 * attributes. If {@code mode} is set to {@code PROXY}, the APC is registered; if
	 * {@code proxyTargetClass} is set to {@code true}, then the APC is forced to use
	 * subclass (CGLIB) proxying.
	 * <p>Several {@code @Enable*} annotations expose both {@code mode} and
	 * {@code proxyTargetClass} attributes. It is important to note that most of these
	 * capabilities end up sharing a {@linkplain AopConfigUtils#AUTO_PROXY_CREATOR_BEAN_NAME
	 * single APC}. For this reason, this implementation doesn't "care" exactly which
	 * annotation it finds -- as long as it exposes the right {@code mode} and
	 * {@code proxyTargetClass} attributes, the APC can be registered and configured all
	 * the same.
	 */
	@Override
	public void registerBeanDefinitions(AnnotationMetadata importingClassMetadata, BeanDefinitionRegistry registry) {
		boolean candidateFound = false;
		Set<String> annTypes = importingClassMetadata.getAnnotationTypes();
		// 遍历所有注解,找到有mode和proxyTargetClass的注解
		for (String annType : annTypes) {
			AnnotationAttributes candidate = AnnotationConfigUtils.attributesFor(importingClassMetadata, annType);
			if (candidate == null) {
				continue;
			}
			Object mode = candidate.get("mode");
			Object proxyTargetClass = candidate.get("proxyTargetClass");
			if (mode != null && proxyTargetClass != null && AdviceMode.class == mode.getClass() &&
					Boolean.class == proxyTargetClass.getClass()) {
				candidateFound = true;
				if (mode == AdviceMode.PROXY) {
					// 注册aop
					AopConfigUtils.registerAutoProxyCreatorIfNecessary(registry);
					// 强制设置proxyTargetClass=true后面使用cglib
					if ((Boolean) proxyTargetClass) {
						AopConfigUtils.forceAutoProxyCreatorToUseClassProxying(registry);
						return;
					}
				}
			}
		}
		if (!candidateFound && logger.isInfoEnabled()) {
			String name = getClass().getSimpleName();
			logger.info(String.format("%s was imported but no annotations were found " +
					"having both 'mode' and 'proxyTargetClass' attributes of type " +
					"AdviceMode and boolean respectively. This means that auto proxy " +
					"creator registration and configuration may not have occurred as " +
					"intended, and components may not be proxied as expected. Check to " +
					"ensure that %s has been @Import'ed on the same class where these " +
					"annotations are declared; otherwise remove the import of %s " +
					"altogether.", name, name, name));
		}
	}
刚刚前面我们谈到Spring事务也是基于AOP的扩展,所以这里也必须要引入注册AOP处理器InfrastructureAdvisorAutoProxyCreator,而它就是生成动态代理对象的重要处理器
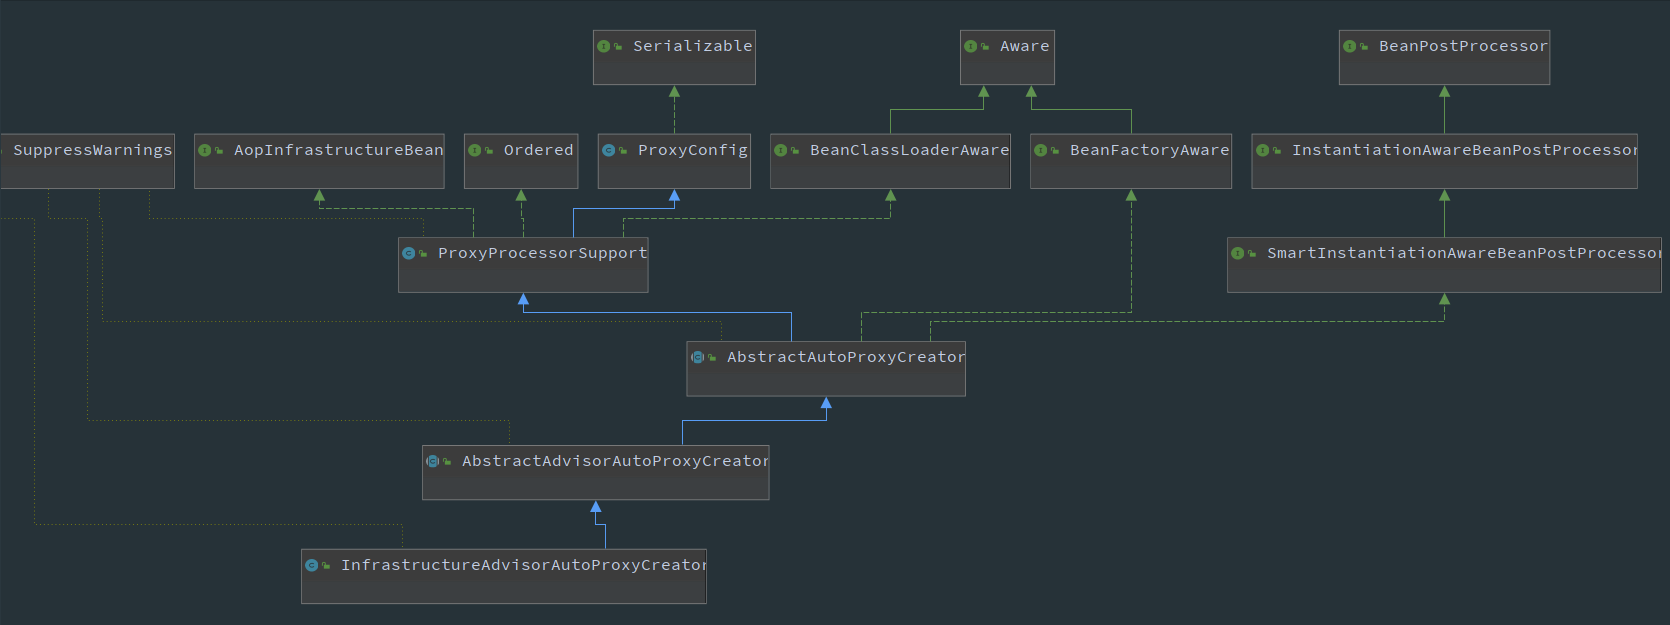
我们看到它是属于AbstractAdvisorAutoProxyCreator的子类,这里跟普通AOP为对象创建代理是一样的
ProxyTransactionManagementConfiguration
其源码如下
/**
 * 代理事务配置,注册事务需要用的一些类,而且Role=ROLE_INFRASTRUCTURE都是属于内部级别的
 *
 * {@code @Configuration} class that registers the Spring infrastructure beans
 * necessary to enable proxy-based annotation-driven transaction management.
 *
 * @author Chris Beams
 * @author Sebastien Deleuze
 * @since 3.1
 * @see EnableTransactionManagement
 * @see TransactionManagementConfigurationSelector
 */
@Configuration(proxyBeanMethods = false)
@Role(BeanDefinition.ROLE_INFRASTRUCTURE)
public class ProxyTransactionManagementConfiguration extends AbstractTransactionManagementConfiguration {

	@Bean(name = TransactionManagementConfigUtils.TRANSACTION_ADVISOR_BEAN_NAME)
	@Role(BeanDefinition.ROLE_INFRASTRUCTURE)
	public BeanFactoryTransactionAttributeSourceAdvisor transactionAdvisor(
			TransactionAttributeSource transactionAttributeSource, TransactionInterceptor transactionInterceptor) {

		BeanFactoryTransactionAttributeSourceAdvisor advisor = new BeanFactoryTransactionAttributeSourceAdvisor();
		advisor.setTransactionAttributeSource(transactionAttributeSource);
		advisor.setAdvice(transactionInterceptor);
		if (this.enableTx != null) {
			advisor.setOrder(this.enableTx.<Integer>getNumber("order"));
		}
		return advisor;
	}

	@Bean
	@Role(BeanDefinition.ROLE_INFRASTRUCTURE)
	public TransactionAttributeSource transactionAttributeSource() {
		return new AnnotationTransactionAttributeSource();
	}

	@Bean
	@Role(BeanDefinition.ROLE_INFRASTRUCTURE)
	public TransactionInterceptor transactionInterceptor(TransactionAttributeSource transactionAttributeSource) {
		TransactionInterceptor interceptor = new TransactionInterceptor();
		interceptor.setTransactionAttributeSource(transactionAttributeSource);
		if (this.txManager != null) {
			interceptor.setTransactionManager(this.txManager);
		}
		return interceptor;
	}
}
这个配置类的主要功能是用来创建用来处理事务的Advisor,而Advisor又是由Advice和Pointcut组成的
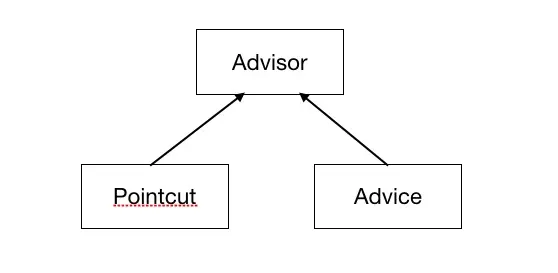
Advisor
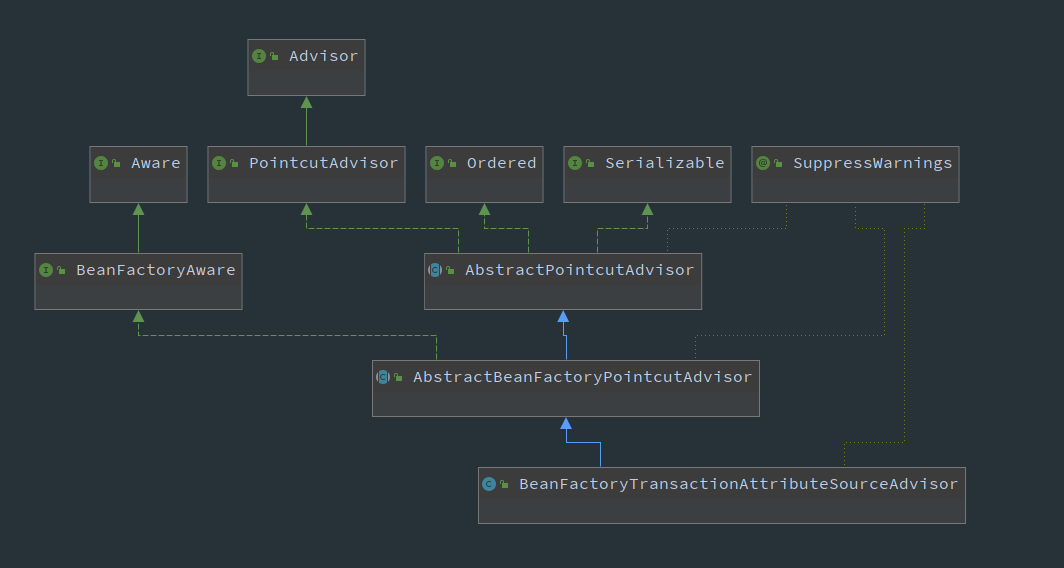
在Spring事务中,Advisor的实现类是BeanFactoryTransactionAttributeSourceAdvisor
**
* 事务属性通知器,存放事务注解的方法相关的属性,本身属于一个Advisor
*
* Advisor driven by a {@link TransactionAttributeSource}, used to include
* a transaction advice bean for methods that are transactional.
*
* @author Juergen Hoeller
* @since 2.5.5
* @see #setAdviceBeanName
* @see TransactionInterceptor
* @see TransactionAttributeSourceAdvisor
*/
@SuppressWarnings("serial")
public class BeanFactoryTransactionAttributeSourceAdvisor extends AbstractBeanFactoryPointcutAdvisor {
@Nullable
private TransactionAttributeSource transactionAttributeSource;
/**
* 内部默认实现了Pointcut
*/
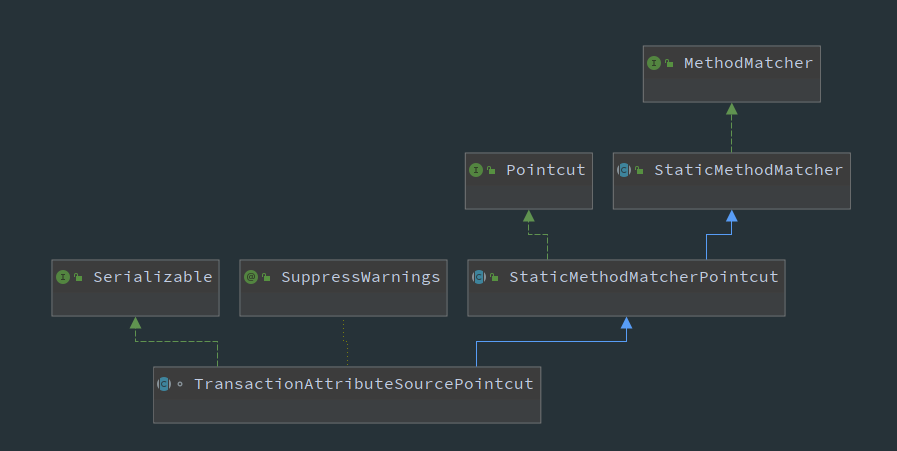
private final TransactionAttributeSourcePointcut pointcut = new TransactionAttributeSourcePointcut() {
@Override
@Nullable
protected TransactionAttributeSource getTransactionAttributeSource() {
return transactionAttributeSource;
}
};
/**
* Set the transaction attribute source which is used to find transaction
* attributes. This should usually be identical to the source reference
* set on the transaction interceptor itself.
* @see TransactionInterceptor#setTransactionAttributeSource
*/
public void setTransactionAttributeSource(TransactionAttributeSource transactionAttributeSource) {
this.transactionAttributeSource = transactionAttributeSource;
}
/**
* Set the {@link ClassFilter} to use for this pointcut.
* Default is {@link ClassFilter#TRUE}.
*/
public void setClassFilter(ClassFilter classFilter) {
this.pointcut.setClassFilter(classFilter);
}
@Override
public Pointcut getPointcut() {
return this.pointcut;
}
}
Advice
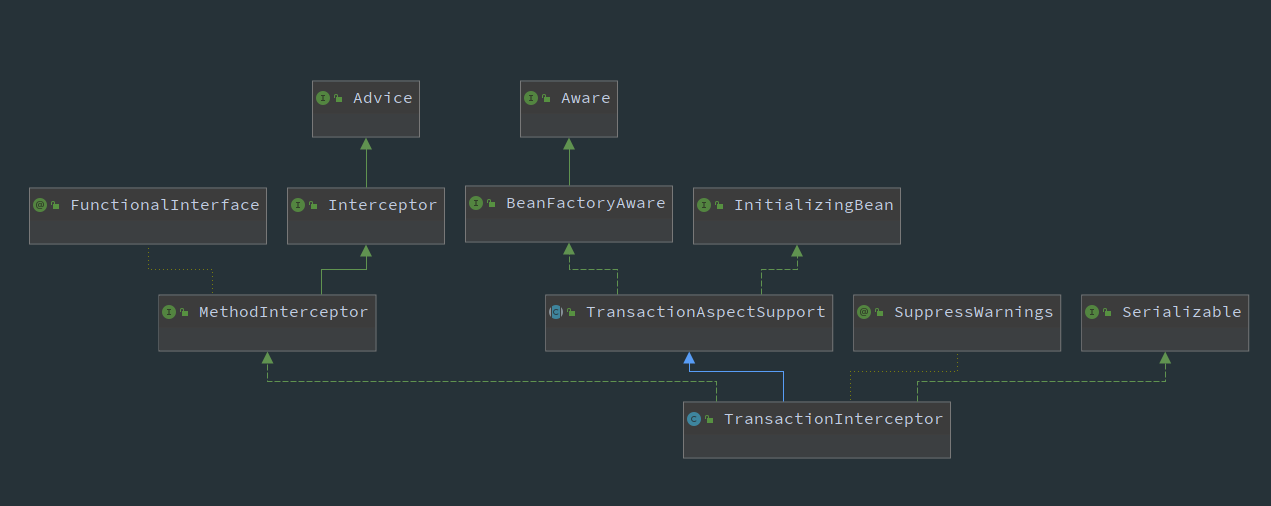
Spring事务中的Advice就是配置类中@Bean注解了的TransactionInterceptor
Pointcut
在BeanFactoryTransactionAttributeSourceAdvisor类中,有一个默认的属性pointcut。
这样,用于实现Spring事务的Advisor,Pointcut以及Advice都已经找到了。关于这三个类的具体作用,我们这里进行整体的上的讲解,后面我们将会深入其内部讲解其是如何进行bean的过滤以及事务逻辑的织入的。
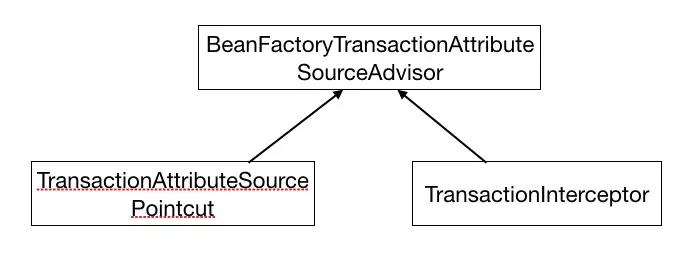
BeanFactoryTransactionAttributeSourceAdvisor
封装了实现事务所需的所有属性,包括Pointcut,Advice,TransactionManager以及一些其他的在Transactional注解中声明的属性;
TransactionAttributeSourcePointcut
用于判断哪些bean需要织入当前的事务逻辑。这里可想而知,其判断的基本逻辑就是判断其方法或类声明上有没有使用@Transactional注解,如果使用了就是需要织入事务逻辑的bean;
TransactionInterceptor
这个bean本质上是一个Advice,其封装了当前需要织入目标bean的切面逻辑,也就是Spring事务是如果借助于数据库事务来实现对目标方法的环绕的。
到此,使用Spring事务的前期准备工作已经做完
在调用的时候,跟AOP一样,会通过执行链的,调用到具体的Advisor,而这里的Advisor就是我们上面找到的BeanFactoryTransactionAttributeSourceAdvisor,然后Advisor在拦截的时候,会去调用Advice里面的invoke方法
TransactionInterceptor里面的invoke方法
	@Override
	@Nullable
	public Object invoke(MethodInvocation invocation) throws Throwable {
		// Work out the target class: may be {@code null}.
		// The TransactionAttributeSource should be passed the target class
		// as well as the method, which may be from an interface.
		// 获取我们的代理对象的class属性
		Class<?> targetClass = (invocation.getThis() != null ? AopUtils.getTargetClass(invocation.getThis()) : null);

		// Adapt to TransactionAspectSupport's invokeWithinTransaction...
		/**
		 * 以事务的方式调用目标方法
		 * 在这埋了一个钩子函数 用来回调目标方法的
		 */
		return invokeWithinTransaction(invocation.getMethod(), targetClass, invocation::proceed);
	}
而具体的处理逻辑在TransactionInterceptor的父类TransactionAspectSupport中的invokeWithinTransaction方法里面,因为源码较长,这里就不粘贴过来了
最终事务的处理,是要表现在持久层上,所以这里的处理跟上面mysql数据库里面直接使用事务的情况一样
事务隔离级别
要理解隔离级别,必须要先知道在并发的情况下,引起的三种状况。
1. Dirty Reads 脏读
一个事务正在对数据进行更新操作,但是更新还未提交,另一个事务这时也来操作这组数据,并且读取了前一个事务还未提交的数据,而前一个事务如果操作失败进行了回滚,后一个事务读取的就是错误数据,这样就造成了脏读。
2. Non-Repeatable Reads 不可重复读
一个事务多次读取同一数据,在该事务还未结束时,另一个事务也对该数据进行了操作,而且在第一个事务两次次读取之间,第二个事务对数据进行了更新,那么第一个事务前后两次读取到的数据是不同的,这样就造成了不可重复读。
3. Phantom Reads 幻像读
第一个数据正在查询符合某一条件的数据,这时,另一个事务又插入了一条符合条件的数据,第一个事务在第二次查询符合同一条件的数据时,发现多了一条前一次查询时没有的数据,仿佛幻觉一样,这就是幻像读。
非重复度和幻像读的区别
非重复读是指同一查询在同一事务中多次进行,由于其他提交事务所做的修改或删除,每次返回不同的结果集,此时发生非重复读。
幻像读是指同一查询在同一事务中多次进行,由于其他提交事务所做的插入操作,每次返回不同的结果集,此时发生幻像读。
表面上看,区别就在于非重复读能看见其他事务提交的修改和删除,而幻像能看见其他事务提交的插入。
归纳
| 名称 | 数据状态 | 实际行为 | 产生原因 |
|---|---|---|---|
| 脏读 | 未提交 | 打算提交但是数据回滚了,读取了提交的数据 | 数据的读取 |
| 不可重复读 | 已提交 | 读取了修改前的数据 | 数据的修改 |
| 幻读 | 已提交 | 读取了插入前的数据 | 数据的插入 |
READ_UNCOMMITTED (读未提交)
这是事务最低的隔离级别,它允许另外一个事务可以看到这个事务未提交的数据。这种隔离级别会产生脏读,不可重复读和幻读。
READ_COMMITTED (读已提交)
保证一个事务修改的数据提交后才能被另外一个事务读取,另外一个事务不能读取该事务未提交的数据。这种事务隔离级别可以避免脏读出现,但是可能会出现不可重复读和幻像读。
REPEATABLE_READ (可重复读)
这种事务隔离级别可以防止脏读、不可重复读,但是可能出现幻像读。它除了保证一个事务不能读取另一个事务未提交的数据外,还保证了不可重复读。
SERIALIZABLE(串行化)
这是花费最高代价但是最可靠的事务隔离级别,事务被处理为顺序执行。除了防止脏读、不可重复读外,还避免了幻像读。
归纳
| 名称 | 结果 | 脏读 | 不可重复读 | 幻读 |
|---|---|---|---|---|
| Read UnCommitted(读未提交) | 什么都不解决 | √ | √ | √ |
| Read Committed(读提交) | 解决了脏读的问题 | - | √ | √ |
| Repeatable Read(重复读) | (mysql的默认级别)解决了不可重复读 ) | - | - | √ |
| Serializable(序列化) | 解决所有问题 | - | - | - |
Spring事务传播特性
比如 A 方法开启了事务,A 方法中调用了 B 方法,B 方法也开启了事务,那么这时候 A 和 B 之间的事务是独立进行的还是一起作用的?
Spring 在这方面为我们提供了管理的方法,也就是下面我们要讨论的 Spring 的事务传播机制。
七种传播特性
PROPAGATION_REQUIRED
默认的spring事务传播级别,使用该级别的特点是,如果上下文中已经存在事务,那么就加入到事务中执行,如果当前上下文中不存在事务,则新建事务执行。所以这个级别通常能满足处理大多数的业务场景。
PROPAGATION_SUPPORTS
从字面意思就知道,supports,支持,该传播级别的特点是,如果上下文存在事务,则支持事务加入事务,如果没有事务,则使用非事务的方式执行。所以说,并非所有的包在transactionTemplate.execute中的代码都会有事务支持。这个通常是用来处理那些并非原子性的非核心业务逻辑操作。应用场景较少。
PROPAGATION_MANDATORY
该级别的事务要求上下文中必须要存在事务,否则就会抛出异常!配置该方式的传播级别是有效的控制上下文调用代码遗漏添加事务控制的保证手段。比如一段代码不能单独被调用执行,但是一旦被调用,就必须有事务包含的情况,就可以使用这个传播级别。
PROPAGATION_REQUIRES_NEW
从字面即可知道,new,每次都要一个新事务,该传播级别的特点是,每次都会新建一个事务,并且同时将上下文中的事务挂起,执行当前新建事务完成以后,上下文事务恢复再执行。
这是一个很有用的传播级别,举一个应用场景:现在有一个发送100个红包的操作,在发送之前,要做一些系统的初始化、验证、数据记录操作,然后发送100封红包,然后再记录发送日志,发送日志要求100%的准确,如果日志不准确,那么整个父事务逻辑需要回滚。
怎么处理整个业务需求呢?就是通过这个PROPAGATION_REQUIRES_NEW 级别的事务传播控制就可以完成。发送红包的子事务不会直接影响到父事务的提交和回滚。
PROPAGATION_NOT_SUPPORTED
这个也可以从字面得知,not supported ,不支持,当前级别的特点就是上下文中存在事务,则挂起事务,执行当前逻辑,结束后恢复上下文的事务。
这个级别有什么好处?可以帮助你将事务极可能的缩小。我们知道一个事务越大,它存在的风险也就越多。所以在处理事务的过程中,要保证尽可能的缩小范围。比如一段代码,是每次逻辑操作都必须调用的,比如循环1000次的某个非核心业务逻辑操作。这样的代码如果包在事务中,势必造成事务太大,导致出现一些难以考虑周全的异常情况。所以这个事务这个级别的传播级别就派上用场了。用当前级别的事务模板抱起来就可以了。
PROPAGATION_NEVER
该事务更严格,上面一个事务传播级别只是不支持而已,有事务就挂起,而PROPAGATION_NEVER传播级别要求上下文中不能存在事务,一旦有事务,就抛出runtime异常,强制停止执行!这个级别上辈子跟事务有仇。
PROPAGATION_NESTED
字面也可知道,nested,嵌套级别事务。该传播级别特征是,如果上下文中存在事务,则嵌套事务执行,如果不存在事务,则新建事务。
两个概念
嵌套事务
那么什么是嵌套事务呢?很多人都不理解,我看过一些博客,都是有些理解偏差。
嵌套是子事务套在父事务中执行,子事务是父事务的一部分,在进入子事务之前,父事务建立一个回滚点,叫save point,然后执行子事务,这个子事务的执行也算是父事务的一部分,然后子事务执行结束,父事务继续执行。重点就在于那个save point。看几个问题就明了了:
如果子事务回滚,会发生什么?
父事务会回滚到进入子事务前建立的save point,然后尝试其他的事务或者其他的业务逻辑,父事务之前的操作不会受到影响,更不会自动回滚。
如果父事务回滚,会发生什么?
父事务回滚,子事务也会跟着回滚!为什么呢,因为父事务结束之前,子事务是不会提交的,我们说子事务是父事务的一部分,正是这个道理。那么:
事务的提交,是什么情况?
是父事务先提交,然后子事务提交,还是子事务先提交,父事务再提交?答案是第二种情况,还是那句话,子事务是父事务的一部分,由父事务统一提交。
现在你再体会一下这个”嵌套“,是不是有那么点意思?
事务挂起
实际上Spring在实现的时候,是通过对应的bind 和 unbind 操作,是在ThreadLocal 对象里,将资源对象绑定或移出当前线程对应的 resources 来实现的。
NESTED 的特性,本质上还是同一个事务的不同保存点,如果涉及到外层事务回滚,则内层的也将会被回滚;
REQUIRED_NEW 的实现对应的是一个新的事务,拿到的是新的资源,所以外层事务回滚时,不影响内层事务。
以上是事务的7个传播级别,在日常应用中,通常可以满足各种业务需求,但是除了传播级别,在读取数据库的过程中,如果两个事务并发执行,那么彼此之间的数据是如何影响的呢?————请看上面的隔离级别