1. 引言
Cesium是一款三维地球和地图可视化开源JavaScript库,使用WebGL来进行硬件加速图形,使用时不需要任何插件支持,基于Apache2.0许可的开源程序,可以免费用于商业和非商业用途
Cesium官网:Cesium: The Platform for 3D Geospatial
Cesium GitHub站点:CesiumGS/cesium: An open-source JavaScript library for world-class 3D globes and maps (github.com)
API文档:Index - Cesium Documentation
通过阅读源码,理清代码逻辑,有助于扩展与开发,笔者主要参考了以下两个系列的文章
渲染是前端可视化的核心,本文描述Cesium渲染模块的Texture
2. WebGL中的Texture
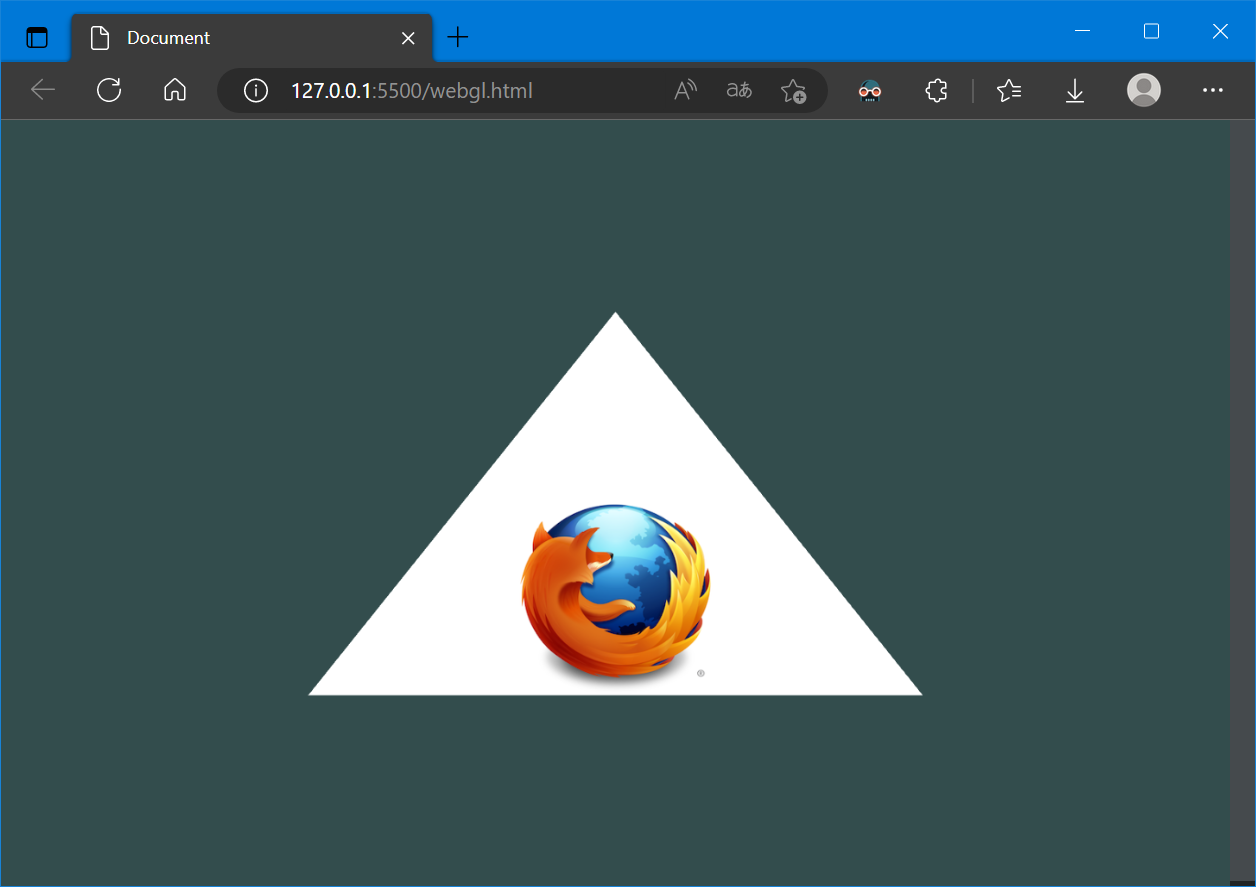
以下大致是一个最简的Texture的WebGL绘制代码(完整代码和数据见文末附录):
// 加载纹理坐标到GPU
const textureCoordinates = new Float32Array([
    -1.0, 0.0,
    2.0, 0.0,
    0.5, 2.0
]);
const textureCoordinatesBuffer = gl.createBuffer();
gl.bindBuffer(gl.ARRAY_BUFFER, textureCoordinatesBuffer);
gl.bufferData(gl.ARRAY_BUFFER, textureCoordinates, gl.STATIC_DRAW);
// 设置纹理坐标属性
textureCoordAttribute = gl.getAttribLocation(shaderProgram, "aTextureCoord");
gl.enableVertexAttribArray(textureCoordAttribute);
gl.vertexAttribPointer(textureCoordAttribute, 2, gl.FLOAT, false, 0, 0);
// 加载图片,图片加载后创建纹理
const image = new Image();
image.src = './cubetexture.png';
image.onload = function () {
    // 创建并绑定纹理对象
    const texture = gl.createTexture();
    gl.bindTexture(gl.TEXTURE_2D, texture);
    // 设置纹理参数
    gl.texParameteri(gl.TEXTURE_2D, gl.TEXTURE_MAG_FILTER, gl.LINEAR);
    gl.texParameteri(gl.TEXTURE_2D, gl.TEXTURE_MIN_FILTER, gl.LINEAR_MIPMAP_NEAREST);
    gl.texParameteri(gl.TEXTURE_2D, gl.TEXTURE_WRAP_S, gl.CLAMP_TO_EDGE);
    gl.texParameteri(gl.TEXTURE_2D, gl.TEXTURE_WRAP_T, gl.CLAMP_TO_EDGE);
    gl.pixelStorei(gl.UNPACK_FLIP_Y_WEBGL, 1);
    // 生成纹理数据
    gl.texImage2D(gl.TEXTURE_2D, 0, gl.RGBA, gl.RGBA, gl.UNSIGNED_BYTE, image);
    gl.generateMipmap(gl.TEXTURE_2D);
    // 激活纹理并绘制
    gl.activeTexture(gl.TEXTURE0);
    gl.clear(gl.COLOR_BUFFER_BIT);
    gl.drawArrays(gl.TRIANGLES, 0, 3);
}
WebGL或者说OpenGL中,纹理(Texture)通常是贴在物体表面的二维图片
参考上述代码,WebGL中纹理使用流程大致如下:
- 加载图片数据
- 创建纹理对象
gl.createTexture() - 绑定纹理对象
gl.bindTexture() - 设置纹理参数
gl.texParameteri() - 使用图片数据生成纹理
gl.texImage2D()、gl.generateMipmap() - 设置纹理坐标
gl.createBuffer()... - 在顶点着色器中传递纹理
- 在片段着色器中采用纹理
- (绘制时)激活纹理并绑定纹理
gl.activeTexture()
纹理参数gl.texParameteri()主要是设置采样方式、平铺方式等,具体可以参考:WebGLRenderingContext.texParameteri() - Web API 接口参考 | MDN (mozilla.org)
上述代码中使用到的gl.pixelStorei()用于图像预处理的函数,具体可以参考:WebGLRenderingContext.pixelStorei() - Web API 接口参考 | MDN (mozilla.org)
使用图片数据生成纹理的gl.texImage2D()方法的重载方法较多,目的无非就是实现各种图片数据的加载,具体可以参考:WebGLRenderingContext.bindTexture() - Web API 接口参考 | MDN (mozilla.org)
gl.generateMipmap()会为当前绑定的纹理自动生成所有需要的多级渐远纹理
更详细的流程和函数解释可以参考:纹理 - LearnOpenGL CN (learnopengl-cn.github.io)
3. Cesium中的Texture
Cesium源码中,对Texture进行了一些封装:
function Texture(options) {
  // ...
  gl.activeTexture(gl.TEXTURE0);
  gl.bindTexture(textureTarget, texture);
  gl.pixelStorei(gl.UNPACK_ALIGNMENT, unpackAlignment);
  // Source: ImageData, HTMLImageElement, HTMLCanvasElement, or HTMLVideoElement
  gl.texImage2D(textureTarget, 0, internalFormat, pixelFormat, PixelDatatype.toWebGLConstant(pixelDatatype, context), source);
  gl.bindTexture(textureTarget, null);

  this._texture = texture;
  this.sampler = defined(options.sampler) ? options.sampler : new Sampler();
}

Texture.prototype.generateMipmap = function (hint) {
  // ...
  gl.hint(gl.GENERATE_MIPMAP_HINT, hint);
  gl.activeTexture(gl.TEXTURE0);
  gl.bindTexture(target, this._texture);
  gl.generateMipmap(target);
  gl.bindTexture(target, null);
};
Texture还封装了以下函数:
Texture.fromFramebuffer = function (options)
Texture.prototype.copyFrom = function (options)
Texture.prototype.copyFromFramebuffer = function(xOffset,yOffset,framebufferXOffset,framebufferYOffset,width,height)
Texture.prototype.isDestroyed = function ()
Texture.prototype.isDestroyed = function ()
另外,还有TextureCache,用来缓存Texture,虽然目前在源码中似乎没怎么使用:
function TextureCache() {
  this._textures = {};
  this._numberOfTextures = 0;
  this._texturesToRelease = {};
}

TextureCache.prototype.getTexture = function (keyword) {
  const cachedTexture = this._textures[keyword];
  return cachedTexture.texture;
};
在Cesium源码中,可以看到纹理基本都是直接new Texture(),例如ImageryLayer.js:
ImageryLayer.prototype._createTextureWebGL = function (context, imagery) {
  const sampler = new Sampler({
    minificationFilter: this.minificationFilter,
    magnificationFilter: this.magnificationFilter,
  });

  const image = imagery.image;

  return new Texture({
    context: context,
    source: image,
    pixelFormat: this._imageryProvider.hasAlphaChannel
      ? PixelFormat.RGBA
      : PixelFormat.RGB,
    sampler: sampler,
  });
};
4. 参考资料
[1]Using textures in WebGL - Web API 接口参考 | MDN (mozilla.org)
[2]纹理 - LearnOpenGL CN (learnopengl-cn.github.io)
[3]Cesium原理篇:6 Renderer模块(2: Texture) - fu*k - 博客园 (cnblogs.com)
[4]webgl 12.Texture (纹理) - 简书 (jianshu.com)
[5]CesiumJS 2022^ 源码解读 5 - 着色器相关的封装设计 - 岭南灯火 - 博客园 (cnblogs.com)
5. 附录
包含Texture的WebGL绘制代码:
<canvas id="canvas"></canvas>
<script>
    const vertexSource = `
                attribute vec3 aPos;
                attribute vec2 aTextureCoord;
                varying highp vec2 vTextureCoord;
                void main()
                {
                    gl_Position = vec4(aPos.x, aPos.y, aPos.z, 1.0);
                    vTextureCoord = aTextureCoord;
                }
              `
    const fragmentSource = `
                varying highp vec2 vTextureCoord;
                uniform sampler2D uSampler;
                void main()
                {
                    gl_FragColor = texture2D(uSampler, vTextureCoord);
                }
              `
    const canvas = document.getElementById('canvas');
    canvas.width = canvas.clientWidth;
    canvas.height = canvas.clientHeight;
    const gl = canvas.getContext('webgl2');

    const vertices = new Float32Array([
        -0.5, -0.5, 0.0,
        0.5, -0.5, 0.0,
        0.0, 0.5, 0.0,
    ]);
    const vbo = gl.createBuffer();
    gl.bindBuffer(gl.ARRAY_BUFFER, vbo);
    gl.bufferData(gl.ARRAY_BUFFER, vertices, gl.STATIC_DRAW);

    const vao = gl.createVertexArray();
    gl.bindVertexArray(vao);
    gl.vertexAttribPointer(0, 3, gl.FLOAT, false, 0, 0);
    gl.enableVertexAttribArray(0)

    const vertexShader = gl.createShader(gl.VERTEX_SHADER);
    gl.shaderSource(vertexShader, vertexSource);
    gl.compileShader(vertexShader);

    const fragmentShader = gl.createShader(gl.FRAGMENT_SHADER);
    gl.shaderSource(fragmentShader, fragmentSource);
    gl.compileShader(fragmentShader);

    const shaderProgram = gl.createProgram();
    gl.attachShader(shaderProgram, vertexShader);
    gl.attachShader(shaderProgram, fragmentShader);
    gl.linkProgram(shaderProgram);
    gl.useProgram(shaderProgram);

    gl.clearColor(0.2, 0.3, 0.3, 1.0);
    gl.clear(gl.COLOR_BUFFER_BIT);

    // 加载纹理坐标到GPU
    const textureCoordinates = new Float32Array([
        -1.0, 0.0,
        2.0, 0.0,
        0.5, 2.0
    ]);
    const textureCoordinatesBuffer = gl.createBuffer();
    gl.bindBuffer(gl.ARRAY_BUFFER, textureCoordinatesBuffer);
    gl.bufferData(gl.ARRAY_BUFFER, textureCoordinates, gl.STATIC_DRAW);
    // 设置纹理坐标属性
    textureCoordAttribute = gl.getAttribLocation(shaderProgram, "aTextureCoord");
    gl.enableVertexAttribArray(textureCoordAttribute);
    gl.vertexAttribPointer(textureCoordAttribute, 2, gl.FLOAT, false, 0, 0);

    const image = new Image();
    image.src = './cubetexture.png';
    image.onload = function () {
        // 创建并绑定纹理对象
        const texture = gl.createTexture();
        gl.bindTexture(gl.TEXTURE_2D, texture);
        // 设置纹理参数
        gl.texParameteri(gl.TEXTURE_2D, gl.TEXTURE_MAG_FILTER, gl.LINEAR);
        gl.texParameteri(gl.TEXTURE_2D, gl.TEXTURE_MIN_FILTER, gl.LINEAR_MIPMAP_NEAREST);
        gl.texParameteri(gl.TEXTURE_2D, gl.TEXTURE_WRAP_S, gl.CLAMP_TO_EDGE);
        gl.texParameteri(gl.TEXTURE_2D, gl.TEXTURE_WRAP_T, gl.CLAMP_TO_EDGE);
        gl.pixelStorei(gl.UNPACK_FLIP_Y_WEBGL, 1);
        // 生成纹理数据
        gl.texImage2D(gl.TEXTURE_2D, 0, gl.RGBA, gl.RGBA, gl.UNSIGNED_BYTE, image);
        gl.generateMipmap(gl.TEXTURE_2D);

        // const sampler = gl.getUniformLocation(shaderProgram, "uSampler");
        // gl.uniform1i(sampler, 0);

        gl.activeTexture(gl.TEXTURE0);
        gl.clear(gl.COLOR_BUFFER_BIT);
        gl.drawArrays(gl.TRIANGLES, 0, 3);
    }
</script>
其中,图片cubetexture.png下载自:webgl-examples/cubetexture.png at main · mdn/webgl-examples · GitHub


![原来你是这样的JAVA–[07]聊聊Integer和BigDecimal](https://img2024.cnblogs.com/blog/37001/202402/37001-20240224171021931-593439949.png)