1. 引言
Cesium自1.87.1版本,开始支持3DTileset使用CustomShader:
Added CustomShader class for styling Cesium3DTileset or ModelExperimental with custom GLSL shaders
在CesiumJS 1.97版本,支持Model entities使用CustomShader:
Model entities now support CustomShader
具体可参考:Releases · CesiumGS/cesium (github.com)
使用CustomShader,编写自定义的Shader,可以实现一些炫酷的特效
本文描述使用CustomShader,实现3D Tiles模型的一些特效
数据来源:功能示例(Vue版) | Mars3D三维可视化平台 | 火星科技
数据地址:http://data.mars3d.cn/3dtiles/jzw-hefei/tileset.json
2. CustomShader
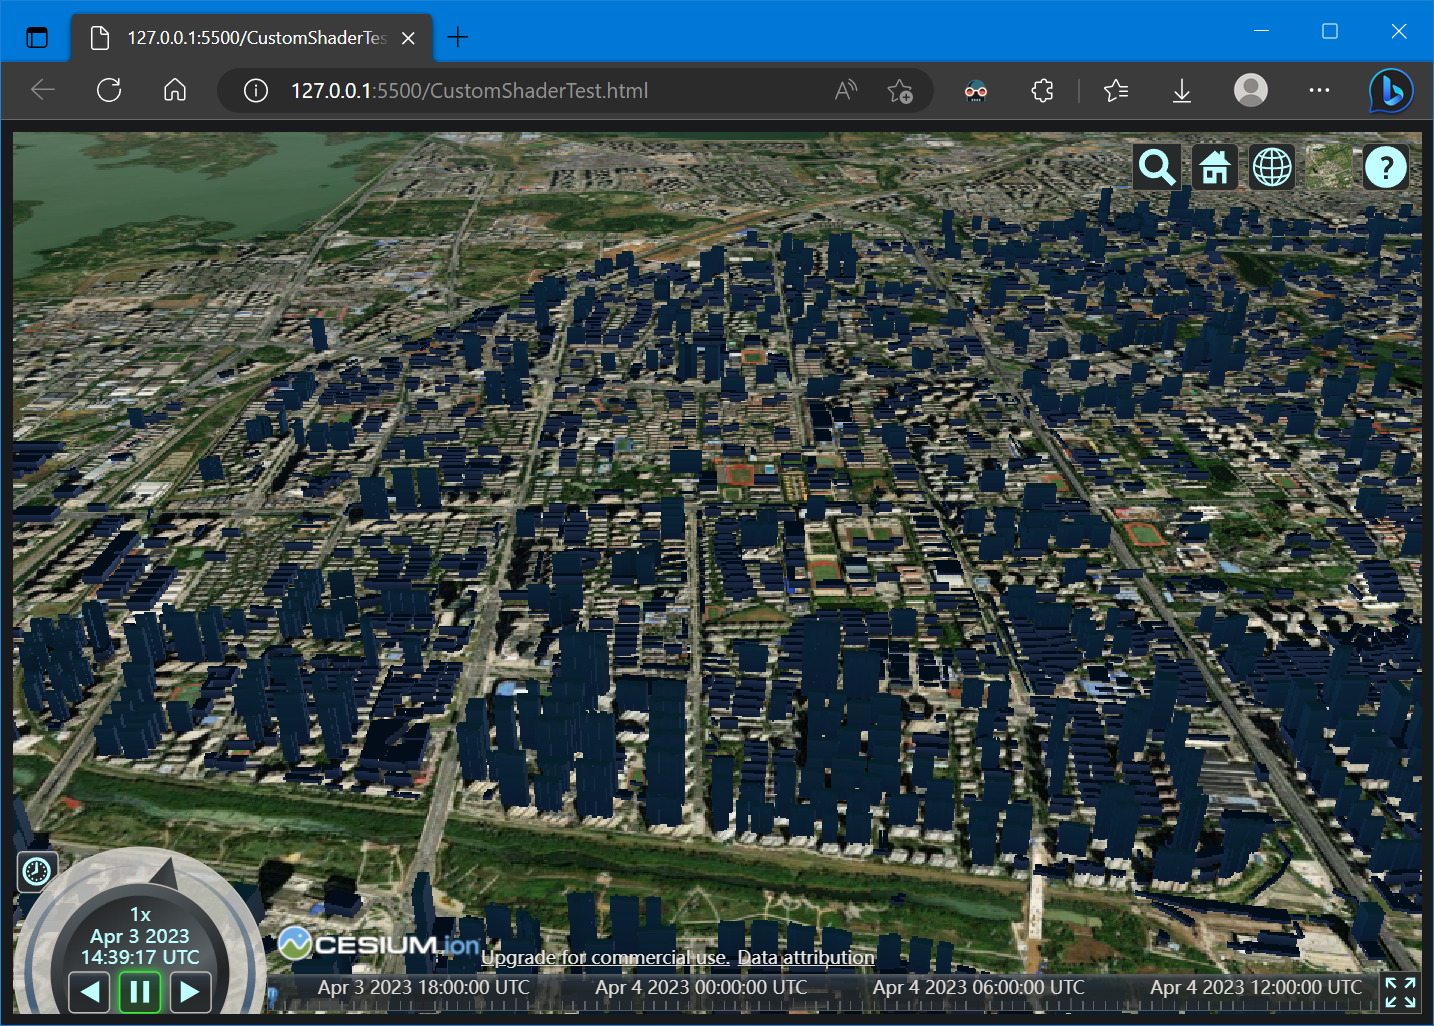
Cesium中Cesium3DTileset的加载代码如下:
<body>
  <!-- Include the CesiumJS JavaScript and CSS files -->
  <script src="https://cesium.com/downloads/cesiumjs/releases/1.101/Build/Cesium/Cesium.js"></script>
  <link href="https://cesium.com/downloads/cesiumjs/releases/1.101/Build/Cesium/Widgets/widgets.css" rel="stylesheet">

  <div id="cesiumContainer"></div>

  <script>
    Cesium.Ion.defaultAccessToken = 'eyJhbGciOiJIUzI1NiIsInR5cCI6IkpXVCJ9.eyJqdGkiOiJlMTk4ZTYyNy00MjkxLTRmZWYtOTg1MS0wOThjM2YzMzIzYzEiLCJpZCI6NzEyMSwic2NvcGVzIjpbImFzciIsImdjIl0sImlhdCI6MTU0ODMxNzI5OX0.rKV8Ldl_bgR3lVvNsbHhTX62j8JH8ADCIWAwk7tXpr8';
    const viewer = new Cesium.Viewer('cesiumContainer');

    const tilesets = viewer.scene.primitives.add(new Cesium.Cesium3DTileset({
      url: "//data.mars3d.cn/3dtiles/jzw-hefei/tileset.json"
    }));

    tilesets.readyPromise.then(function (tileset) {
      viewer.flyTo(tileset);
    });
  </script>
</body>
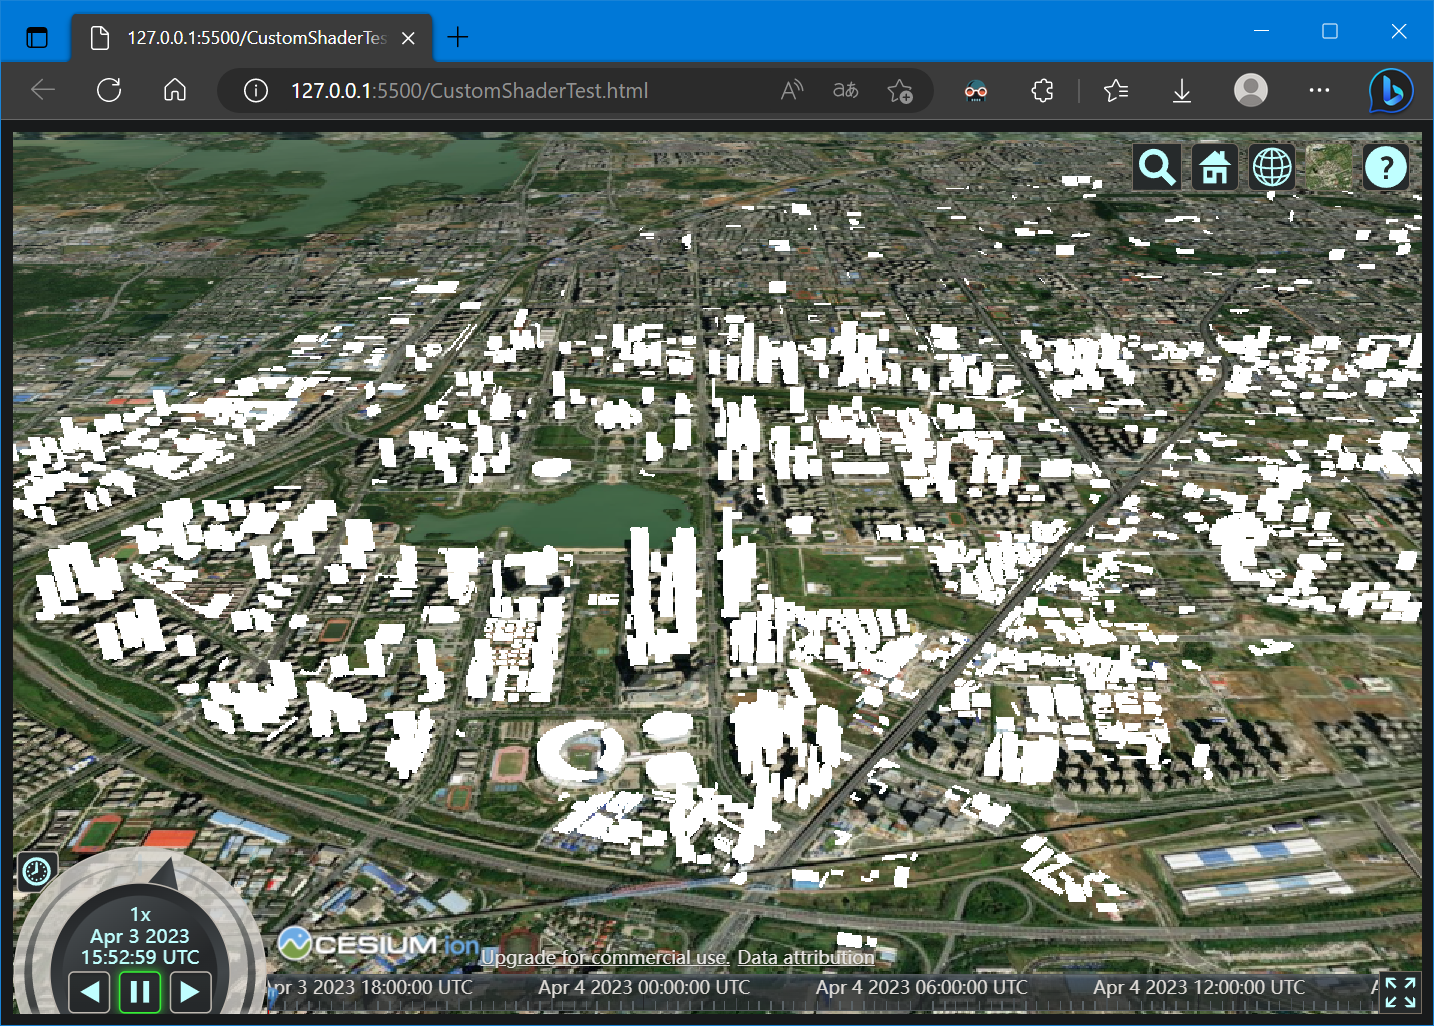
效果如下:
在Cesium3DTileset中,支持设置CustomShader,示例如下:
const customShader = new Cesium.CustomShader(/* ... */);

// Applying to all tiles in a tileset.
const tileset = await Cesium.Cesium3DTileset.fromUrl(
  "http://example.com/tileset.json", {
    customShader: customShader
});
viewer.scene.primitives.add(tileset);
具体信息可参考:
- Cesium3DTileset - Cesium Documentation
- cesium/Documentation/CustomShaderGuide at main · CesiumGS/cesium (github.com)
参考:CustomShader - Cesium Documentation,CustomShader的构造示例如下:
const customShader = new CustomShader({
  uniforms: {
    u_colorIndex: {
      type: Cesium.UniformType.FLOAT,
      value: 1.0
    },
    u_normalMap: {
      type: Cesium.UniformType.SAMPLER_2D,
      value: new Cesium.TextureUniform({
        url: "http://example.com/normal.png"
      })
    }
  },
  varyings: {
    v_selectedColor: Cesium.VaryingType.VEC3
  },
  vertexShaderText: `
  void vertexMain(VertexInput vsInput, inout czm_modelVertexOutput vsOutput) {
    v_selectedColor = mix(vsInput.attributes.color_0, vsInput.attributes.color_1, u_colorIndex);
    vsOutput.positionMC += 0.1 * vsInput.attributes.normal;
  }
  `,
  fragmentShaderText: `
  void fragmentMain(FragmentInput fsInput, inout czm_modelMaterial material) {
    material.normal = texture(u_normalMap, fsInput.attributes.texCoord_0);
    material.diffuse = v_selectedColor;
  }
  `
});
具体的参数及含义如下:
| 名字 | 类型 | 描述 |
|---|---|---|
mode |
CustomShaderMode | (可选)自定义着色器模式 |
lightingModel |
LightingModel | (可选)照明模型(例如 PBR 或未照明) |
| translucencyMode | CustomShaderTranslucencyMode | (可选)用于定义半透明模式 |
uniforms |
Object <string, UniformSpecifier> | (可选)用于定义uniforms |
varyings |
Object <string, VaryingType> | (可选)用于声明着色器中使用的其他 GLSL varyings |
vertexShaderText |
string | (可选)作为 GLSL 代码字符串的自定义顶点着色器,必须包含一个名为 vertexMain 的 GLSL 函数 |
fragmentShaderText |
string | (可选)作为 GLSL 代码字符串的自定义片段着色器,必须包含一个名为fragmentMain的GLSL函数 |
更为具体的CustomShader使用可参考CustomShader指南:CustomShaderGuide
通过阅读这份指南,基本可以完全了解CustomShader的使用,此处主要讲述FragmentShader的使用
FragmentShaderText必须包含函数void fragmentMain(FragmentInput fsInput, inout czm_modelMaterial material),其中FragmentInput包含的数据与结构如下:
struct FragmentInput {
    // Processed attribute values. See the Attributes Struct section below.
    Attributes attributes;
    // Feature IDs/Batch IDs. See the FeatureIds Struct section below.
    FeatureIds featureIds;
    // Metadata properties. See the Metadata Struct section below.
    Metadata metadata;
    // Metadata class properties. See the MetadataClass Struct section below.
    MetadataClass metadataClass;
    // Metadata statistics. See the Metadata Statistics Struct section below
    MetadataStatistics metadataStatistics;
};
czm_modelMaterial 包含的数据与结构如下:
/**
 * @property {vec3} diffuse Incoming light that scatters evenly in all directions.
 * @property {float} alpha Alpha of this material. 0.0 is completely transparent; 1.0 is completely opaque.
 * @property {vec3} specular Color of reflected light at normal incidence in PBR materials. This is sometimes referred to as f0 in the literature.
 * @property {float} roughness A number from 0.0 to 1.0 representing how rough the surface is. Values near 0.0 produce glossy surfaces, while values near 1.0 produce rough surfaces.
 * @property {vec3} normalEC Surface's normal in eye coordinates. It is used for effects such as normal mapping. The default is the surface's unmodified normal.
 * @property {float} occlusion Ambient occlusion recieved at this point on the material. 1.0 means fully lit, 0.0 means fully occluded.
 * @property {vec3} emissive Light emitted by the material equally in all directions. The default is vec3(0.0), which emits no light.
 */
struct czm_modelMaterial {
    vec3 diffuse;
    float alpha;
    vec3 specular;
    float roughness;
    vec3 normalEC;
    float occlusion;
    vec3 emissive;
};
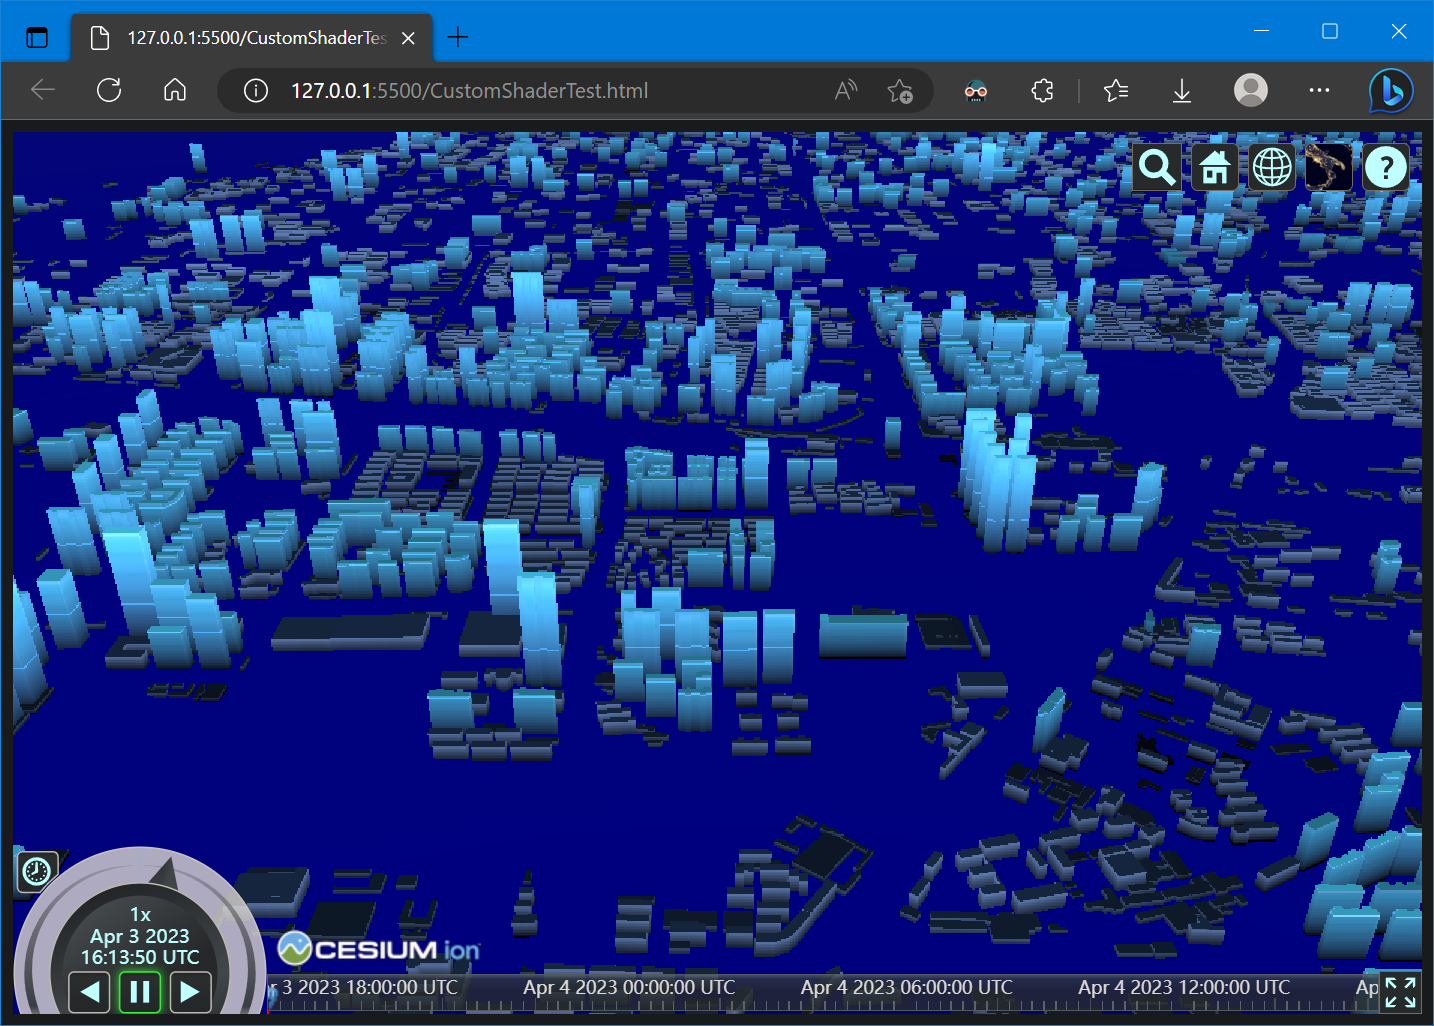
综上,将Cesium3DTileset设置为白色的示例代码如下:
<body>
   <!-- Include the CesiumJS JavaScript and CSS files -->
   <script src="https://cesium.com/downloads/cesiumjs/releases/1.101/Build/Cesium/Cesium.js"></script>
   <link href="https://cesium.com/downloads/cesiumjs/releases/1.101/Build/Cesium/Widgets/widgets.css" rel="stylesheet">

  <div id="cesiumContainer"></div>

  <script>
    Cesium.Ion.defaultAccessToken = 'eyJhbGciOiJIUzI1NiIsInR5cCI6IkpXVCJ9.eyJqdGkiOiJlMTk4ZTYyNy00MjkxLTRmZWYtOTg1MS0wOThjM2YzMzIzYzEiLCJpZCI6NzEyMSwic2NvcGVzIjpbImFzciIsImdjIl0sImlhdCI6MTU0ODMxNzI5OX0.rKV8Ldl_bgR3lVvNsbHhTX62j8JH8ADCIWAwk7tXpr8';
    const viewer = new Cesium.Viewer('cesiumContainer');

    const customShader = new Cesium.CustomShader({
      lightingModel: Cesium.LightingModel.UNLIT,
      fragmentShaderText: `
        void fragmentMain(FragmentInput fsInput, inout czm_modelMaterial material) {
            material.diffuse = vec3(1.0);
            material.alpha = 1.0;
        }
      `,
    });

    // Applying to all tiles in a tileset.
    const tilesets = viewer.scene.primitives.add(new Cesium.Cesium3DTileset({
      url: "//data.mars3d.cn/3dtiles/jzw-hefei/tileset.json",
      customShader: customShader
    }));

    tilesets.readyPromise.then(function (tileset) {
      viewer.flyTo(tileset);
    });

  </script>
</body>
效果如下:
将Cesium3DTileset设置光带的示例代码如下:
<body>
   <!-- Include the CesiumJS JavaScript and CSS files -->
   <script src="https://cesium.com/downloads/cesiumjs/releases/1.101/Build/Cesium/Cesium.js"></script>
   <link href="https://cesium.com/downloads/cesiumjs/releases/1.101/Build/Cesium/Widgets/widgets.css" rel="stylesheet">

  <div id="cesiumContainer"></div>

  <script>
    Cesium.Ion.defaultAccessToken = 'eyJhbGciOiJIUzI1NiIsInR5cCI6IkpXVCJ9.eyJqdGkiOiJlMTk4ZTYyNy00MjkxLTRmZWYtOTg1MS0wOThjM2YzMzIzYzEiLCJpZCI6NzEyMSwic2NvcGVzIjpbImFzciIsImdjIl0sImlhdCI6MTU0ODMxNzI5OX0.rKV8Ldl_bgR3lVvNsbHhTX62j8JH8ADCIWAwk7tXpr8';
    const viewer = new Cesium.Viewer('cesiumContainer');

    const customShader = new Cesium.CustomShader({
      lightingModel: Cesium.LightingModel.UNLIT,
      fragmentShaderText: `
          void fragmentMain(FragmentInput fsInput, inout czm_modelMaterial material) {
              float _baseHeight = 0.0; // 物体的基础高度,需要修改成一个合适的建筑基础高度
              float _heightRange = 60.0; // 高亮的范围(_baseHeight ~ _baseHeight + _heightRange) 默认是 0-60米
              float _glowRange = 300.0; // 光环的移动范围(高度)
              float vtxf_height = fsInput.attributes.positionMC.z-_baseHeight;
              float vtxf_a11 = fract(czm_frameNumber / 120.0) * 3.14159265 * 2.0;
              float vtxf_a12 = vtxf_height / _heightRange + sin(vtxf_a11) * 0.1;
              material.diffuse*= vec3(vtxf_a12, vtxf_a12, vtxf_a12);
              float vtxf_a13 = fract(czm_frameNumber / 360.0);
              float vtxf_h = clamp(vtxf_height / _glowRange, 0.0, 1.0);
              vtxf_a13 = abs(vtxf_a13 - 0.5) * 2.0;
              float vtxf_diff = step(0.005, abs(vtxf_h - vtxf_a13));
              material.diffuse += material.diffuse * (1.0 - vtxf_diff);
          }
      `,
    });

    // Applying to all tiles in a tileset.
    const tilesets = viewer.scene.primitives.add(new Cesium.Cesium3DTileset({
      url: "//data.mars3d.cn/3dtiles/jzw-hefei/tileset.json",
      customShader: customShader
    }));

    tilesets.readyPromise.then(function (tileset) {
      viewer.flyTo(tileset);
    });

  </script>
</body>
fragmentShaderText代码复制自:Cesium1.87+ 实现建筑泛光效果 - 简书 (jianshu.com)
效果如下:
3. 参考资料
[1] Custom Shaders 3D Tiles - Cesium Sandcastle
[2] cesium/Documentation/CustomShaderGuide at main · CesiumGS/cesium · GitHub
[3] CustomShader - Cesium Documentation
[4] 功能示例(Vue版) | Mars3D三维可视化平台 | 火星科技
[5] Cesium1.87+ 实现建筑泛光效果 - 简书 (jianshu.com)
[6] Cesium3Dtilesets 使用customShader的解读以及泛光效果示例_cesium customshader_liuqing0.0的博客-CSDN博客