一、框架介绍
回想起那个去年的7月份,第一份实习,组长让我写一份金蝶云的SQL文档,当时一看2000多张表,当时就猛吸一根烟,然后去gitee看看有没有好的框架快速生成 SQL 文档 ,由此找到了 screw (中文:螺丝钉)
screw gitee 链接 : screw: 简洁好用的数据库表结构文档工具,支持MySQL/MariaDB/SqlServer/Oracle/PostgreSQL/TIDB/CacheDB 数据库。 (gitee.com)
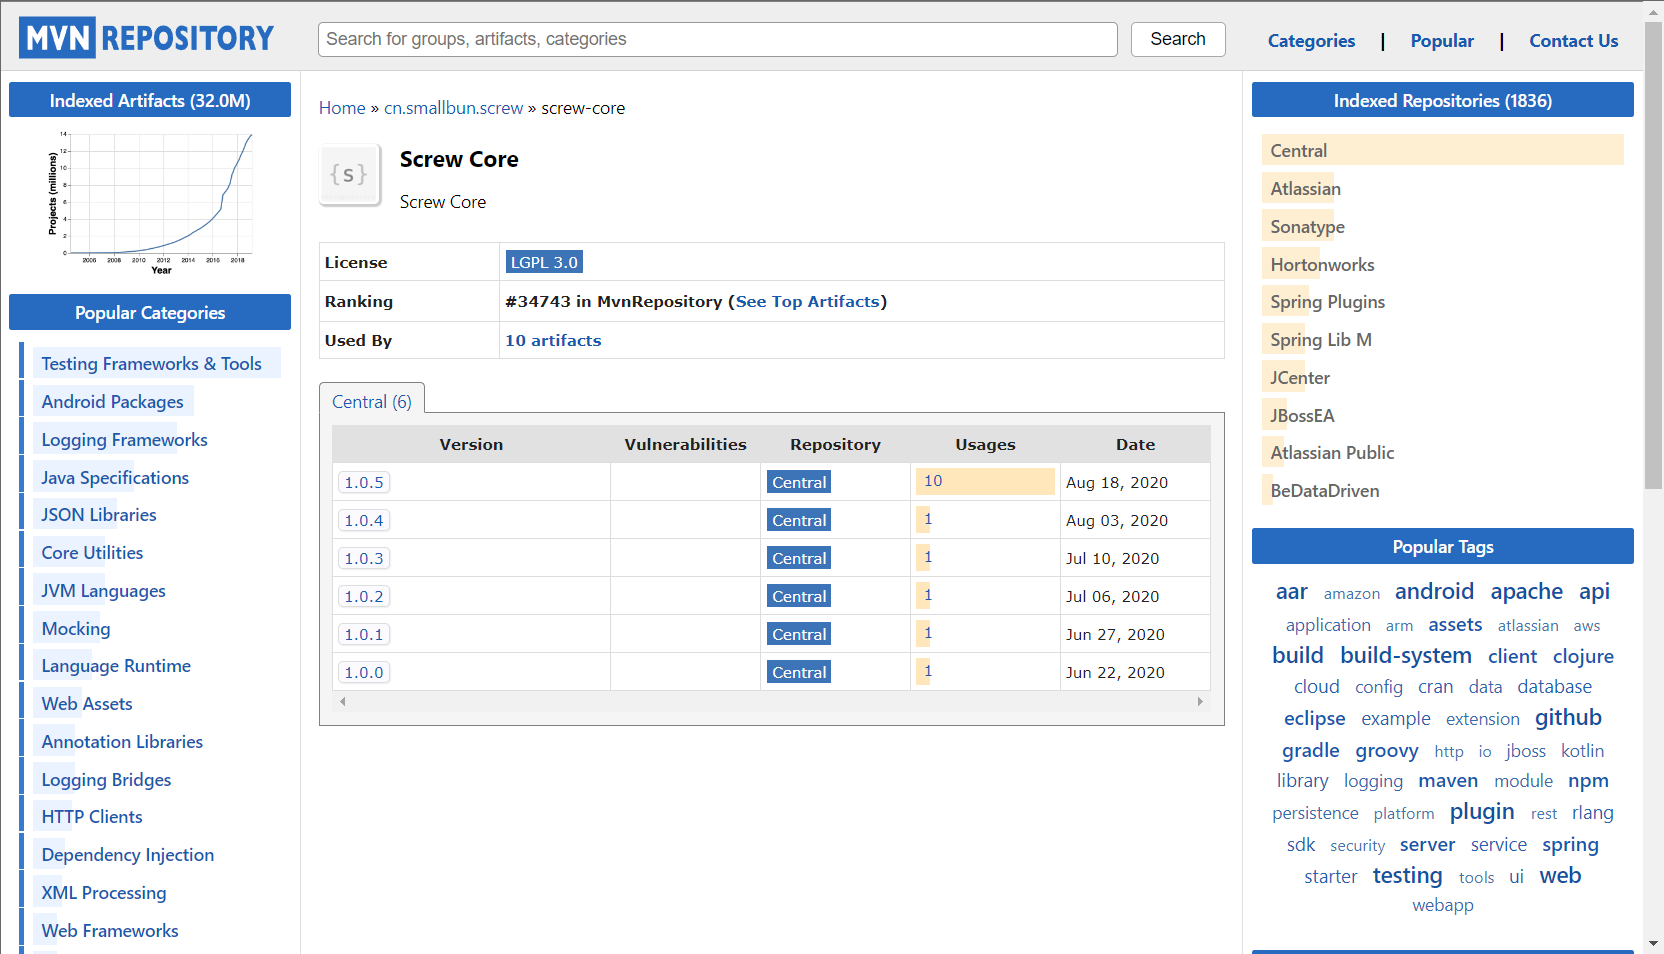
现在已经有了6个版本
Maven Repository: cn.smallbun.screw » screw-core (mvnrepository.com)
并且此框架还支持 那些表的过滤生成文档 比如 那些前缀 后缀的表名以及单独指定哪些表不需要生成文档
同理,也可以支持哪些前后缀的表名需要生成文档
框架的README文档写的 已经很详细了,但是有些人可能还不知道如何应用起来,因此写起这篇文章
二、SpringBoot引入 screw 实践
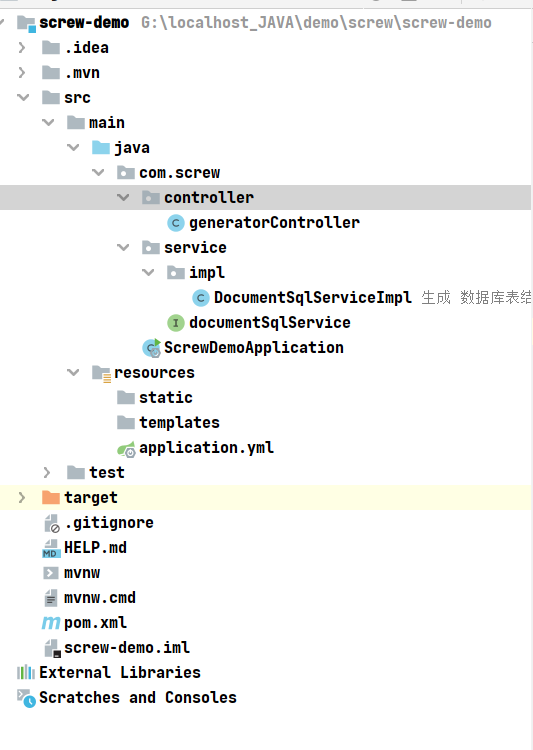
目录结构
依赖与配置
创建springboot工程完后,引入依赖
SpringBoot 版本不受限制 2.x 或 3.x 都可
依赖
<?xml version="1.0" encoding="UTF-8"?>
<project xmlns="http://maven.apache.org/POM/4.0.0" xmlns:xsi="http://www.w3.org/2001/XMLSchema-instance"
         xsi:schemaLocation="http://maven.apache.org/POM/4.0.0 https://maven.apache.org/xsd/maven-4.0.0.xsd">
    <modelVersion>4.0.0</modelVersion>
    <parent>
        <groupId>org.springframework.boot</groupId>
        <artifactId>spring-boot-starter-parent</artifactId>
        <version>2.7.8</version>
        <relativePath/> <!-- lookup parent from repository -->
    </parent>
    <groupId>com.screw</groupId>
    <artifactId>screw-demo</artifactId>
    <version>0.0.1-SNAPSHOT</version>
    <name>screw-demo</name>
    <description>Demo project for Spring Boot</description>
    <properties>
        <java.version>1.8</java.version>
    </properties>
    <dependencies>
        <dependency>
            <groupId>org.springframework.boot</groupId>
            <artifactId>spring-boot-starter-web</artifactId>
        </dependency>

        <dependency>
            <groupId>org.springframework.boot</groupId>
            <artifactId>spring-boot-devtools</artifactId>
            <scope>runtime</scope>
            <optional>true</optional>
        </dependency>
        <dependency>
            <groupId>com.mysql</groupId>
            <artifactId>mysql-connector-j</artifactId>
            <scope>runtime</scope>
        </dependency>
        <dependency>
            <groupId>org.projectlombok</groupId>
            <artifactId>lombok</artifactId>
            <optional>true</optional>
        </dependency>
        <dependency>
            <groupId>org.springframework.boot</groupId>
            <artifactId>spring-boot-starter-test</artifactId>
            <scope>test</scope>
        </dependency>
        <dependency>
            <groupId>org.freemarker</groupId>
            <artifactId>freemarker</artifactId>
            <version>2.3.30</version>
        </dependency>
        <!-- Hikari数据库连接池 也可采用阿里巴巴的Druid、C3p0等数据库连接池 -->
        <dependency>
            <groupId>com.zaxxer</groupId>
            <artifactId>HikariCP</artifactId>
            <version>3.4.5</version>
        </dependency>
        <!--****** 引入数据库表结构文档生成器Screw依赖 ******-->
        <dependency>
            <groupId>cn.smallbun.screw</groupId>
            <artifactId>screw-core</artifactId>
            <version>1.0.5</version>
        </dependency>
    </dependencies>

    <build>
        <plugins>
            <plugin>
                <groupId>org.springframework.boot</groupId>
                <artifactId>spring-boot-maven-plugin</artifactId>
                <configuration>
                    <excludes>
                        <exclude>
                            <groupId>org.projectlombok</groupId>
                            <artifactId>lombok</artifactId>
                        </exclude>
                    </excludes>
                </configuration>
            </plugin>
        </plugins>
    </build>

</project>
配置
按照自己需要来进行配置
# 服务端口
server:
  port: 8083

# 数据源配置
spring:
  datasource:
    name: blog
    url: jdbc:mysql://localhost:3306/blog?&allowMultiQueries=true&useUnicode=true&characterEncoding=UTF-8&serverTimezone=Asia/Shanghai&useSSl=false
    username: root
    password: 123456
    driver-class-name: com.mysql.cj.jdbc.Driver
    xa:
      properties:
        #设置useInformationSchema 可以获取tables表注释信息 即解决数据库表和列字段有说明、生成文档没有说明
        useInformationSchema: true

# 生成数据库文档文件路径
FILE_OUTPUT_DIR: F:\dbDoc\
# 版本
DOC_VERSION: 1.0.0
# screw配置的文件名称,即数据库文档名称
DOC_FILE_NAME: 腿毛测试数据库设计文档
# 描述
DOC_DESCRIPTION: 数据库设计文档生成
注意: 作者使用的 mysql 版本是 8.x 版本 ,若是使用 5.x 版本,则需要修改
Controller
package com.screw.controller;

import com.screw.service.documentSqlService;
import org.springframework.beans.factory.annotation.Autowired;
import org.springframework.web.bind.annotation.RequestMapping;
import org.springframework.web.bind.annotation.RestController;

/**
 * @Description 生成数据库文档
 * @Author YeHaoNan~
 * @Date 2023-02-15 21:42
 * @Version 1.0.0
 **/
@RestController
@RequestMapping("/generator")
public class generatorController {

    private final documentSqlService documentSqlService;

    @Autowired
    public generatorController(com.screw.service.documentSqlService documentSqlService) {
        this.documentSqlService = documentSqlService;
    }

    /**
     * 生成数据库表结构文档
     */
    @RequestMapping("/generatorDocument")
    public void generatorDocument(){
        documentSqlService.generatorDocument();
    }
}
Service 及 ServiceImpl
package com.screw.service;

/**
 * @Description 数据库生成文档
 * @Author YeHaoNan~
 * @Date 2023-02-15 21:33
 * @Version 1.0.0
 **/

public interface documentSqlService {

    /**
     * 生成  数据库表结构文档
     * @author YeHaoNan~
     * @date 2023-02-15 20:34
     */
    void generatorDocument();
}
package com.screw.service.impl;

import cn.smallbun.screw.core.Configuration;
import cn.smallbun.screw.core.engine.EngineConfig;
import cn.smallbun.screw.core.engine.EngineFileType;
import cn.smallbun.screw.core.engine.EngineTemplateType;
import cn.smallbun.screw.core.execute.DocumentationExecute;
import cn.smallbun.screw.core.process.ProcessConfig;
import com.screw.service.documentSqlService;
import com.zaxxer.hikari.HikariConfig;
import com.zaxxer.hikari.HikariDataSource;
import org.springframework.beans.factory.annotation.Autowired;
import org.springframework.beans.factory.annotation.Value;
import org.springframework.context.ApplicationContext;
import org.springframework.stereotype.Service;
import javax.sql.DataSource;
import java.util.ArrayList;
/**
 * @Description
 * @Author YeHaoNan~
 * @Date 2023-02-15 21:35
 * @Version 1.0.0
 **/
@Service
public class DocumentSqlServiceImpl implements documentSqlService {

    @Autowired
    private ApplicationContext applicationContext;//注入应用上下文

    /**
     * MySQL驱动
     */
    @Value("${spring.datasource.driver-class-name}")
    private String Driver_Class_Name;
    /**
     * 数据库URL   characterEncoding=UTF-8: 防止生成后文档乱码
     */
    @Value("${spring.datasource.url}")
    private String DB_URL;
    /**
     * MySQL数据库账号密码
     */
    @Value("${spring.datasource.username}")
    private String DB_USERNAME = "root";
    @Value("${spring.datasource.password}")
    private String DB_PASSWORD = "123456";

    /**
     *  生成数据库文档文件路径 可根据本机电脑自行配置
     */
    @Value("${FILE_OUTPUT_DIR}")
    private String FILE_OUTPUT_DIR;

    /**
     * 版本
     */
    @Value("${DOC_VERSION}")
    private String DOC_VERSION;

    /**
     * screw配置的文件类型 HTML->HTML文件  WORD->WORD文件  MD->Markdown文件
     */
//    private static final EngineFileType FILE_OUTPUT_TYPE = EngineFileType.WORD;
    private static final EngineFileType FILE_OUTPUT_TYPE = EngineFileType.HTML;
//    private static final EngineFileType FILE_OUTPUT_TYPE = EngineFileType.MD;
    /**
     * screw配置的文件名称,即数据库文档名称
     */
    @Value("${DOC_FILE_NAME}")
    private String DOC_FILE_NAME;
    /**
     * 描述
     */
    @Value("${DOC_DESCRIPTION}")
    private String DOC_DESCRIPTION;

    /**
     * 生成 数据库表结构文档
     */
    @Override
    public void generatorDocument() {
        //获取数据源 此方法报No qualifying bean of type 'javax.sql.DataSource' available
//        DataSource dataSource = applicationContext.getBean(DataSource.class);

        //获取数据源  创建HikariConfig配置类
        HikariConfig hikariConfig = new HikariConfig();
        hikariConfig.setDriverClassName(Driver_Class_Name);
        hikariConfig.setJdbcUrl(DB_URL);
        hikariConfig.setUsername(DB_USERNAME);
        hikariConfig.setPassword(DB_PASSWORD);
        //#设置useInformationSchema 可以获取tables表注释信息 即解决数据库表和列字段有说明、生成文档没有说明
        hikariConfig.addDataSourceProperty("useInformationSchema", "true");
        hikariConfig.setMinimumIdle(2);
        hikariConfig.setMaximumPoolSize(5);
        DataSource dataSource = new HikariDataSource(hikariConfig);

        //创建screw的引擎配置
        EngineConfig engineConfig = EngineConfig.builder()
                //生成文件路径
                .fileOutputDir(FILE_OUTPUT_DIR)
                //打开目录
                .openOutputDir(true)
                //文件类型  HTML->HTML文件  WORD->WORD文件  MD->Markdown文件
                .fileType(FILE_OUTPUT_TYPE)
                //生成模板实现
                .produceType(EngineTemplateType.freemarker)
                //自定义文件名称,即数据库文档名称
                .fileName(DOC_FILE_NAME).build();

        //创建screw的配置:生成文档配置(包含以下自定义版本号、描述等配置连接)
        Configuration config = Configuration.builder()
                //版本
                .version(DOC_VERSION)
                //描述
                .description(DOC_DESCRIPTION)
                //数据源
                .dataSource(dataSource)
                //生成配置
                .engineConfig(engineConfig)
                //生成配置
                .produceConfig(getProcessConfig())
                .build();
        //执行screw,生成数据库文档
        new DocumentationExecute(config).execute();
    }

    /**
     * 配置想要生成的表、想要忽略的表
     * @return
     */
    private ProcessConfig getProcessConfig() {
        //创建screw的处理配置,可忽略
        //忽略表
        ArrayList<String> ignoreTableName = new ArrayList<>();
        ignoreTableName.add("files");
        ignoreTableName.add("week_view");
        //忽略表前缀,如忽略test_开头的数据库表
        ArrayList<String> ignorePrefix = new ArrayList<>();
        ignorePrefix.add("test_");
        //忽略表后缀
        ArrayList<String> ignoreSuffix = new ArrayList<>();
        ignoreSuffix.add("_test");

        // 需要生成数据库文档的表  如果designatedTablePrefix设置值不为空,则 designatedTableName 中的表名要去掉前缀,不然会重复生成,并且表名和字段注释有误
        ArrayList<String> designatedTableName = new ArrayList<>();
//        designatedTableName.add("user");
//        designatedTableName.add("product");
        // 需要生成数据库文档的表前缀
//        ArrayList<String> designatedTablePrefix = new ArrayList<>();
//        designatedTablePrefix.add("t_");

        //指定生成逻辑、当存在指定表、指定表前缀、指定表后缀时,将生成指定表,其余表不生成、并跳过忽略表配置
        ProcessConfig processConfig = ProcessConfig.builder()
                //根据名称指定表生成
//                .designatedTableName(new ArrayList<>())
                .designatedTableName(designatedTableName)
                //根据表前缀生成
//                .designatedTablePrefix(new ArrayList<>())
//                .designatedTablePrefix(designatedTablePrefix)
                //根据表后缀生成
                .designatedTableSuffix(new ArrayList<>())
                //忽略表名
                .ignoreTableName(ignoreTableName)
                //忽略表前缀
                .ignoreTablePrefix(ignorePrefix)
                //忽略表后缀
                .ignoreTableSuffix(ignoreSuffix).build();
        return processConfig;
    }


}
以上代码,值得注意的点就是,看你需要生成什么格式的文档了,目前我知道的支持生成 HTML、MD、WORD格式
private static final EngineFileType FILE_OUTPUT_TYPE = EngineFileType.HTML;
个人更建议生成 HTML或MD 格式 ,因为WORD格式的文章生成起来阅读性差,且不美观
全部写完之后,进行测试
打开浏览器,请求 localhost:8083/generator/generatorDocument 即可
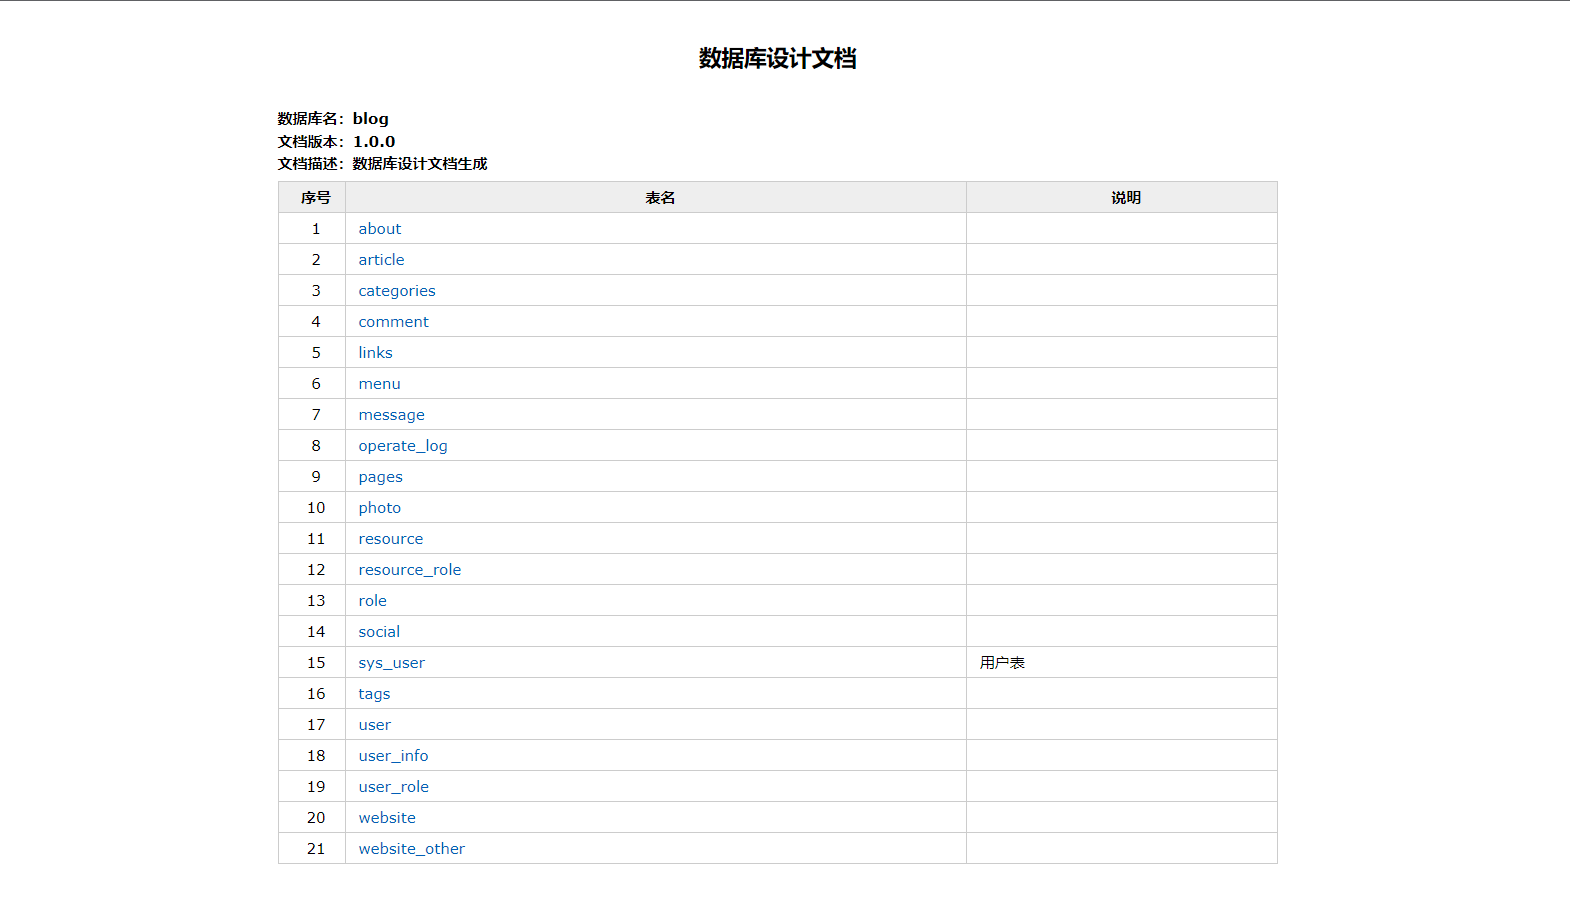
HTML例子:
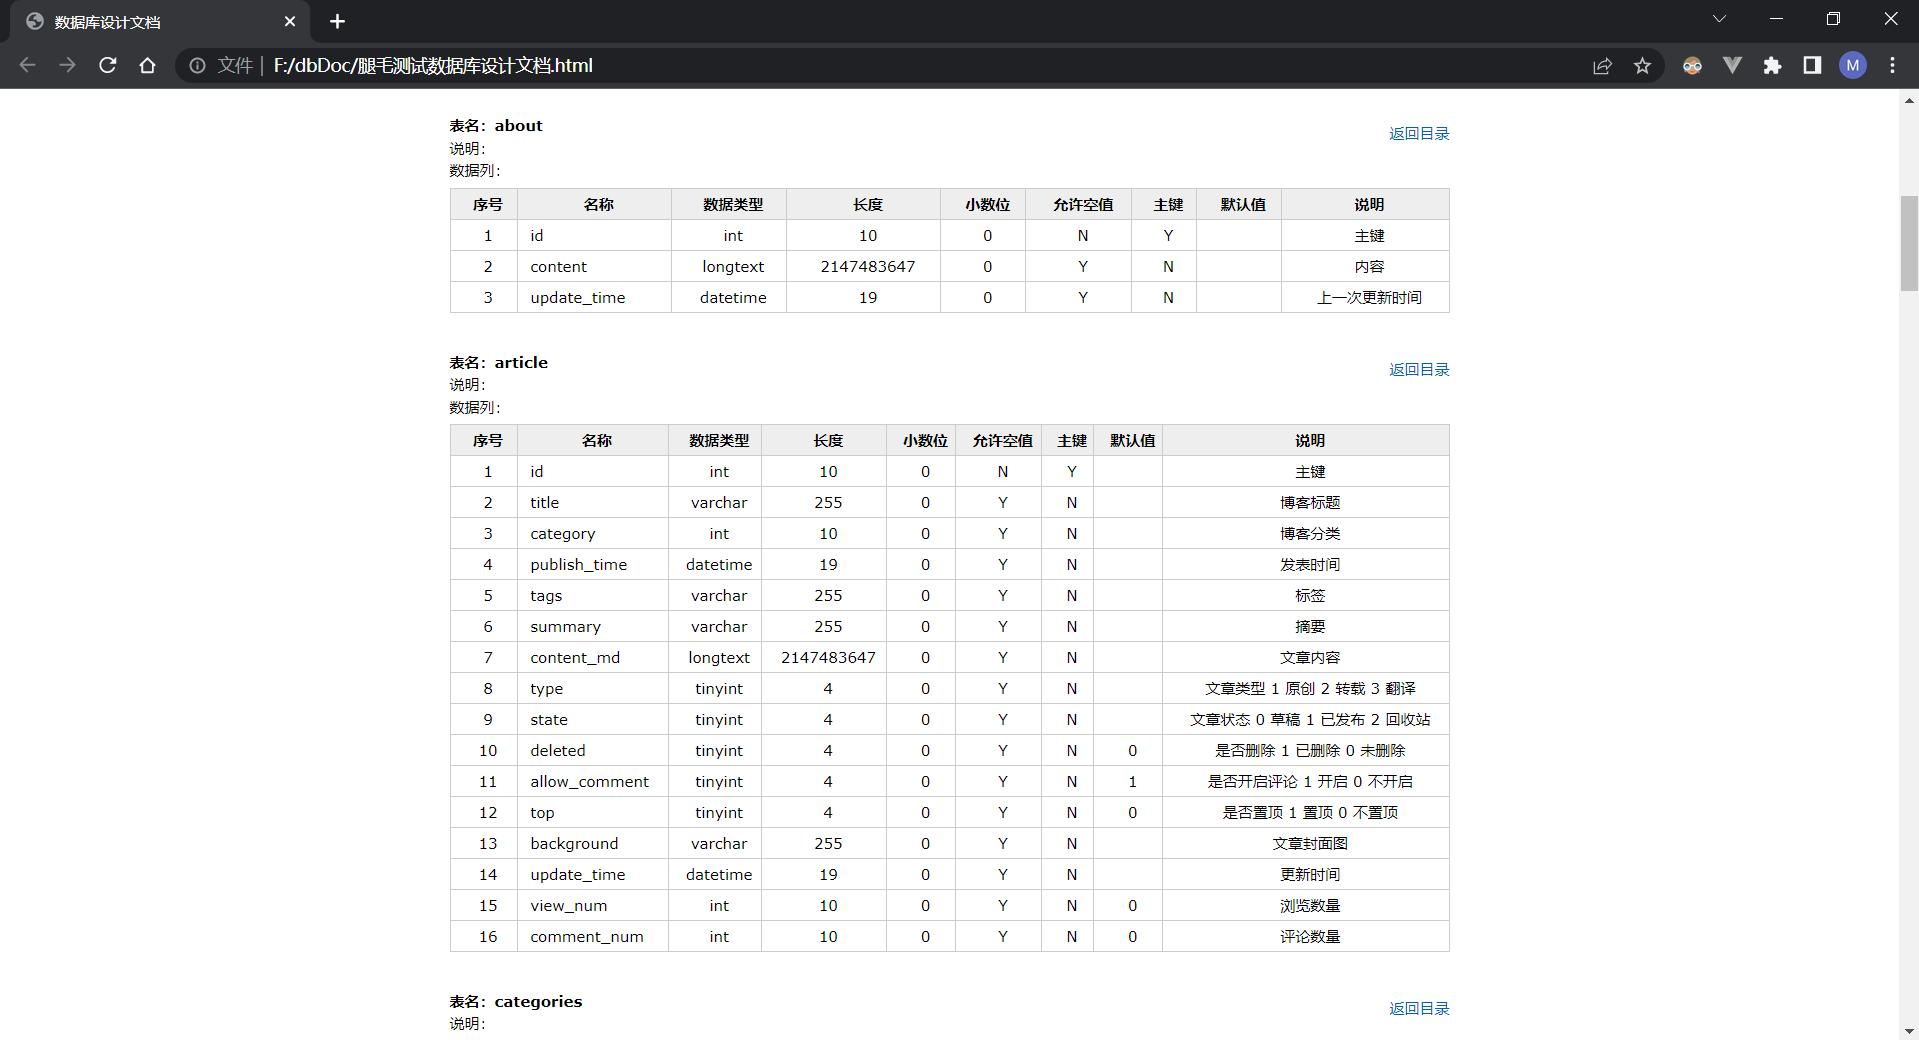
以上就是生成的文档
这是生成文档的目录结构
可能有人,就不知道,为啥 说明那一栏,只有一个有说明,而其他的都没有?
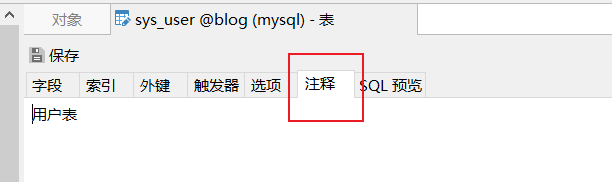
那是因为 只有这个表名 写了注释,其他的表名我都没有写
表的过滤是否有效?
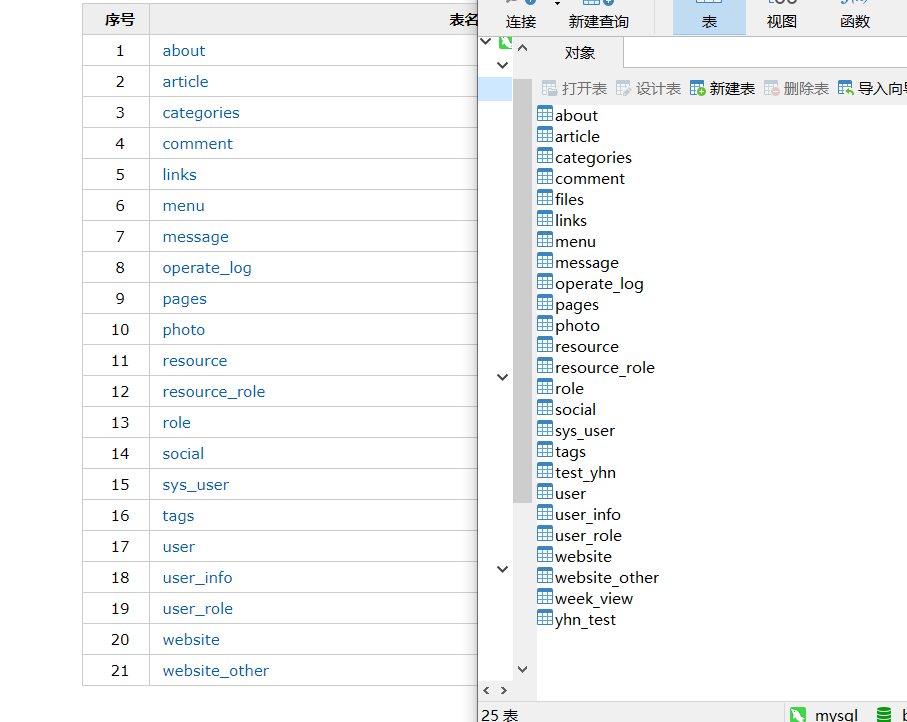
请看我前面展示的代码,里面有详细说明了,哪些格式的表需要过滤了,实践证明这是有效的