BBS登录功能
目录
一、登录功能编写步骤概览
- 渲染登录页面
- 添加图片验证
- 前端获取数据
- 后端校验数据
二、登录功能编写步骤详细
1.开设登录接口
    # 登录功能
    path('login/', views.login_func, name='register_view'),
2.写登录视图函数先返回页面
def login_func(request):

    return render(request, 'loginPage.html')
3.创建登录前端页面 先渲染用户名密码和登录按钮
<!DOCTYPE html>
<html lang="en">
<head>
    <meta charset="UTF-8">
    <title>Title</title>
    <script src="https://cdn.bootcdn.net/ajax/libs/jquery/3.6.1/jquery.js"></script>
    {% load static %}
    <link rel="stylesheet" href="{% static 'bootstrap-3.4.1-dist/css/bootstrap.min.css' %}">
    <script src="{% static 'bootstrap-3.4.1-dist/js/bootstrap.min.js' %}"></script>
</head>
<body>
<div class="container">
    <div class="col-md-8 col-md-offset-2">
        <h2 class="text-center">用户登录</h2>
        <div class="form-group">
            <label for="name">用户名</label>
            <input type="text" id="name" class="form-control" name="username">
        </div>
        <div class="form-group">
            <label for="password">密码</label>
            <input type="password" id="password" class="form-control" name="password">
        </div>
        <input type="button" class="btn btn-success btn-block" value="登录" id="loginBtn">
    </div>
</div>
</body>
</html>
4.开设验证码路由
    # 图片验证码相关功能
    path('get_code/', views.get_code_func),
5.写验证码的视图函数
# 1.先导入图片验证码相关的模块
from PIL import Image, ImageFont, ImageDraw
from io import BytesIO, StringIO
import random

# 2.写一个产生随机验证码的函数
def get_random():
    return random.randint(0, 255), random.randint(0, 255), random.randint(0, 255)

# 3.在写获取验证码的代码
def get_code_func(request):
    # 先产生图片对象
    img_obj = Image.new('RGB', (350, 35), get_random())
    # 将图片对象交给画笔对象
    draw_obj = ImageDraw.Draw(img_obj)
    # 确定字体样式(ttf文件)
    font_obj = ImageFont.truetype('static/font/111.ttf', 35)
    # 产生随机验证码
    code = ''
    for i in range(5):
        random_upper = chr(random.randint(65, 90))
        random_lower = chr(random.randint(97, 122))
        random_int = str(random.randint(1, 9))
        # 三选一
        temp_choice = random.choice([random_upper, random_lower, random_int])
        # 写到图片上
        draw_obj.text((i * 60 + 45, 0), temp_choice, font=font_obj)
        code += temp_choice
    # 后端保存验证码 便于后续的比对
    request.session['code'] = code
    io_obj = BytesIO()
    img_obj.save(io_obj, 'png')
    return HttpResponse(io_obj.getvalue())
6.在前端编写获取验证码的代码
            <div class="form-group">
                <label for="code">验证码</label>
                <div class="row">
                    <div class="col-md-6">
                        <input type="text" id="code" class="form-control" name="code">
                    </div>
                    <div class="col-md-6">
                        <img src="/get_code/" alt="" width="350" height="35" id="d1">
                    </div>
                </div>
            </div>
7.在前端写script标签 写验证码动态刷新的代码
        // 1.验证码动态刷新
        $('#d1').click(function () {
            let oldSrc = $(this).attr('src');
            $(this).attr('src', oldSrc + '?')
        })
8.写Ajax请求
        // 2.登录按钮发送ajax请求
        $('#loginBtn').click(function () {
            console.log('dddd')
            // 可以再次使用form标签序列化功能 也可以自己挨个获取
            $.ajax({
                url:'',
                type:'post',
                data:{'username':$('#name').val(), 'password':$('#password').val(), 'code':$('#code').val(), 'csrfmiddlewaretoken':'{{ csrf_token }}'},
                success:function (args) {
                    if(args.code === 10000){
                        window.location.href = args.url
                    }else{
                        alert(args.msg)
                    }
                }
            })
        })
9.后端写登录信息比对逻辑代码
    back_dict = {'code': 10000, 'msg': ''}
    if request.method == 'POST':
        username = request.POST.get('username')
        password = request.POST.get('password')
        code = request.POST.get('code')
        if code.upper() == request.session.get('code').upper():
            user_obj = auth.authenticate(request, username=username, password=password)
            if user_obj:
                # 保存用户登录状态
                auth.login(request, user_obj)  # 执行之后就可以使用request.user获取登录用户对象
                back_dict['msg'] = '登录成功'
                back_dict['url'] = '/home/'
            else:
                back_dict['code'] = 10001
                back_dict['msg'] = '用户名或密码'
        else:
            back_dict['code'] = 10002
            back_dict['msg'] = '验证码错误'
        return JsonResponse(back_dict)
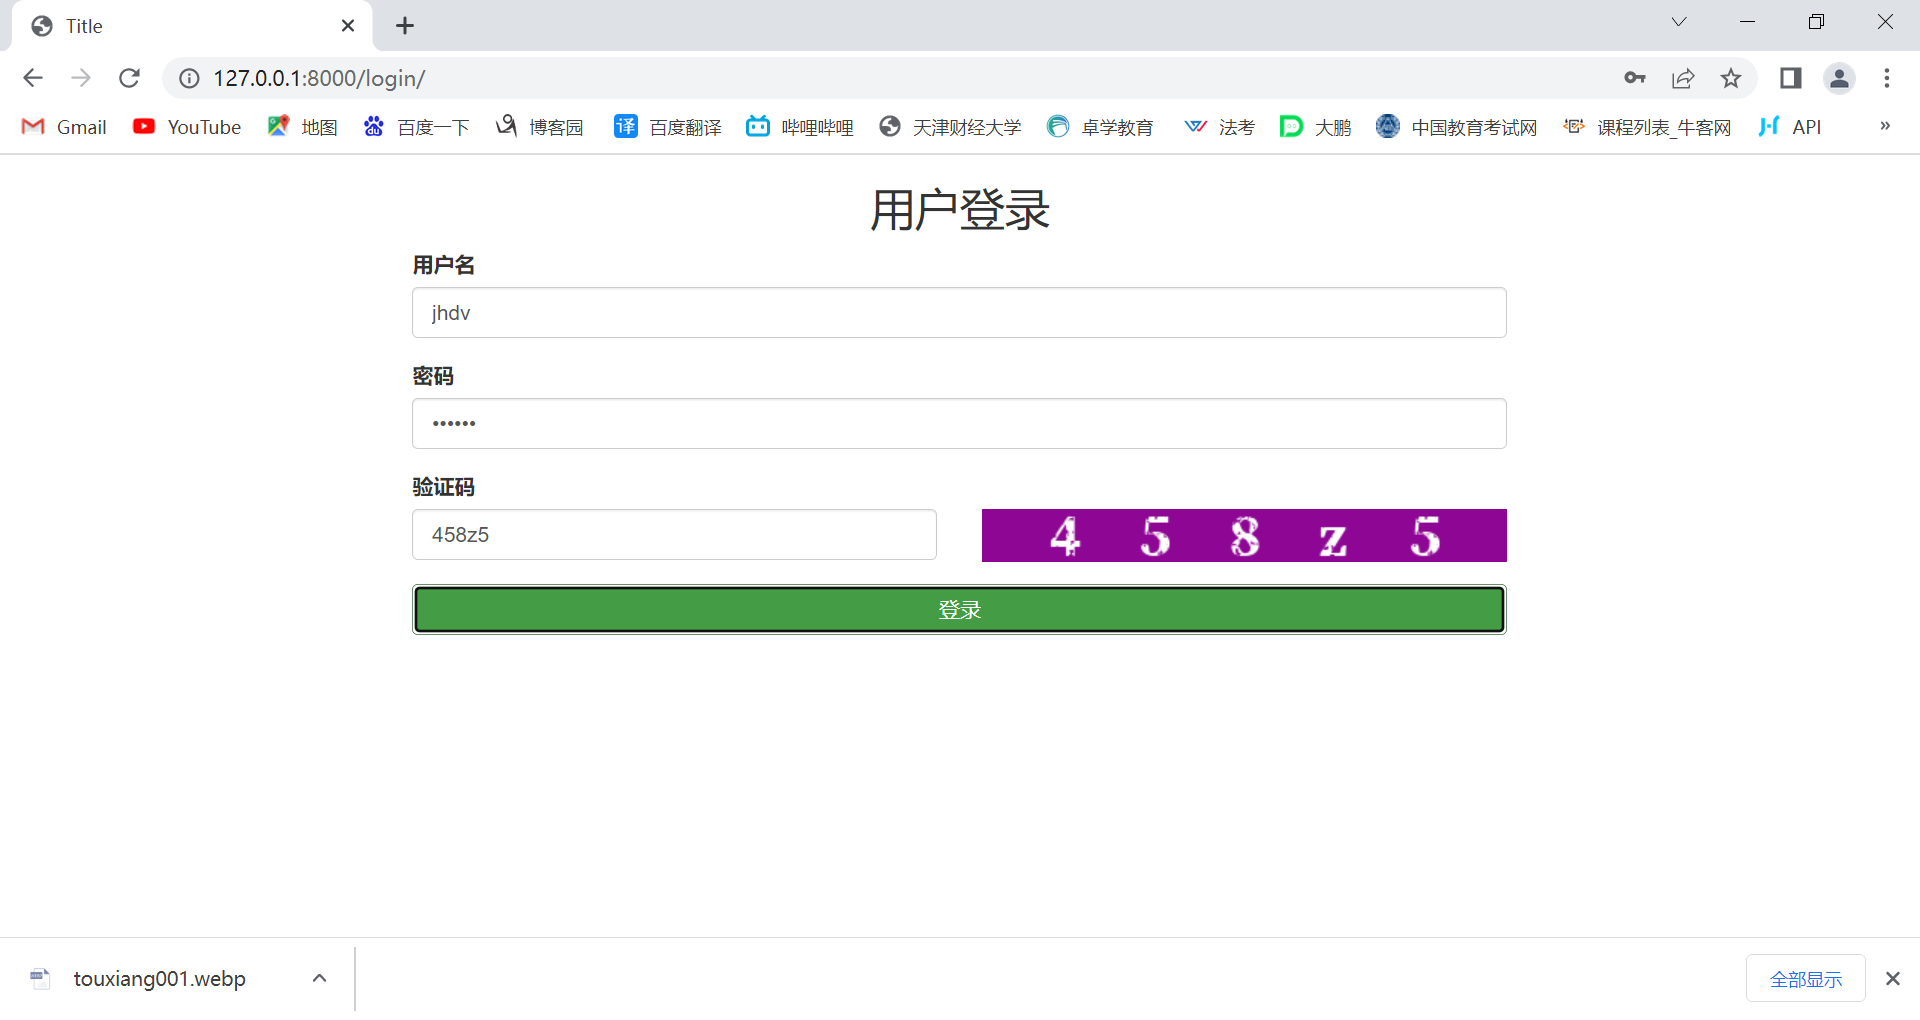
10.登录功能前端展示效果图如下