安装Linux系统
VMware安装
首先安装VMware
VMware下载地址
在镜像网站下载镜像,直接进行安装
虚拟机安装
镜像下载地址
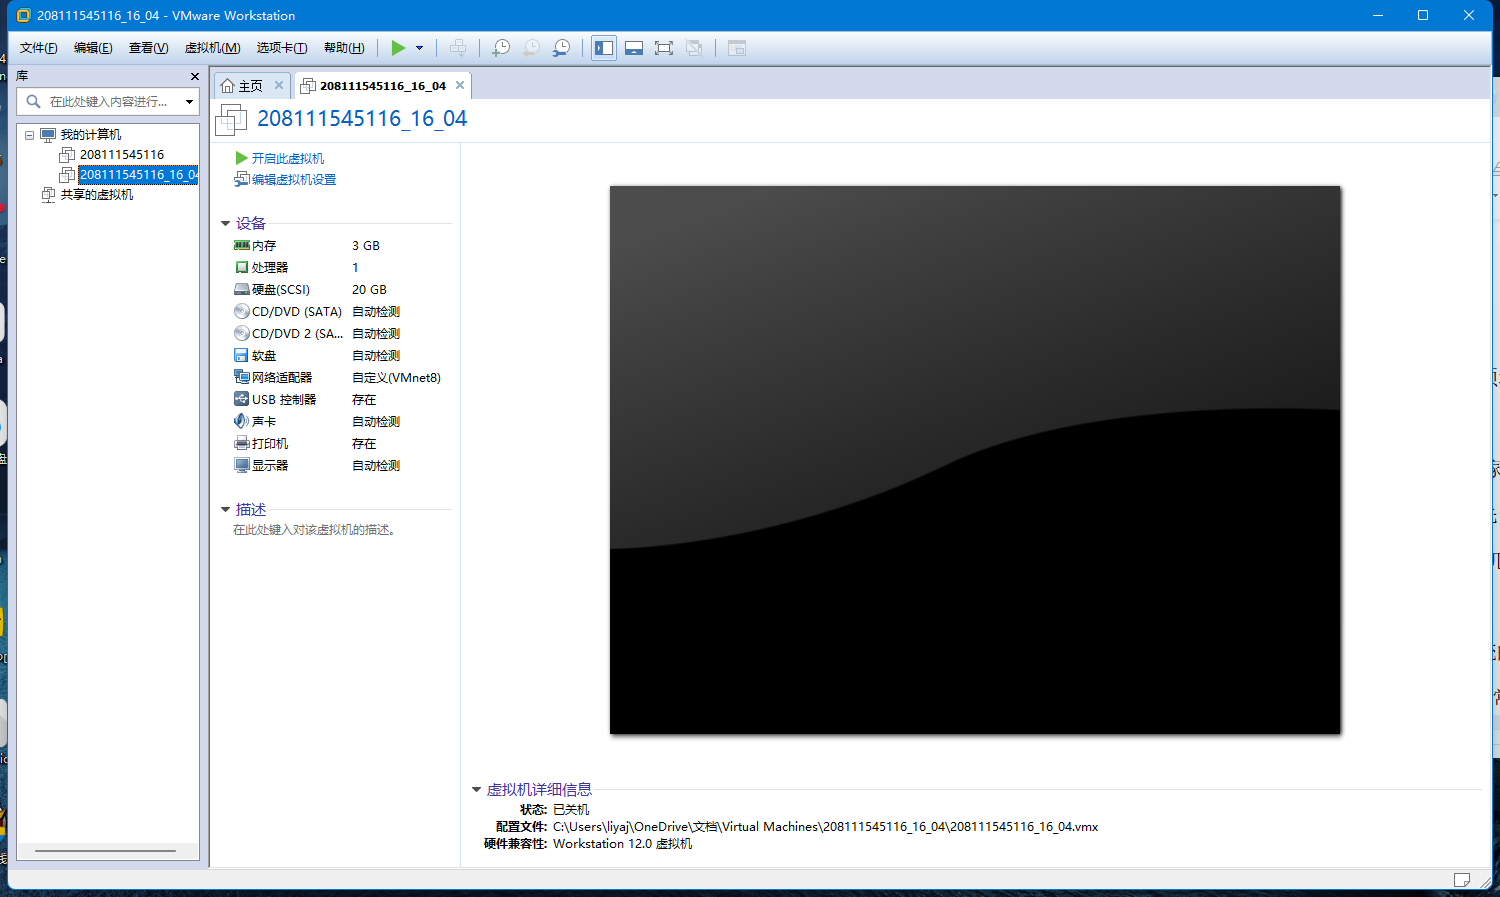
这里使用\(16.04\)版本
-
点击创建新的虚拟机
-
根据向导选择镜像并安装

-
安装完成之后开启虚拟机
等待虚拟机启动
Linux介绍
- \(LINUX\)的内核
内核是系统的核心,是运行程序和管理像磁盘和打印机等硬件设备的核心程序。 - \(LINUX \ SHELL\)
Shell是系统的用户界面,它是一个命令解释器,它解释用户输入的命令,并且把它们送到内核。提供了用户与内核进行交互操作的一种接口。 - \(LINUX\) 文件系统
Linux文件系统是文件存放在磁盘等存储设备上的组织方法。Linux能支持多种目前许多的文件系统,如EXT2、EXT3、FAT、VFAT、ISO9660、NFS、SMB等。 - \(LINUX\)应用系统
标准的Linux系统都有一整套称为应用程序的程序集,包括文本编辑器、编程语言、X Window、办公套件、Internet工具、数据库等。
Linux常用命令
此处使用\(Tabby\)进行ssh连接操作

文件与目录管理
目录操作
-
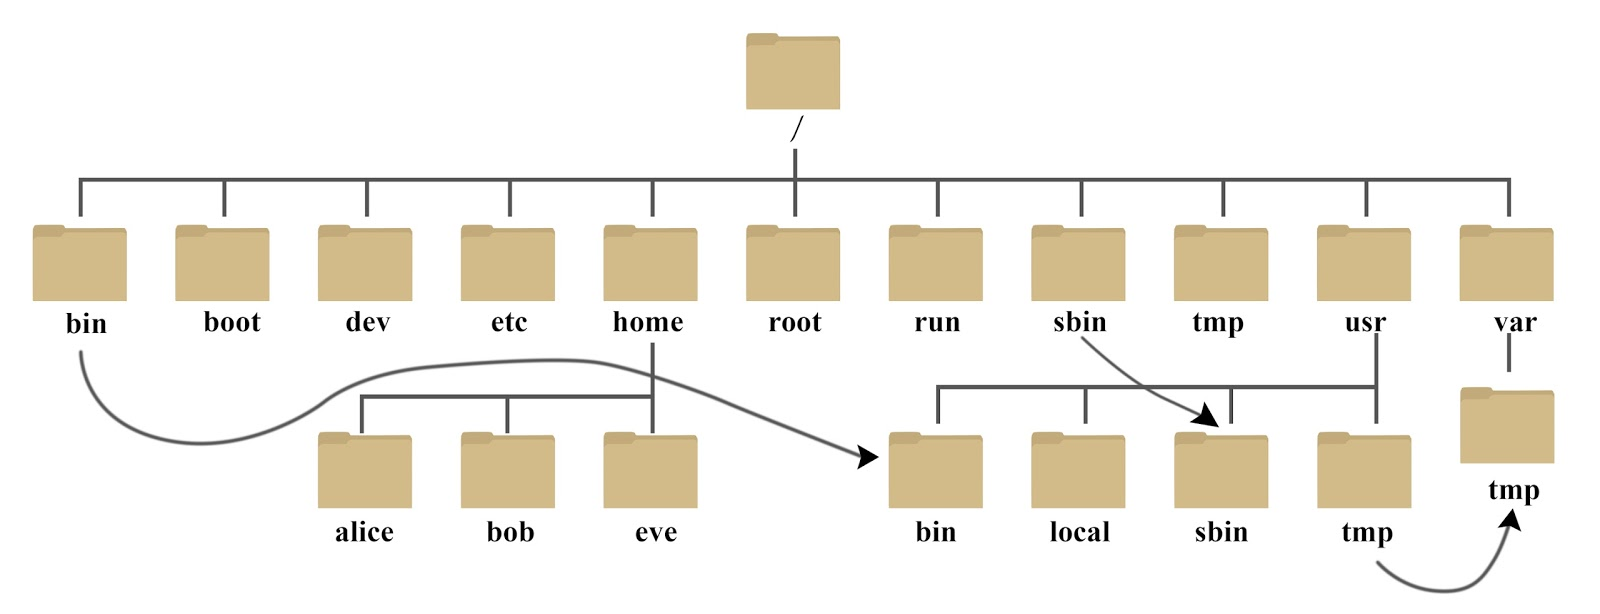
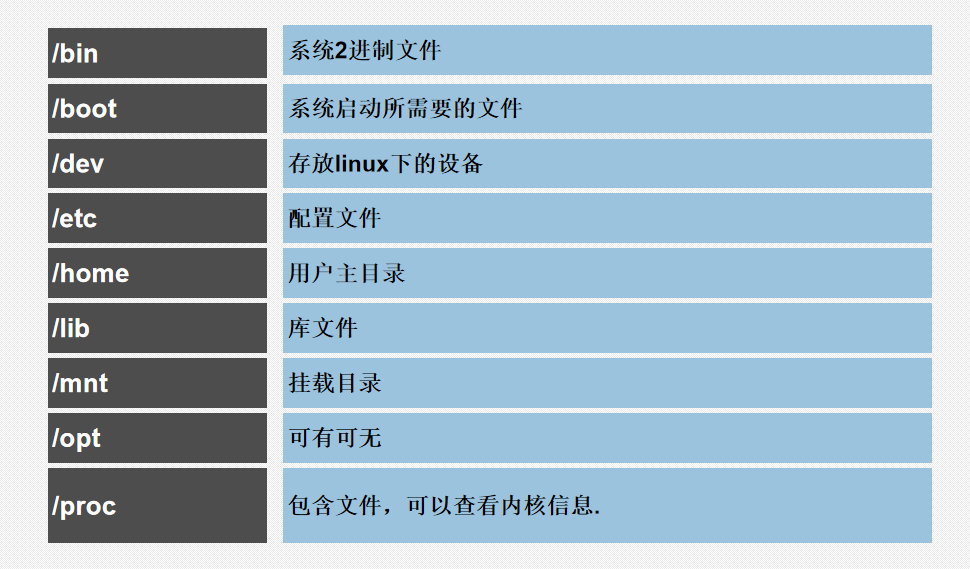
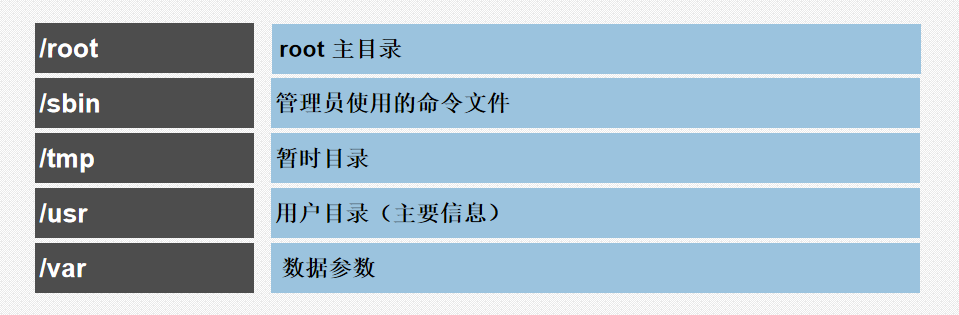
系统目录结构
-
目录创建
lyj208111545116@ubuntu:~$ mkdir work
lyj208111545116@ubuntu:~$ ls
Desktop  Documents  Downloads  examples.desktop  Music  Pictures  Public  Templates  Videos  work
- 目录删除
- 删除空目录
- 删除非空目录
lyj208111545116@ubuntu:~$ rmdir work
lyj208111545116@ubuntu:~$ ls
Desktop  Documents  Downloads  examples.desktop  Music  Pictures  Public  Templates  Videos
lyj208111545116@ubuntu:~$ rmdir work
rmdir: 删除 'work' 失败: 目录非空
lyj208111545116@ubuntu:~$ rm -r work
- 查看当前所在目录
lyj208111545116@ubuntu:~$ pwd

- 转换目录
lyj208111545116@ubuntu:~$ cd [dir]
# dir 相对路径或绝对路径

- 到用户的主目录
lyj208111545116@ubuntu:~/Desktop$ cd ~

- 回到先前的目录
lyj208111545116@ubuntu:~$ cd -
# /home/lyj208111545116/Desktop

- 回到上级目录
lyj208111545116@ubuntu:~/Desktop$ cd ..

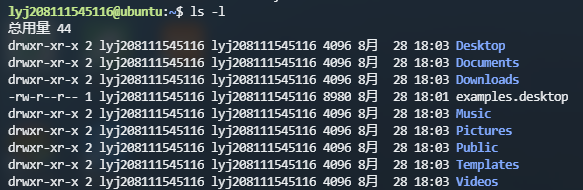
- 查看当前目录的内容
lyj208111545116@ubuntu:~$ ls
# Desktop  Documents  Downloads  examples.desktop  Music  Pictures  Public  Templates  Videos

可选参数
-
[-a] 显示隐藏文件和目录

-
[-l]显示文件的细节.
-
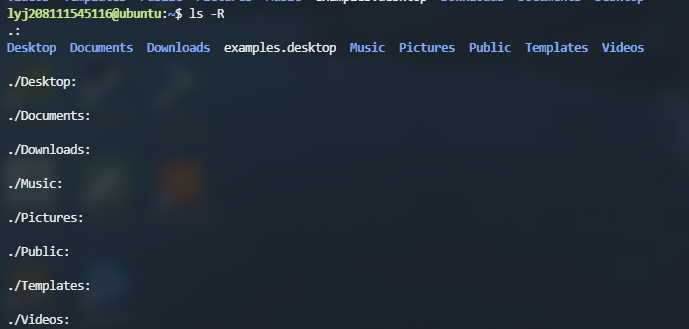
[-R]递归的显示子目录
-
复制文件
lyj208111545116@ubuntu:~/work$ ls
# test
lyj208111545116@ubuntu:~/work$ cd test
lyj208111545116@ubuntu:~/work/test$ ls
# t.txt
lyj208111545116@ubuntu:~/work/test$ cp t.txt ~/work
lyj208111545116@ubuntu:~/work/test$ cd ..
lyj208111545116@ubuntu:~/work$ ls
# test  t.txt
附加操作
- -r
递归的复制子目录 - -f
若目的地已经有相同档名的档案存在,则在复 制前先予以删除再行复制 . - -a
尽可能将档案状态、权限等资料都照原状予以复制
文件操作
- 文件创建
lyj208111545116@ubuntu:~/work$ touch t.txt
lyj208111545116@ubuntu:~/work$ ls
t.txt
- 文件删除
lyj208111545116@ubuntu:~/work$ rm t.txt
lyj208111545116@ubuntu:~/work$ ls
-
链接
- ln命令会保持每一处链接文件的同步性,也就是说,不论你改动了哪一处,其它的文件都会发生相同的变化 .
- ln的链接又分为软链接和硬链接两种
- 硬连接是存在同一个文件系统中,而软连接却可以跨越不同的文件系统 。不能建立指向目录的硬链接
-
软链接
lyj208111545116@ubuntu:~/work$ ln -s ~/work/test/t.txt t.txt
lyj208111545116@ubuntu:~/work$ ls -l t.txt
lrwxrwxrwx 1 lyj208111545116 lyj208111545116 37 8月  29 15:27 t.txt -> /home/lyj208111545116/work/test/t.txt
- 硬链接
lyj208111545116@ubuntu:~/work/test$ ln ~/work/t.txt t.txt
lyj208111545116@ubuntu:~/work/test$ ls -l t.txt
-rw-rw-r-- 2 lyj208111545116 lyj208111545116 0 8月  29 15:31 t.txt
- 移动文件
lyj208111545116@ubuntu:~/work$ ls
test
lyj208111545116@ubuntu:~/work$ cd test
lyj208111545116@ubuntu:~/work/test$ ls
t.txt
lyj208111545116@ubuntu:~/work/test$ mv t.txt ~/work
lyj208111545116@ubuntu:~/work/test$ ls
lyj208111545116@ubuntu:~/work/test$ cd ..
lyj208111545116@ubuntu:~/work$ ls
test  t.txt
- 文件查看
-
cat [filename]
显示文件内容

-
less [filename]
-
分页显示文件,显示一页,不能拖动滚动条
3. more [filename]
分页显示文件
4. head [options] [filename]
显示文件的前n行

5. tail [options] [filename]
显示文件的后n行
-
查找文件
- 查找指定的文件

- 在文件中查找字符串
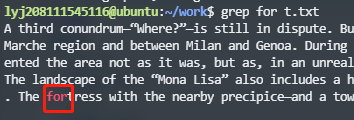
- 查找指定的文件
-
查看文件属性
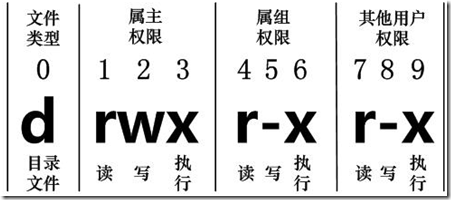
| 文件权限 | 文件所属的用户 | 文件所属的组 | 数据最后修改时间 | 文件 |
|---|---|---|---|---|
| Permissions | Owner | Group | Date | file |
lyj208111545116@ubuntu:~/work$ ls -l
总用量 20
drwxrwxr-x 2 lyj208111545116 lyj208111545116  4096 8月  29 16:55 test
-rw-rw-r-- 1 lyj208111545116 lyj208111545116 10240 8月  29 16:25 test.tar.gz
-rw-rw-r-- 1 lyj208111545116 lyj208111545116    74 8月  29 16:19 t.txt
- 修改文件权限
| 名称 | 字符 | 数值 |
|---|---|---|
| 可读 | r | 4 |
| 可写 | w | 2 |
| 可执行 | x | 1 |
| 可以使用直接相加的分数来进行修改 |
lyj208111545116@ubuntu:~/work$ sudo chmod 777 ~/work/test
lyj208111545116@ubuntu:~/work$ ls -l
总用量 20
drwxrwxrwx 2 t1              test_grp         4096 8月  29 16:55 test
-rw-rw-r-- 1 lyj208111545116 lyj208111545116 10240 8月  29 16:25 test.tar.gz
-rw-rw-r-- 1 lyj208111545116 lyj208111545116    74 8月  29 16:19 t.txt
- 修改文件用户
lyj208111545116@ubuntu:~/work$ sudo chown t1 ~/work/test
lyj208111545116@ubuntu:~/work$ ls -l
总用量 20
drwxrwxr-x 2 t1              lyj208111545116  4096 8月  29 16:55 test
-rw-rw-r-- 1 lyj208111545116 lyj208111545116 10240 8月  29 16:25 test.tar.gz
-rw-rw-r-- 1 lyj208111545116 lyj208111545116    74 8月  29 16:19 t.txt
- 修改文件所属组
lyj208111545116@ubuntu:~/work$ sudo chgrp test_grp ~/work/test
lyj208111545116@ubuntu:~/work$ ls -l
总用量 20
drwxrwxr-x 2 t1              test_grp         4096 8月  29 16:55 test
-rw-rw-r-- 1 lyj208111545116 lyj208111545116 10240 8月  29 16:25 test.tar.gz
-rw-rw-r-- 1 lyj208111545116 lyj208111545116    74 8月  29 16:19 t.txt
管理
User
- 创建用户
lyj208111545116@ubuntu:~/work/test$ sudo useradd [opt] [username]
- 删除用户
lyj208111545116@ubuntu:~/work/test$ sudo userdel [opt] [username]
- 修改用户
lyj208111545116@ubuntu:~/work/test$ sudo usermod [opt] [username]
- 修改密码
lyj208111545116@ubuntu:~/work/test$ sudo passwd [opt] [username]
- 查看登录用户

- 用户切换
lyj208111545116@ubuntu:~$ su t1
密码:[输入密码]
t1@ubuntu:/home/lyj208111545116$
Group
- 添加组
# 权限问题
lyj208111545116@ubuntu:~$ sudo groupadd test_grp
- 删除组
lyj208111545116@ubuntu:~$ groupdel test_grp
- 显示用户所在的组
lyj208111545116@ubuntu:~$ groups lyj208111545116
# lyj208111545116 : lyj208111545116 adm cdrom sudo dip plugdev lpadmin sambashare
杂项
- 通配符
- \({*}\)
匹配多个字符 - \(?\)
匹配单个字符 - [a-z]
匹配a\(\sim\)z之间的字符 - [^a-z]
匹配除了a\(\sim\)z之间的字符
- \({*}\)
- Standard I/O
读取数据的对象称为输入流,能向其写入的对象叫输出流 。
| 名称 | 文件标识符 | 设备 |
|---|---|---|
| STDIN | 0 | 键盘 |
| STDOUT | 1 | 显示器、打印机 |
| STDERROR | 2 | 显示器 |
- redirect I/O
| 序号 | 命令 | 作用 |
|---|---|---|
| 1 | > file | 把结果写入文件,文件内容覆盖 |
| 2 | < file | 读文件内容作为命令输入 |
| 3 | >> file | 把结果写入文件,文件内容不覆盖 |
| 4 | 2>&1 | 把错误输出写道标准输出 |
lyj208111545116@ubuntu:~/work$ ls -l t.txt > t.txt
lyj208111545116@ubuntu:~/work$ cat t.txt
-rw-rw-r-- 1 lyj208111545116 lyj208111545116 0 8月  29 16:14 t.txt
lyj208111545116@ubuntu:~/work$ cat t.txt
t.txt
lyj208111545116@ubuntu:~/work$ cat < t.txt
t.txt
lyj208111545116@ubuntu:~/work$ cat t.txt
t.txt
lyj208111545116@ubuntu:~/work$ ls -l t.txt >> t.txt
lyj208111545116@ubuntu:~/work$ cat t.txt
t.txt
-rw-rw-r-- 1 lyj208111545116 lyj208111545116 6 8月  29 16:17 t.txt
- 管道命令
管道可以使一个命令的输入作为另一个命令的输出 ‘|’
lyj208111545116@ubuntu:~$ ps -ax | grep tty
   935 tty1     Ss+    0:00 /sbin/agetty --noclear tty1 linux
   959 tty7     Ssl+   0:36 /usr/lib/xorg/Xorg -core :0 -seat seat0 -auth /var/run/lightdm/root/:0 -nolisten tcp vt7 -novtswitch
 73365 pts/4    S+     0:00 grep --color=auto tty
-
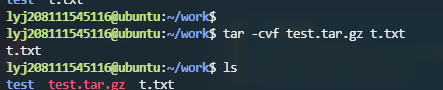
压缩解压命令
- tar
-
打包
-
解包

-
参数
-
-x : extract files
-v : verbose mod
-z : to compress or decompress *.gz
-j : to compress or decompress *.bz2
-f : specify the file to extract
-c : to create an archive- gzip
-
压缩

-
解压缩

-
- bzip2
-
压缩

-
解压缩

-
- tar
-
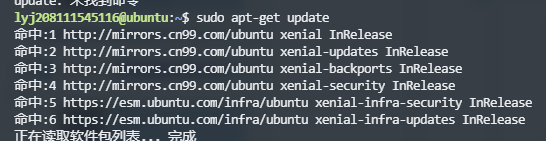
软件安装
- install
安装

- update
更新软件源
- delete
删除
- install
-
查看ip信息
lyj208111545116@ubuntu:~$ ifconfig
ens33     Link encap:以太网  硬件地址 00:0c:29:de:e1:77
          inet 地址:192.168.116.129  广播:192.168.116.255  掩码:255.255.255.0
          inet6 地址: fe80::b88e:a830:917e:5d19/64 Scope:Link
          UP BROADCAST RUNNING MULTICAST  MTU:1500  跃点数:1
          接收数据包:6575 错误:0 丢弃:0 过载:0 帧数:0
          发送数据包:4050 错误:0 丢弃:0 过载:0 载波:0
          碰撞:0 发送队列长度:1000
          接收字节:3652164 (3.6 MB)  发送字节:354508 (354.5 KB)

lo        Link encap:本地环回
          inet 地址:127.0.0.1  掩码:255.0.0.0
          inet6 地址: ::1/128 Scope:Host
          UP LOOPBACK RUNNING  MTU:65536  跃点数:1
          接收数据包:320 错误:0 丢弃:0 过载:0 帧数:0
          发送数据包:320 错误:0 丢弃:0 过载:0 载波:0
          碰撞:0 发送队列长度:1000
          接收字节:25855 (25.8 KB)  发送字节:25855 (25.8 KB)
- 查看内核日志
lyj208111545116@ubuntu:~$ dmesg | more
[    0.000000] Linux version 4.15.0-142-generic (buildd@lgw01-amd64-039) (gcc version 5.4.0 20160609 (Ubuntu 5.4.0-6ubuntu1~16.04.12)) #146~16.04.1-Ubuntu SMP Tue Apr 13 09:27:15 UTC 2021 (Ubuntu 4.15.0-142.146~16.04.1-generic 4.15.18)
[    0.000000] Command line: BOOT_IMAGE=/boot/vmlinuz-4.15.0-142-generic root=UUID=709a5400-bfe1-4787-b168-3eff490adec2 ro find_preseed=/preseed.cfg auto noprompt priority=critical locale=en_US quiet
[    0.000000] KERNEL supported cpus:
[    0.000000]   Intel GenuineIntel
[    0.000000]   AMD AuthenticAMD
[    0.000000]   Centaur CentaurHauls
[    0.000000] x86/fpu: Supporting XSAVE feature 0x001: 'x87 floating point registers'
[    0.000000] x86/fpu: Supporting XSAVE feature 0x002: 'SSE registers'
[    0.000000] x86/fpu: Supporting XSAVE feature 0x004: 'AVX registers'
[    0.000000] x86/fpu: xstate_offset[2]:  576, xstate_sizes[2]:  256
[    0.000000] x86/fpu: Enabled xstate features 0x7, context size is 832 bytes, using 'standard' format.
[    0.000000] e820: BIOS-provided physical RAM map:
[    0.000000] BIOS-e820: [mem 0x0000000000000000-0x000000000009e7ff] usable
[    0.000000] BIOS-e820: [mem 0x000000000009e800-0x000000000009ffff] reserved
[    0.000000] BIOS-e820: [mem 0x00000000000dc000-0x00000000000fffff] reserved
[    0.000000] BIOS-e820: [mem 0x0000000000100000-0x00000000bfedffff] usable
[    0.000000] BIOS-e820: [mem 0x00000000bfee0000-0x00000000bfefefff] ACPI data
[    0.000000] BIOS-e820: [mem 0x00000000bfeff000-0x00000000bfefffff] ACPI NVS
[    0.000000] BIOS-e820: [mem 0x00000000bff00000-0x00000000bfffffff] usable
[    0.000000] BIOS-e820: [mem 0x00000000f0000000-0x00000000f7ffffff] reserved
[    0.000000] BIOS-e820: [mem 0x00000000fec00000-0x00000000fec0ffff] reserved
[    0.000000] BIOS-e820: [mem 0x00000000fee00000-0x00000000fee00fff] reserved
[    0.000000] BIOS-e820: [mem 0x00000000fffe0000-0x00000000ffffffff] reserved
[    0.000000] NX (Execute Disable) protection: active
[    0.000000] SMBIOS 2.7 present.
[    0.000000] DMI: VMware, Inc. VMware Virtual Platform/440BX Desktop Reference Platform, BIOS 6.00 07/02/2015
[    0.000000] Hypervisor detected: VMware
[    0.000000] vmware: TSC freq read from hypervisor : 2900.000 MHz
[    0.000000] vmware: Host bus clock speed read from hypervisor : 66000000 Hz
[    0.000000] vmware: using sched offset of 3092833125 ns
[    0.000000] e820: update [mem 0x00000000-0x00000fff] usable ==> reserved
[    0.000000] e820: remove [mem 0x000a0000-0x000fffff] usable
[    0.000000] e820: last_pfn = 0xc0000 max_arch_pfn = 0x400000000
[    0.000000] MTRR default type: uncachable
[    0.000000] MTRR fixed ranges enabled:
[    0.000000]   00000-9FFFF write-back
[    0.000000]   A0000-BFFFF uncachable
[    0.000000]   C0000-CFFFF write-protect
[    0.000000]   D0000-EFFFF uncachable
[    0.000000]   F0000-FFFFF write-protect
[    0.000000] MTRR variable ranges enabled:
[    0.000000]   0 base 000C0000000 mask 3FFC0000000 uncachable
[    0.000000]   1 base 00000000000 mask 3FF00000000 write-back
[    0.000000]   2 disabled
[    0.000000]   3 disabled
编写和编译程序
编译c程序
- 使用vim编写c程序
lyj208111545116@ubuntu:~$ vi main.c

#include<stdio.h>
int main()
{

	printf("hello world");
	return 0;
}
- 使用指令编译并运行
lyj208111545116@ubuntu:~$ gcc main.c -o ma
lyj208111545116@ubuntu:~$ ~/ma
hello world
编写c++程序
- 使用vim编写c++程序
lyj208111545116@ubuntu:~$ vi cpp_test.cpp

#include <iostream>
int main()
{
std::cout << "hello world" << std::endl;
return 0;
}
- 使用指令编译并运行
lyj208111545116@ubuntu:~$ g++ cpp_test.cpp -o ct
lyj208111545116@ubuntu:~$ ~/ct
hello world