一、SpringBoot简介
SpringBoot用来简化spring应用开发,约定大于配置,去繁从简,是J2EE一站式解决方案
2、SpringBoot的优点
-
快速创建独立运行的Spring项目以及主流框架的集成
-
使用嵌入式的Servlet容器,应用无需打成WAR包
-
starts自动依赖与版本控制
-
大量的自动配置,简化开发,也可修改默认值
-
无需配置XML,无代码生成,开箱即用
-
准生成环境的运行时应用监控
-
与云计算天然集成
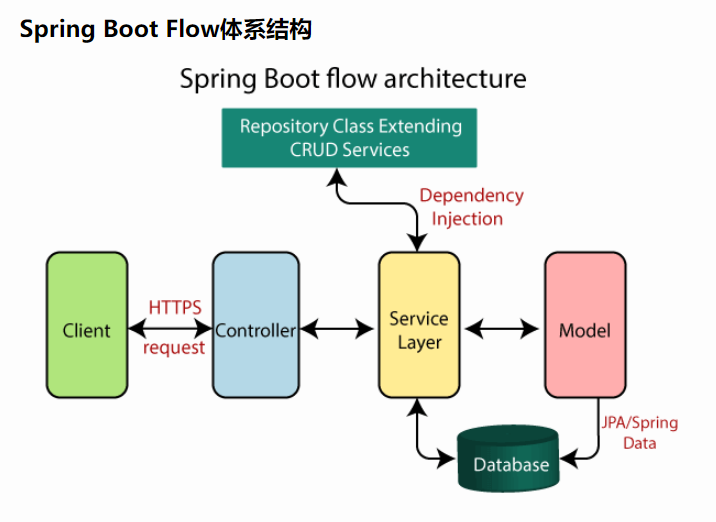
3、Spring Boot Flow体系结构
4、SpringBoot项目
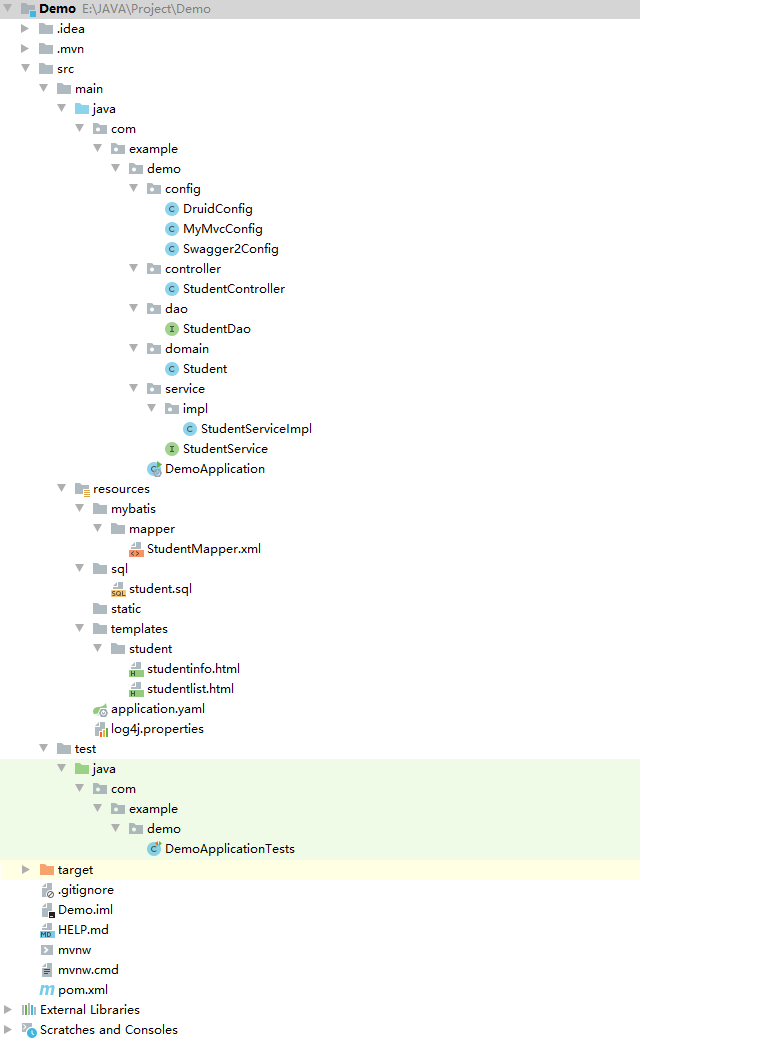
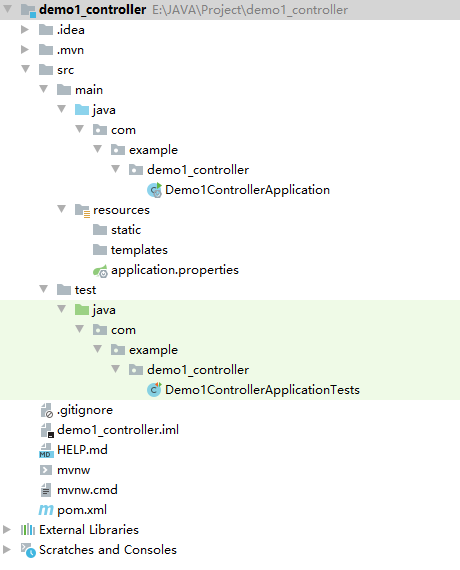
1.SpringBoot项目常见目录结构
2.SpringBoot项目分层
(1)Controller层:控制层
(2)Service层:业务层
Service层负责业务模块的逻辑应用设计。先设计放接口的类,再创建实现的类,然后在配置文件中进行配置其实现的关联。Service层调用Dao层接口,接收Dao层返回的数据,完成项目的基本功能设计。封装Service层的业务逻辑有利于业务逻辑的独立性和重复利用性。
(3)Dao层:数据访问层
Dao层负责与数据库进行交互。Dao层封装对于数据库的增删改查,不涉及业务逻辑,只是达到按某个条件对数据库中的数据进行某一具体操作的要求。(有的项目中也将Dao层写为Mapper层)
(4)Domain层:数据表对象层
Domain层定义数据库中存储的实体类。(有的项目也将Domain层写为Entity层或Model层)
(5)Config层:配置类层
Config层定义一些与配置有关的类。
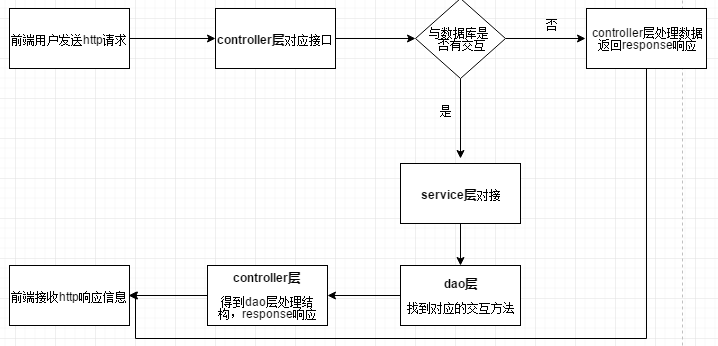
3.工作流程
二、Controller层(demo1_controller项目)
1、新建项目
安装
安装
安装
1.项目建立过程
1.
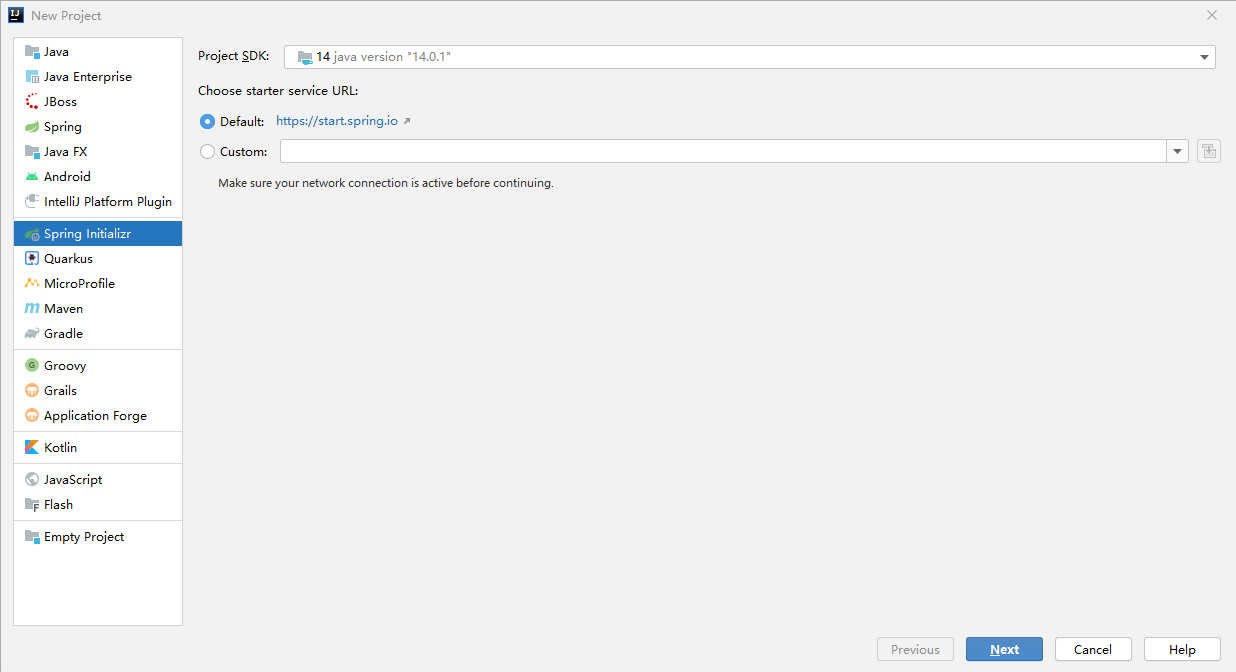
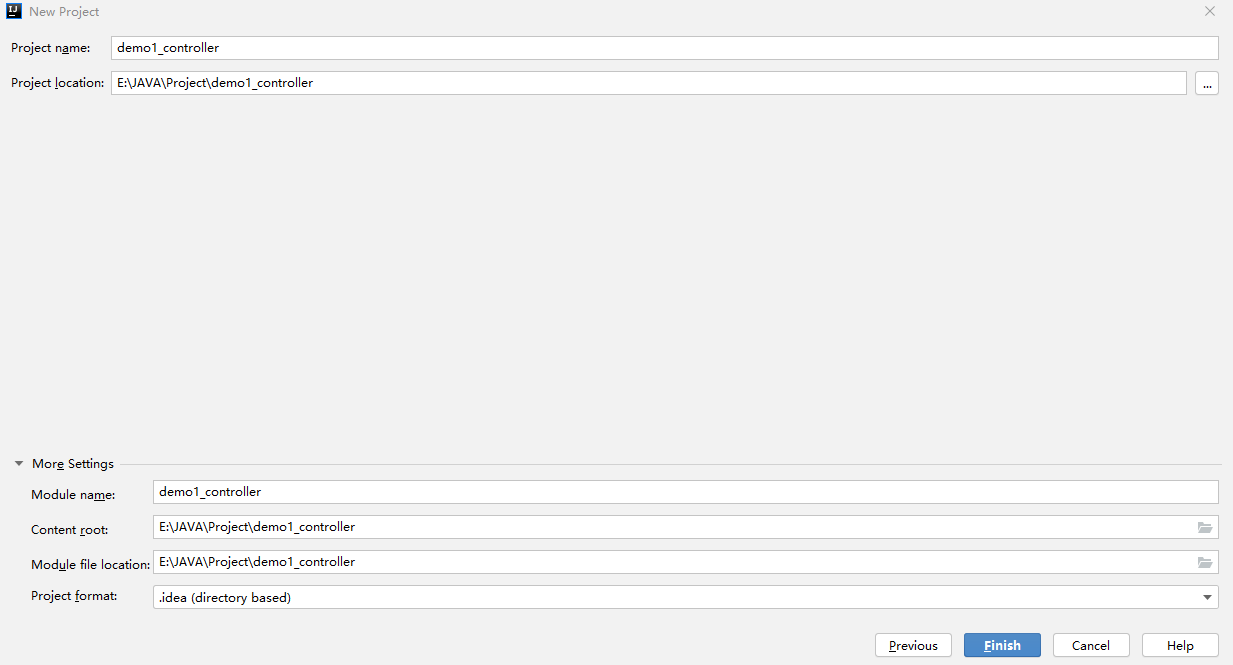
2.填完信息后,点击Next

此处的组织名和项目名由自己命名,仅是一个项目标识符,没有特别的规则
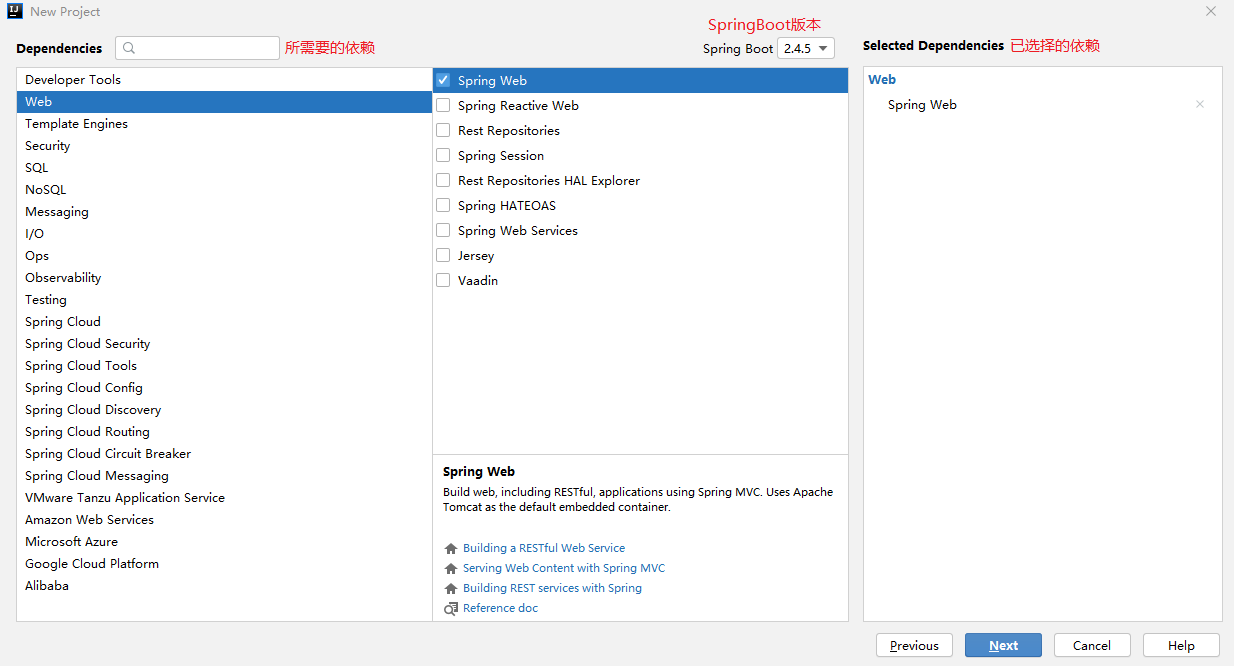
3.此界面可以选择需要的依赖于选择SpringBoot的版本。此时我们只需要用到spring Web依赖,点击Next。如果后续需求有所变化,可以在pom.xml文件进行修改
4.检查当前页面,点击Finish,此时已经成功新建一个SpringBoot项目
-
-
/src/main/resources目录下目录结构
-
static:保存所有的静态资源 js css images
-
templates:保存所有的模板页面(SpringBoot默认jar包使用嵌入式的Tomcat,默认不支持jsp页面,可以使用模板引擎freemarker、thyleaf),由于现在倾向前后端开发的模式(后台springboot,前端采用vue,react等),因此模板引擎逐渐在被主流技术淘汰。
-
application.properties:SpringBoot应用配置文件,可以修改一些默认设置。(springboot支持properties和yaml两种格式的配置文件,只要文件名是application,springboot均可识别。)
-
-
/src/test/java/com/example/demo1_controller/Demo1ControllerApplicationTests
项目使用的JDK版本可以在
项目使用的Maven版本可以在File->Settings->Build,Execution,Deployment->Build Toos->Maven下修改
3.部分文件内容
查看目前pom.xml的依赖模块
 1 <!-- web模块 -->
 2 <dependency>
 3     <groupId>org.springframework.boot</groupId>
 4     <artifactId>spring-boot-starter-web</artifactId>
 5 </dependency>
 6 <!-- test模块 -->
 7 <dependency>
 8     <groupId>org.springframework.boot</groupId>
 9     <artifactId>spring-boot-starter-test</artifactId>
10     <scope>test</scope>
11 </dependency>
新增maven-compiler-plugin插件指定jdk版本(根据实际情况(就是有没有报错)看是否要加,有的人不加也没有问题)。
1 <build> 2 <plugins> 3 <plugin> 4 <groupId>org.springframework.boot</groupId> 5 <artifactId>spring-boot-maven-plugin</artifactId> 6 </plugin> 7 8 <!-- maven-compiler-plugin插件 指定项目源码及编译后的Jdk版本 --> 9 <plugin> 10 <groupId>org.apache.maven.plugins</groupId> 11 <artifactId>maven-compiler-plugin</artifactId> 12 <version>3.8.1</version> 13 <configuration> 14 <source>1.8</source> 15 <target>1.8</target> 16 </configuration> 17 </plugin> 18 </plugins> 19 </build>
-
application.properties文件内容为空
2、Controller类
1.新建Controller类
-
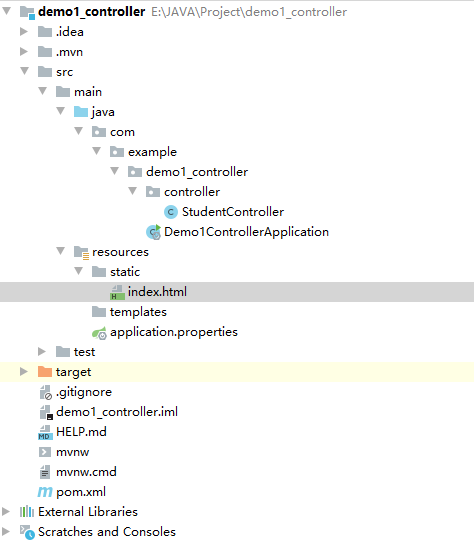
在/src/main/java/com/example/demo1_controller目录下新建文件夹controller(右键demo1_controller文件夹->New->Package:controller)
-
在controller文件夹下新建类StudentController(右键controller文件夹->New->Java Class:StudentController)
-
在StudentController类上添上注解@Controller,表明这是一个controller类(可以在里面定义一些路由函数)
此时StudentController.java文件全部内容为
1 package com.example.demo1_controller.Controller; 2 3 import org.springframework.stereotype.Controller; 4 5 @Controller 6 public class StudentController { 7 }
2.尝试后端给前端返回一个Hello World内容
在StudentController方法类写HelloWorld()方法
1 @ResponseBody
2 @RequestMapping(value = "/helloworld")
3 public String HelloWorld() {
4     return "Hello World";
5 }
(1)@RequestMapping("url")是处理请求地址映射,url是请求路径的一部分。(@RequestMapping表明这是一个路由函数)
此时前端请求路径为:http://localhost:8080/helloworld,项目运行结果

@RequestMapping("url")也可以用在controller类上,此时controller类中的方法的请求路径后部分内容为类的url拼接上方法的url
如在controller类上添加@RequestMapping("/student")
1 @Controller 2 @RequestMapping(value = "/student") 3 public class StudentController { 4 5 @ResponseBody 6 @RequestMapping(value = "/helloworld") 7 public String HelloWorld() { 8 return "Hello World"; 9 } 10 }
此时前端请求路径为http://localhost:8080/student/helloworld,项目运行结果

(2)@ResponseBody注解的作用是将controller的方法返回的对象通过适当的转换器转换为指定的格式之后,写入到response对象的body区,通常用来返回JSON数据或者是XML数据
controller类的方法可以通过返回值进行页面跳转,如果采用@ResponseBody则使该方法直接返回数据给前端
@ResponseBody注解可以直接放在controller类上,则表示该类所有方法返回值都是给前端的数据
1 @Controller 2 @ResponseBody 3 @RequestMapping(value = "/student") 4 public class StudentController { 5 6 @RequestMapping(value = "/helloworld") 7 public String HelloWorld() { 8 return "Hello World"; 9 } 10 }
此时项目运行结果与(1)相同
(3)@RestController相当于@ResponseBody + @Controller合在一起的作用,是一种简洁写法。
1 @RestController 2 @RequestMapping(value = "/student") 3 public class StudentController { 4 5 @RequestMapping(value = "/helloworld") 6 public String HelloWorld() { 7 return "Hello World"; 8 } 9 }
此时项目运行结果与(1)相同
3.初始页面
SpringBoot默认的页面映射路径(即模板文件存放的位置)为“classpath:/templates/*.html”。静态文件路径为“classpath:/static/”,其中可以存放JS、CSS等模板共用的静态文件
SpringBoot整合了springmvc的拦截功能,拦截了所有的请求。默认放行的资源是:resources/static/ 目录下所有静态资源。(不走controller控制器就能直接访问到资源)html页面如果放在resources/templates目录下,则需要走controller控制器,controller放行,允许该资源访问,该资源才能被访问到。否则就会报404错误
此时resources/static与 resources/templates 目录下都为空
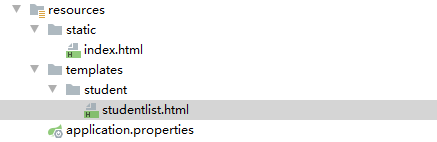
我们在resources/static目录下新建HTML文件index.html,此时目录结构
index.html文件内容
 1 <!DOCTYPE html>
 2 <html lang="en">
 3 <head>
 4     <meta charset="UTF-8">
 5     <title>初始页面</title>
 6 </head>
 7 <body>
 8 欢迎来到SpringBoot
 9 </body>
10 </html>
项目运行访问初始页面

1 导入thymeleaf依赖
在pom.xml文件<dependencies></dependencies>标签内新增thymeleaf模块
1 <!-- thymeleaf模块 -->
2 <dependency>
3     <groupId>org.springframework.boot</groupId>
4     <artifactId>spring-boot-starter-thymeleaf</artifactId>
5 </dependency>
在pom.xml文件<properties></properties>标签内设置thymeleaf模块版本
1 <!-- 设置thymeleaf模板引擎的模板 -->
2 <thymeleaf.version>3.0.11.RELEASE</thymeleaf.version>
3 <thymeleaf-layout-dialect.version>2.2.2</thymeleaf-layout-dialect.version>
2 新建一个初始页面studentlist.html
在resources/templates目录下新建文件夹stduent,在student文件夹下新建studentlist.html文件
3 编写一个配置类
(2)在config文件夹下新建类MyMvcConfig
(3)MyMvcConfig实现WebMvcConfigurer接口与使用@Configuration表明为配置类
 1 package com.example.demo1_controller.config;
 2
 3 import org.springframework.web.servlet.config.annotation.ViewControllerRegistry;
 4 import org.springframework.web.servlet.config.annotation.WebMvcConfigurer;
 5
 6 @Configuration
 7 public class MyMvcConfig implements WebMvcConfigurer {
 8
 9     /**
10      * 视图控制器
11      * @param registry
12      */
13     @Override
14     public void addViewControllers(ViewControllerRegistry registry) {
15         //初始页面设置为"student/studentlist"
16         //第一次参数为指定访问路径,第二个参数为指定访问视图名
17         registry.addViewController("/").setViewName("student/studentlist");
18     }
19 }
此时运行项目的初始页面为

注意:不可在MyMvcConfig上注解@EnableWebMvc,若注解@EnableWebMvc,表明全面接管SpringMVC配置。不使用@EnableWebMvc注解,仅表示在SpringBoot默认配置上对SpringMVC进行扩展
4.CRUD操作
(1)请求路径
| 普通CRUD | RestfulCRUD | |
|---|---|---|
| 查询 | getStudent | student---GET |
| 添加 | addStudent?xxx | student---POST |
| 修改 | updateStudent?id=xxx&xxx=xxx | student/{id}---PUT |
| 删除 | deleteStduent?id=1 | stduent/{id}---DELETE |
普通的CRUD用的是易于理解的请求路径,如getStudent(获取学生,GET请求)、addStudent(添加学生,POST请求)?xxx
RestFul风格的CRUD可以使用同名的请求路径,通过不同的请求方式来区分具体的请求:如查询与添加请求路径都是.../student,但GET方法是查询,POST方法是添加。将url视为资源,根据HTTP请求方式(HTTP协议的内容)对资源产生不同的操作GET是查询、POST是添加、PUT是更新、DELETE是删除。
请求架构
| 请求uri | 请求方式 | |
|---|---|---|
| 查询所有学生 | students | GET |
| 查询某个学生(来到修改页面) | student/{id} | GET |
| 来到添加页面 | student | GET |
| 添加学生 | student | POST |
| 来到修改页面(查询某个学生) | student/{id} | GET |
| 修改学生 | student | PUT |
| 删除学生 | student/{id} | DELETE |
(2)学生实体类
-
在/src/main/java/com/example/demo1_controller目录下新建文件夹domain
-
在domain文件夹下新建类Student
-
1 package com.example.demo1_controller.domain; 2 3 import org.springframework.format.annotation.DateTimeFormat; 4 5 import java.io.Serializable; 6 import java.util.Date; 7 8 /** 9 * Student类 学生实体类 10 */ 11 public class Student implements Serializable { 12 13 private Integer id; //学号 14 private String name; //姓名 15 private Integer score; //成绩 16 private String birthplace; //籍贯 17 //日期的格式 年-月-日 18 @DateTimeFormat(pattern = "yyyy-MM-dd") 19 private Date birthday; //生日 20 21 public Integer getId() { 22 return id; 23 } 24 25 public void setId(Integer id) { 26 this.id = id; 27 } 28 29 public String getName() { 30 return name; 31 } 32 33 public void setName(String name) { 34 this.name = name; 35 } 36 37 public Integer getScore() { 38 return score; 39 } 40 41 public void setScore(Integer score) { 42 this.score = score; 43 } 44 45 public String getBirthplace() { 46 return birthplace; 47 } 48 49 public void setBirthplace(String birthplace) { 50 this.birthplace = birthplace; 51 } 52 53 public Date getBirthday() { 54 return birthday; 55 } 56 57 public void setBirthday(Date birthday) { 58 this.birthday = birthday; 59 } 60 61 @Override 62 public String toString() { 63 return "Student{" + 64 "id=" + id + 65 ", name='" + name + '\'' + 66 ", score=" + score + 67 ", birthplace='" + birthplace + '\'' + 68 ", birthday=" + birthday + 69 '}'; 70 } 71 }
(3)添加学生
①在studentlist.html页面新增添加按钮
 1 <!DOCTYPE html>
 2 <html lang="en"xmlns:th="http://www.thymeleaf.org">
 3 <head>
 4     <meta charset="UTF-8">
 5     <title>学生列表</title>
 6 </head>
 7 <body>
 8     <div>
 9         <a th:href="@{/student}">
10             <button>添加学生</button>
11         </a>
12     </div>
13 </body>
14 </html>
<a></a>标签里的th:href就是请求路径
注意:新建的html文件没有指定使用thymeleaf模板引擎,需要在<html></html>标签里添加xmlns:th="http://www.thymeleaf.org"
studentlist.html页面

②编写controller类的ToStudent()方法
用户点击添加按钮,我们需要能够跳转到学生信息的添加页面,故将/student路径映射到一个可以跳转至学生信息添加页面的方法上
1 package com.example.demo1_controller.controller; 2 3 import org.springframework.stereotype.Controller; 4 import org.springframework.web.bind.annotation.GetMapping; 5 import org.springframework.web.bind.annotation.RequestMapping; 6 import org.springframework.web.bind.annotation.ResponseBody; 7 8 @Controller 9 public class StudentController { 10 11 @ResponseBody 12 @RequestMapping(value = "/helloworld") 13 public String HelloWorld() { 14 return "Hello World"; 15 } 16 17 /** 18 * 来到学生信息页面 19 * @return 20 */ 21 @GetMapping(value = "/student") 22 public String ToStudent() { 23 24 return "student/studentinfo"; 25 } 26 }
因为需要用到页面跳转,所以该controller就不注解为@RestController,需要直接返回数据给前端的可以用@ResponseBody注解
@GetMapping("url")相当于@RequestMapping(valus = "url",method = RequestMethod.GET)也是一种简洁写法。
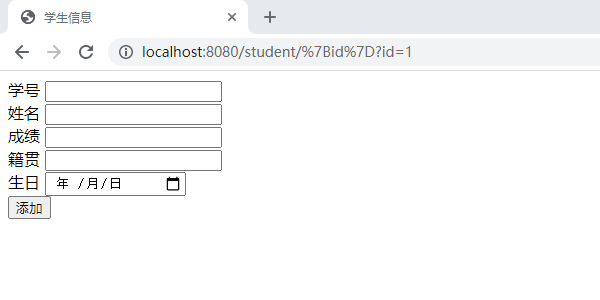
③新增studentinfo.html页面
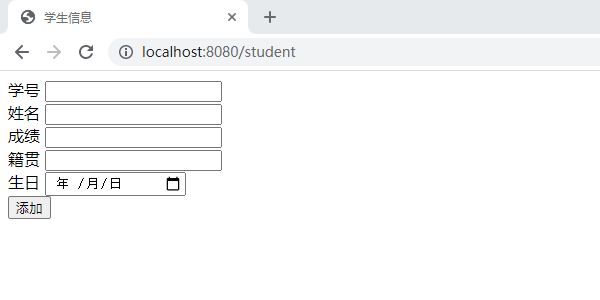
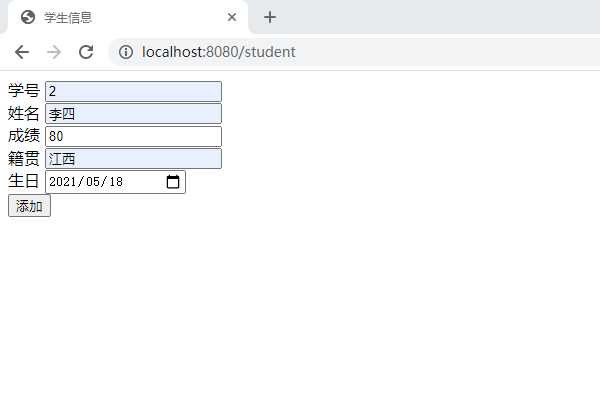
在resources/templates/student文件夹下新建studentinfo.html文件,写一个表单输入需要添加的学生信息
 1 <!DOCTYPE html>
 2 <html lang="en"xmlns:th="http://www.thymeleaf.org">
 3 <head>
 4     <meta charset="UTF-8">
 5     <title>学生信息</title>
 6 </head>
 7 <body>
 8     <form th:action="@{/student}" method="post">
 9         <div>
10             <label>学号</label>
11             <input name="id">
12         </div>
13         <div>
14             <label>姓名</label>
15             <input name="name">
16         </div>
17         <div>
18             <label>成绩</label>
19             <input name="score">
20         </div>
21         <div>
22             <label>籍贯</label>
23             <input name="birthplace">
24         </div>
25         <div>
26             <label>生日</label>
27             <input name="birthday" type="date">
28         </div>
29         <button type="submit" th:text="添加"></button>
30     </form>
31 </body>
32 </html>
studentinfo.html页面
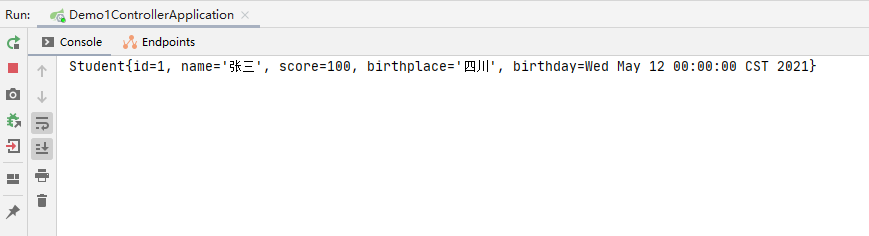
 1 /**
 2 * 添加学生信息
 3 * @param student
 4 * @return
 5 */
 6 @PostMapping(value = "/student")
 7 public String AddStudent(Student student) {
 8
 9     //执行添加学生信息操作,本项目未连接数据库,仅在控制台输出需要存储的学生数据
10     System.out.println(student);
11     //跳转至学生列表页面
12     return "student/studentlist";
13 }
@PostMapping("url")相当于@RequestMapping(valus = "url",method = RequestMethod.POST)
⑤业务流程
-
-
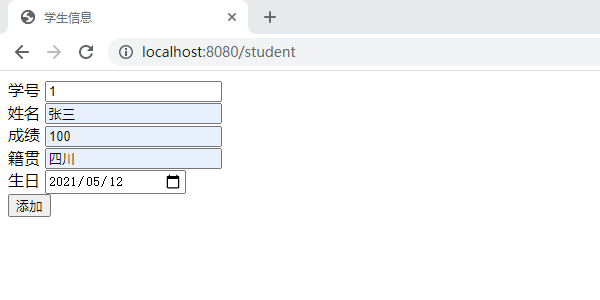
点击添加学生按钮来到学生信息页面,输入数据
- 点击添加按钮回到学生列表页面(与①中页面一样),控制台可以看到前端写入的学生数据
(4)查找学生
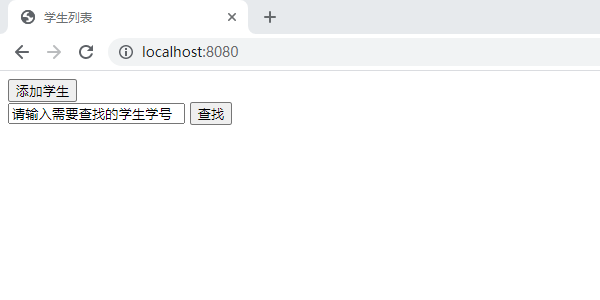
①在studentlist.html页面新增学生学号输入框及查找按钮
1     <div>
2         <form th:action="@{/student/{id}}" method="get">
3             <input name="id">
4             <button type="submit" th:text="查找"></button>
5         </form>
6     </div>
此处请求路径为xxx/studnet/{id},请求方式为GET
②编写controller类的FindStudentById()方法
1 /** 2 * 查找某个学生信息 3 * @param id 4 * @return 5 */ 6 @GetMapping(value = "/student/{id}") 7 public String FindStudentById(Integer id) { 8 9 //执行通过学生id从数据库查找学生信息操作,本项目未连接数据库,仅在控制台输出学生id 10 System.out.println("所查找学生的学号"+id); 11 //跳转至学生信息页面 12 return "student/studentinfo"; 13 }
③业务流程
-
来到初始页面
-
在输入框输入需要查询的学生学号
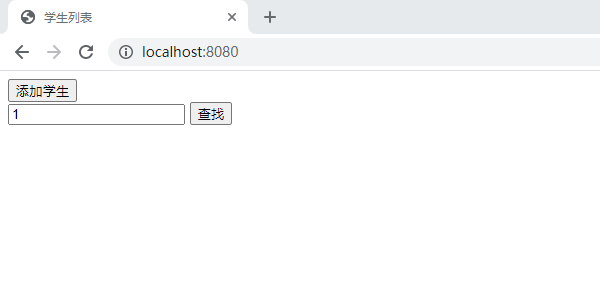
-
点击查找按钮后来到学生信息页面,如果连接了数据库执行了查找操作后会在本页面显示该学生的信息
- 控制台输出所查找的学生学号

因为添加学生和查找学生用的同一个学生信息页面,即studentinfo.html,添加学生跳转的学生信息页面下方按钮应该为“添加”,而查找学生跳转的学生信息页面下方按钮可以省略,或者下方变为两个按钮:修改与删除。可以采用判断是否有student值,如果为空则说明是添加学生跳转过来的页面,如果非空则说明是查找学生跳转过来的页面,具体方法在此不详谈。
(5)修改学生
需要修改学生则应当首先查找到学生,查找过程与(4)查找学生相同
由于本项目未连接数据库,无法判断学生信息页面是由添加学生按钮还是查找学生按钮跳转,所以不再实现功能
(6)删除学生
同(5)修改学生,此处不再实现
5、常用注解
-
RequestMapping
 1 public @interface RequestMapping {
 2     String name() default "";
 3
 4     @AliasFor("path")
 5     String[] value() default {};
 6
 7     @AliasFor("value")
 8     String[] path() default {};
 9
10     RequestMethod[] method() default {};
11
12     String[] params() default {};
13
14     String[] headers() default {};
15
16     String[] consumes() default {};
17
18     String[] produces() default {};
19 }
-
-
method: 指定请求的method类型, 分为GET、POST、PUT、DELETE等
-
consumes: 指定处理请求的提交内容类型(Content-Type),例如application/json, text/html
-
produces: 指定返回的内容类型,仅当request请求头中的(Accept)类型中包含该指定类型才返回
-
params: 指定request中必须包含某些参数值是,才让该方法处理
-
headers: 指定request中必须包含某些指定的header值,才能让该方法处理请求
-
三、Service层(demo2_service项目)
1、新建项目
新建项目过程与demo1_controller项目类似,不再赘述
2、Servie层处理前端请求并返回数据
1.环境准备
pom.xml文件里也要添加thymeleaf模块,指定thymeleaf版本,以及新增maven-compiler-plugin插件指定jdk版本,具体方法demo1_controller已经展示过
2.新建StudentController类
在src/main/java/com/example/demo2_service目录下新建controller文件夹,并在controller文件夹下新建StudentController类,StudentController上注解@RestController
3.新建Service接口及ServiceImpl类
在src/main/java/com/example/demo2_service目录下新建service文件夹,在service文件夹下新建StudentService接口与impl文件夹,在impl文件夹下再新建StudentServiceImpl类并实现StudentService接口,在StudentServiceImpl类上用@Service注解表明这是一个Service类
4.在Service接口及ServiceImpl类中声明及实现方法
在StudentService接口中声明getFibonacciResult(Integer number)方法
1 /**
2   * 通过前端传入数据计算斐波那契数列值
3   * @param number
4   * @return
5   */
6 public Integer getFibonacciResult(Integer number);
在StduentServiceImpl类中实现getFibonacciResult(Integer number)方法
 1 /**
 2   * 通过前端传入数据计算斐波那契数列值
 3   * @param number
 4   * @return
 5   */
 6 @Override
 7 public Integer getFibonacciResult(Integer number) {
 8
 9     if (number == 1 || number == 2) {
10         return 1;
11     } else {
12         return getFibonacciResult(number - 1) + getFibonacciResult(number - 2);
13     }
14 }
5.编写controller类
 1 @Autowired
 2 StudentService studentService;
 3
 4 /**
 5   * 前端输入初始值,返回斐波那契数列值
 6   * @param number
 7   * @return
 8   */
 9 @RequestMapping("/getFibonacciResult")
10 public Integer getFibonacciResult(Integer number) {
11
12     return studentService.getFibonacciResult(number);
13 }
通过@Autowired自动注入StudentService,就可以从controller层使用service层的类对象,并调用其方法,对象的创建、销毁等生命周期由SpringBoot管理,开发者不用考虑
6.配置SpringMVC
(此步骤非必要,一般是在springboot项目中,修改默认启动页(默认启动页是static/index.html),修改@ResponseBody返回json转换方式,新增资源过滤,配置跨域,添加拦截器等操作需要配置mvc。)
在src/main/java/com/example/demo2_service目录下新建config文件夹,并在config文件夹下新建MyMvcConfig类
MyMvcConfig类
 1 package com.example.demo2_service.config;
 2
 3 import org.springframework.context.annotation.Configuration;
 4 import org.springframework.web.servlet.config.annotation.ViewControllerRegistry;
 5 import org.springframework.web.servlet.config.annotation.WebMvcConfigurer;
 6
 7 @Configuration
 8 public class MyMvcConfig implements WebMvcConfigurer {
 9
10     /**
11      * 视图控制器
12      * @param registry
13      */
14     @Override
15     public void addViewControllers(ViewControllerRegistry registry) {
16         //初始页面设置为"student"
17         //第一次参数为指定访问路径,第二个参数为指定访问视图名
18         registry.addViewController("/").setViewName("student");
19     }
20 }
7.新建并编写Student.html文件
在resources/templates目录下新建Student.html文件,并编写一个input输入框与button按钮,用于前端向后端提交数据
 1 <!DOCTYPE html>
 2 <html lang="en"xmlns:th="http://www.thymeleaf.org">
 3 <head>
 4     <meta charset="UTF-8">
 5     <title>Title</title>
 6 </head>
 7 <body>
 8     <div>
 9         <form th:action="@{/getFibonacciResult}" method="post">
10             <input name="number">
11             <button type="submit" th:text="提交"></button>
12         </form>
13     </div>
14 </body>
15 </html>
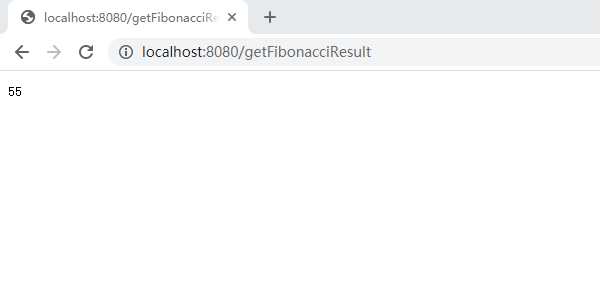
8.业务流程
-
来到初始页面student.html,在input输入框内输入数字10
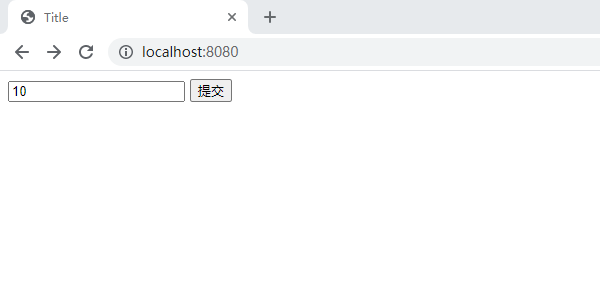
-
点击提交按钮,即可得到经过Service层计算得到的返回值
3、Service层将Dao层的数据传递给前端
一般dao层是用于读写数据库的层,此处使用代码中固定的数据来模拟数据库读写,章节四中会连接数据库,演示实际读写数据库的操作。
1.新建StudentDao类
在src/main/java/com/example/demo2_service目录下新建dao文件夹,并在dao文件夹下新建StudentDao类,StudentDao上注解@Repository表明这是一个Dao类
注意:正常SpringBoot项目开发中,Dao层一般设置为接口而非具体类
2.编写StudentDao类
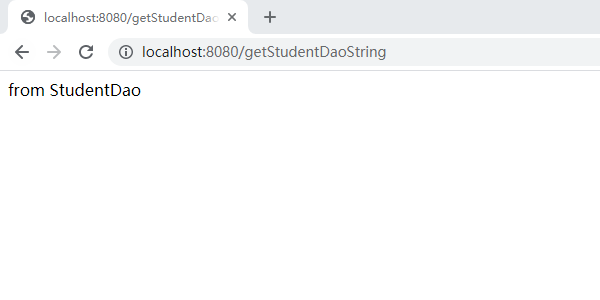
 1 package com.example.demo2_service.dao;
 2
 3 import org.springframework.stereotype.Repository;
 4
 5 /**
 6  * 数据访问层
 7  */
 8 @Repository
 9 public class StudentDao {
10
11     String studentDaoString = new String("from StudentDao");
12
13     /**
14      * 得到Dao层数据
15      * @return
16      */
17     public String getStudentDaoString() {
18         return studentDaoString;
19     }
20 }
此处getStudentDaoString()方法为返回一个字符串
3.编写StudentService接口与StudentServiceImpl类
 1 package com.example.demo2_service.service;
 2
 3 /**
 4  * 业务层
 5  */
 6 public interface StudentService {
 7
 8     /**
 9      * 通过前端传入数据计算斐波那契数列值
10      * @param number
11      * @return
12      */
13     public Integer getFibonacciResult(Integer number);
14
15     /**
16      * 得到Dao层数据
17      * @return
18      */
19     public String getStudentDaoString();
20
21 }
StudentServiceImpl类
 1 package com.example.demo2_service.service.impl;
 2
 3 import com.example.demo2_service.dao.StudentDao;
 4 import com.example.demo2_service.service.StudentService;
 5 import org.springframework.beans.factory.annotation.Autowired;
 6 import org.springframework.stereotype.Service;
 7
 8 /**
 9  * 业务层
10  */
11 @Service
12 public class StudentServiceImpl implements StudentService {
13
14     @Autowired
15     StudentDao studentDao;
16
17     /**
18      * 通过前端传入数据计算斐波那契数列值
19      * @param number
20      * @return
21      */
22     @Override
23     public Integer getFibonacciResult(Integer number) {
24
25         if (number == 1 || number == 2) {
26             return 1;
27         } else {
28             return getFibonacciResult(number - 1) + getFibonacciResult(number - 2);
29         }
30     }
31
32     /**
33      * 得到Dao层数据
34      * @return
35      */
36     @Override
37     public String getStudentDaoString() {
38         return studentDao.getStudentDaoString();
39     }
40 }
4.编写StduentController类
 1 package com.example.demo2_service.controller;
 2
 3 import com.example.demo2_service.service.StudentService;
 4 import org.springframework.beans.factory.annotation.Autowired;
 5 import org.springframework.web.bind.annotation.RequestMapping;
 6 import org.springframework.web.bind.annotation.RestController;
 7
 8 /**
 9  * 控制层
10  */
11 @RestController
12 public class StudentController {
13
14     @Autowired
15     StudentService studentService;
16
17     /**
18      * 前端输入初始值,返回斐波那契数列值
19      * @param number
20      * @return
21      */
22     @RequestMapping("/getFibonacciResult")
23     public Integer getFibonacciResult(Integer number) {
24
25         return studentService.getFibonacciResult(number);
26     }
27
28     /**
29      * 通过Service层得到Dao层的数据
30      * @return
31      */
32     @RequestMapping("/getStudentDaoString")
33     public String getStudentDaoString() {
34         return studentService.getStudentDaoString();
35     }
36 }
5.业务流程
前端访问http://localhost:8080/getStudentDaoString地址
四、Dao层(demo3_dao项目)
1、新建项目
新建项目过程与demo1_controller项目类似,不再赘述
2、环境准备
需要安装
1.pom.xml
jdbc模块、druid模块、log4j2模块、mysql驱动模块、mybatis模块
 1 <!-- jdbc模块 spring读写数据库的库 -->
 2 <dependency>
 3     <groupId>org.springframework.boot</groupId>
 4     <artifactId>spring-boot-starter-jdbc</artifactId>
 5 </dependency>
 6
 7 <!-- druid模块 数据库连接池(池子里放一些连接,每次直接取,不用新建提升性能) -->
 8 <dependency>
 9     <groupId>com.alibaba</groupId>
10     <artifactId>druid</artifactId>
11     <version>1.1.20</version>
12 </dependency>
13
14 <!-- log4j2模块 日志 -->
15 <dependency>
16     <groupId>log4j</groupId>
17     <artifactId>log4j</artifactId>
18     <version>1.2.17</version>
19 </dependency>
20
21 <!-- mysql驱动模块 连接mysql的驱动 -->
22 <dependency>
23     <groupId>mysql</groupId>
24     <artifactId>mysql-connector-java</artifactId>
25     <version>8.0.23</version>
26 </dependency>
27
28 <!-- mybatis模块 spring读写数据库的另一个库 -->
29 <dependency>
30     <groupId>org.mybatis.spring.boot</groupId>
31     <artifactId>mybatis-spring-boot-starter</artifactId>
32     <version>2.1.4</version>
33 </dependency>
同样使用maven-compiler-plugin插件指定项目源码及编译后的Jdk版本
 1 <!-- maven-compiler-plugin插件 指定项目源码及编译后的Jdk版本 -->
 2 <plugin>
 3     <groupId>org.apache.maven.plugins</groupId>
 4     <artifactId>maven-compiler-plugin</artifactId>
 5     <version>3.8.1</version>
 6     <configuration>
 7         <source>1.8</source>
 8         <target>1.8</target>
 9     </configuration>
10 </plugin>
2.application.yaml
默认配置文件为application.properties,我们采用yaml格式的配置文件,在resources文件夹下新建application.yaml文件,原有的application.properties可以删除
spring:
  datasource:
    #数据源基本配置
    username: root
    password: 123
    url: jdbc:mysql://localhost:3306/springboot?useUnicode=true&characterEncoding=utf8&serverTimezone=GMT%2B8
    driver-class-name: com.mysql.cj.jdbc.Driver
    type: com.alibaba.druid.pool.DruidDataSource
    initialization-mode: always
    schema:
      - classpath:sql/student.sql   #数据库建表语句

    #配置监控统计拦截的filters,去掉后监控界面sql无法统计,‘wall'用于防火墙
    filters: stat,wall,log4j
    #打开PSCache,并且指定每个连接上PSCache的大小
    maxPoolPreparedStatementPerConnectionSize: 20
    #合并多个DruidDataSource的监控数据
    useGlobalDataSourceStat: true
    connectionProperties:
      #druid.stat.mergeSql合并执行的相同sql,避免因为参数不同而统计多条sql语句
      #druid.stat.slowSqlMillis用来配置SQL慢的标准,执行时间超过slowSqlMillis的就是慢
      druid.stat.mergeSql = true;druid.stat.slowSqlMillis = 500

  #使form表单可以发送put请求
  mvc:
    hiddenmethod:
      filter:
        enabled: true

#mybatis配置
mybatis:
  #指定sql映射文件路径
  mapper-locations: classpath:mybatis/mapper/*.xml
配置文件此处不进行详细说明
3.Druid配置类
在src/main/java/com/example/demo3_dao目录下新建config文件夹,并在config文件夹下新建DruidConfig类。
 1 package com.example.demo3_dao.config;
 2
 3 import com.alibaba.druid.pool.DruidDataSource;
 4 import com.alibaba.druid.support.http.StatViewServlet;
 5 import com.alibaba.druid.support.http.WebStatFilter;
 6 import org.springframework.boot.context.properties.ConfigurationProperties;
 7 import org.springframework.boot.web.servlet.FilterRegistrationBean;
 8 import org.springframework.boot.web.servlet.ServletRegistrationBean;
 9 import org.springframework.context.annotation.Bean;
10 import org.springframework.context.annotation.Configuration;
11
12 import javax.sql.DataSource;
13 import java.util.Arrays;
14 import java.util.HashMap;
15 import java.util.Map;
16
17 /**
18  * Druid配置类
19  */
20 @Configuration
21 public class DruidConfig {
22
23     @Bean
24     @ConfigurationProperties(prefix = "spring.datasource")
25     public DataSource druid() {
26         return new DruidDataSource();
27     }
28
29     /**
30      * 配置Druid监控
31      * @return
32      */
33     //配置一个管理后台的Servlet
34     @Bean
35     public ServletRegistrationBean statViewServlet() {
36
37         ServletRegistrationBean bean = new ServletRegistrationBean(new StatViewServlet(),"/druid/*");
38
39         Map<String,String> initParams = new HashMap<>();
40         initParams.put("loginUsername","admin");
41         initParams.put("loginPassword","123456");
42         initParams.put("allow","");     //默认允许所有访问
43         bean.setInitParameters(initParams);
44
45         return bean;
46     }
47
48     //配置一个web监控的filter
49     @Bean
50     public FilterRegistrationBean webStatFilter() {
51         FilterRegistrationBean bean = new FilterRegistrationBean();
52         bean.setFilter(new WebStatFilter());
53
54         Map<String,String> initParams = new HashMap<>();
55         initParams.put("exclusions","*.js,*.css,/druid/*");
56         bean.setInitParameters(initParams);
57
58         bean.setUrlPatterns(Arrays.asList("/*"));
59
60         return bean;
61     }
62 }
4.log4j日志
在resources目录下新建log4j.properties文件。
1 log4j.rootLogger=DEBUG, stdout
2 log4j.appender.stdout=org.apache.log4j.ConsoleAppender
3 log4j.appender.stdout.layout=org.apache.log4j.PatternLayout
4 log4j.appender.stdout.layout.ConversionPattern=%5p [%t] - %m%n
5.student.sql建表语句
在resources目录下新建sql文件夹,将student.sql文件导入sql文件夹
 1 SET NAMES utf8;
 2 SET FOREIGN_KEY_CHECKS = 0;
 3
 4 -- ----------------------------
 5 -- Table structure for student
 6 -- ----------------------------
 7 CREATE TABLE IF NOT EXISTS `student`  (
 8   `id` int NOT NULL COMMENT '学号',
 9   `name` varchar(16) CHARACTER SET utf8 COLLATE utf8_general_ci NOT NULL COMMENT '姓名',
10   `score` int NOT NULL COMMENT '成绩',
11   `birthplace` varchar(16) CHARACTER SET utf8 COLLATE utf8_general_ci NOT NULL COMMENT '籍贯',
12   `birthday` date NOT NULL COMMENT '生日',
13   PRIMARY KEY (`id`) USING BTREE
14 ) ENGINE = InnoDB CHARACTER SET = utf8 COLLATE = utf8_general_ci ROW_FORMAT = Dynamic;
15
16 SET FOREIGN_KEY_CHECKS = 1;
6.Student实体类
在src/main/java/com/example/demo3_dao目录下新建domain文件夹,并在domain下新建Student类
3、连接数据库
此时可以在测试类中查看数据源
src/test/java/com/example/demo3_dao/Demo3DaoApplicationTests
 1 package com.example.demo3_dao;
 2
 3 import org.junit.jupiter.api.Test;
 4 import org.springframework.beans.factory.annotation.Autowired;
 5 import org.springframework.boot.test.context.SpringBootTest;
 6
 7 import javax.sql.DataSource;
 8 import java.sql.Connection;
 9 import java.sql.SQLException;
10
11 @SpringBootTest
12 class Demo3DaoApplicationTests {
13
14     @Autowired
15     DataSource dataSource;
16
17     /**
18      * 测试查看数据源
19      * @throws SQLException
20      */
21     @Test
22     void contextLoads() throws SQLException {
23         System.out.println(dataSource.getClass());
24
25         Connection connection = dataSource.getConnection();
26         System.out.println("数据源:"+connection);
27         connection.close();
28     }
29 }
运行测试类的contextLoads()方法,可在控制台看到druid数据源


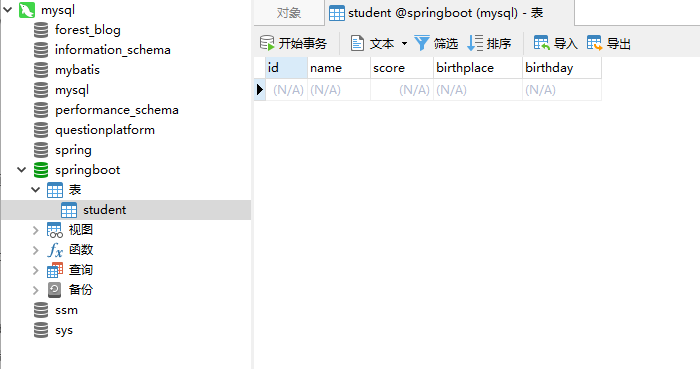
通过Navicat可以发现springboot下已经成功新建数据表
4、注解法进行CRUD
 1 package com.example.demo3_dao.dao;
 2
 3 import com.example.demo3_dao.domain.Student;
 4 import org.apache.ibatis.annotations.*;
 5 import org.springframework.stereotype.Repository;
 6
 7 import java.util.List;
 8
 9 @Mapper
10 @Repository
11 public interface StudentDao {
12
13     /**
14      * 添加学生信息
15      * @param student
16      */
17     @Insert("INSERT INTO student(id,name,score,birthplace,birthday) VALUES (#{id},#{name},#{score},#{birthplace},#{birthday})")
18     public void AddStudent(Student student);
19
20     /**
21      * 删除学生信息
22      * @param id
23      */
24     @Delete("DELETE FROM student WHERE id=#{id}")
25     public void DeleteStudentById(Integer id);
26
27     /**
28      * 修改学生信息
29      * @param student
30      */
31     @Update("UPDATE student SET name=#{name},score=#{score},birthplace=#{birthplace},birthday=#{birthday} WHERE id=#{id}")
32     public void UpdateStudent(Student student);
33
34     /**
35      * 查找某个学生信息
36      * @param id
37      * @return
38      */
39     @Select("SELECT * FROM student WHERE id=#{id}")
40     public Student FindStudentById(Integer id);
41
42     /**
43      * 查找所有学生信息
44      * @return
45      */
46     @Select("SELECT * FROM student")
47     public List<Student> FindAllStudent();
48 }
注意:
@Repository需要在Spring中配置扫描地址,然后生成Dao层的Bean才能被注入到Service层中
@SpringBootApplication
@MapperScan("com.example.demo3_dao.dao")
public class Demo3DaoApplication {

    public static void main(String[] args) {
        SpringApplication.run(Demo3DaoApplication.class, args);
    }

}
@Mapper不需要配置扫描地址,通过xml里面的namespace里面的接口地址,生成了Bean后注入到Service层中
本项目未编写controller层、service层等,就不具体实现其功能,可以通过使用测试类(Demo3DaoApplicationTests)查看是否成功进行数据交互
1.测试添加学生功能
添加学生测试方法
 1 /**
 2   * 测试添加学生
 3   */
 4 @Test
 5 public void AddStudent() {
 6
 7     //默认一个学生信息
 8     Student student = new Student();
 9     student.setId(1);
10     student.setName("张三");
11     student.setScore(100);
12     student.setBirthplace("四川");
13     SimpleDateFormat simpleDateFormat = new SimpleDateFormat("yyyy-MM-dd");
14     Date date = new Date();
15     try {
16         date = simpleDateFormat.parse("2020-02-02");
17     } catch (ParseException e) {
18         e.printStackTrace();
19     }
20     student.setBirthday(date);
21
22     //在控制台输出学生信息
23     System.out.println("学生信息:"+student);
24     //将学生信息存入数据库
25     studentDao.AddStudent(student);
26 }
运行测试方法
控制台可以看到学生信息

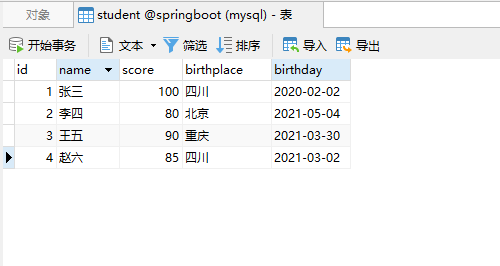
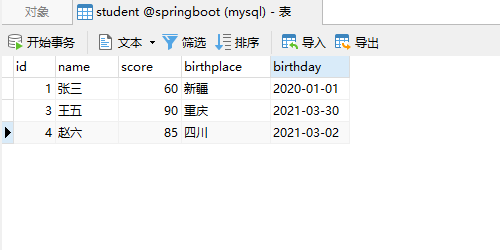
通过Navicat可以看到数据被写入数据库

2.测试查找学生功能
通过Navicat在数据库写入几条数据
查找学生测试方法
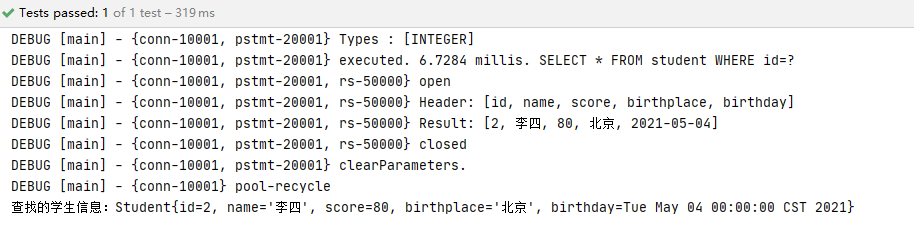
 1 /**
 2   * 测试查找学生
 3   * @return
 4   */
 5 @Test
 6 public void FindStudentById() {
 7
 8     //从数据库查找学生
 9     Student student = studentDao.FindStudentById(2);
10     //在控制台输出学生信息
11     System.out.println("查找的学生信息:"+student);
12 }
运行测试方法
3.测试修改学生功能
修改学生测试方法
 1 /**
 2   * 测试修改学生
 3   */
 4 @Test
 5 public void UpdateStudent() {
 6
 7     //默认一个学生信息
 8     Student student = new Student();
 9     //待修改学生的学号
10     student.setId(1);
11     //修改其他信息
12     student.setName("张三");
13     student.setScore(60);
14     student.setBirthplace("新疆");
15     SimpleDateFormat simpleDateFormat = new SimpleDateFormat("yyyy-MM-dd");
16     Date date = new Date();
17     try {
18         date = simpleDateFormat.parse("2020-01-01");
19     } catch (ParseException e) {
20         e.printStackTrace();
21     }
22     student.setBirthday(date);
23
24     //在控制台输出学生信息
25     System.out.println("修改后的学生信息:"+student);
26     //修改学生信息
27     studentDao.UpdateStudent(student);
28 }
运行测试方法
可在控制台看到修改后的学生的信息

通过Navicat可以看到数据库中的内容已经被修改

4.测试删除学生功能
删除学生测试方法
1 /**
2   * 测试删除学生   */
3 @Test
4 public void DeleteStudentById() {
5     //删除学号为2的学生
6     studentDao.DeleteStudentById(2);
7 }
运行测试方法
通过Navicat可以看到数据库中的内容已经被修改
5、配置文件法进行CRUD
1.新建并编写StduentMapper.xml文件
在resources目录下新建mybatis文件夹,在mybatis文件夹下新建mapper文件夹,在mapper文件夹下新建StudentMapper.xml
 1 <?xml version="1.0" encoding="UTF-8" ?>
 2 <!DOCTYPE mapper
 3         PUBLIC "-//mybatis.org//DTD Mapper 3.0//EN"
 4         "http://mybatis.org/dtd/mybatis-3-mapper.dtd">
 5 <mapper namespace="com.example.demo3_dao.dao.StudentDao">
 6
 7     <!-- 新增学生 -->
 8     <insert id="AddStudent">
 9         INSERT INTO student(id,name,score,birthplace,birthday) VALUES (#{id},#{name},#{score},#{birthplace},#{birthday})
10     </insert>
11
12     <!-- 删除学生 -->
13     <delete id="DeleteStudentById">
14         DELETE FROM student WHERE id=#{id}
15     </delete>
16
17     <!-- 更新学生 -->
18     <update id="UpdateStudent">
19         UPDATE student SET name=#{name},score=#{score},birthplace=#{birthplace},birthday=#{birthday} WHERE id=#{id}
20     </update>
21
22     <!-- 查询某个学生 -->
23     <select id="FindStudentById" resultType="com.example.demo.domain.Student">
24         SELECT * FROM student WHERE id=#{id}
25     </select>
26
27     <!-- 查询所有学生 -->
28     <select id="FindAllStudent" resultType="com.example.demo.domain.Student">
29         SELECT * FROM student
30     </select>
31
32 </mapper>
2.在application.yaml文件中配置mybatis信息
1 #mybatis配置
2 mybatis:
3   #指定sql映射文件路径
4   mapper-locations: classpath:mybatis/mapper/*.xml
3.StudentDao.interface方法名与StduentMapper.xml中的id名要一一对应
如StduentDao.interface中新增学生
1 public void AddStudent(Student student);
StudentMapper.xml中新增学生
1 <!-- 新增学生 -->
2 <insert id="AddStudent">
3     INSERT INTO student(id,name,score,birthplace,birthday) VALUES (#{id},#{name},#{score},#{birthplace},#{birthday})
4 </insert>
此时StudentDao.interfeace内容为
 1 package com.example.demo3_dao.dao;
 2
 3 import com.example.demo3_dao.domain.Student;
 4 import org.apache.ibatis.annotations.*;
 5 import org.springframework.stereotype.Repository;
 6
 7 import java.util.List;
 8
 9 @Mapper
10 @Repository
11 public interface StudentDao {
12
13     /**
14      * 添加学生信息
15      * @param student
16      */
17     public void AddStudent(Student student);
18
19     /**
20      * 删除学生信息
21      * @param id
22      */
23     public void DeleteStudentById(Integer id);
24
25     /**
26      * 修改学生信息
27      * @param student
28      */
29     public void UpdateStudent(Student student);
30
31     /**
32      * 查找某个学生信息
33      * @param id
34      * @return
35      */
36     public Student FindStudentById(Integer id);
37
38     /**
39      * 查找所有学生信息
40      * @return
41      */
42     public List<Student> FindAllStudent();
43 }
本项目未编写controller层、service层等,就不具体实现其功能
可以从测试类中验证CRUD操作,与注解法类似,此处不再演示
1、目录结构
见 一、SpringBoot简介->4、SpringBoot项目->1.SpringBoot项目常见目录结构
2、层级简介
src/main/java/com/example/demo目录下
config是配置文件夹
controller是控制层文件夹
dao是数据访问层文件夹
domain是数据表对象层文件夹
service是业务层文件夹
src/main/resources文件夹下
mybatis是mybatis相关文件夹
sql是Mysql语句文件夹
static是静态资源文件夹
templates是模板文件夹
src/test目录下与测试相关
pom.xml与配置依赖相关
3、CRUD演示
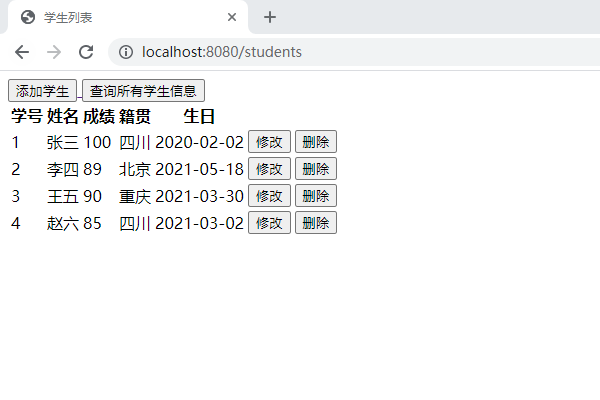
1.添加学生
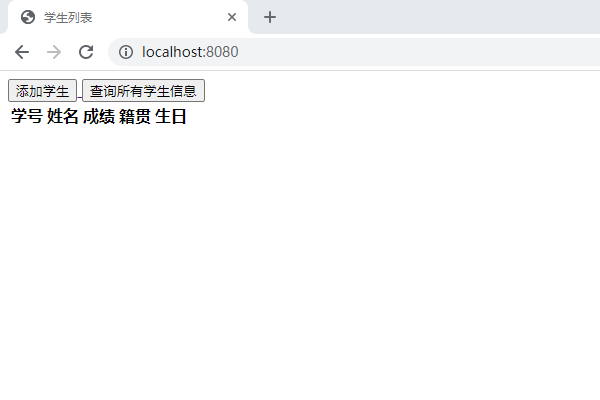
初始页面
进入添加页面并填写信息
点击添加按钮回到学生列表页面

此项目仅做了查询所有学生信息,点击“查询所有学生信息”按钮即可在学生列表页面看到所有学生信息
3.修改学生
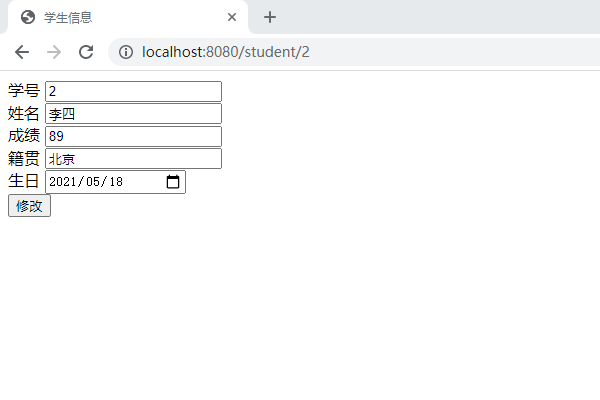
点击需要修改的学生信息右侧的修改按钮,此处选择修改2号学生,进入修改页面
点击修改按钮返回至学生列表页面
4.删除学生
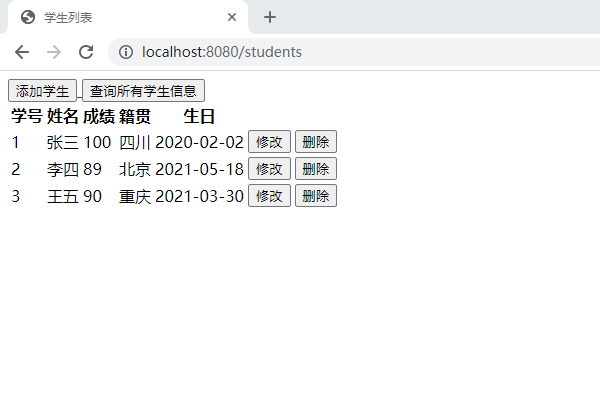
点击需要删除的学生信息右侧的删除按钮,此处选择删除4号学生,刷新学生列表页面
文章理论部分主要来自B站 尚硅谷SpringBoot顶尖教程(springboot之idea版spring boot) 及数篇其他博客 在此不一一说明出处