props,混入mixin,插件,elementui使用(重点),vuex,vue Router, localStorage系列
props,混入mixin,插件,elementui使用(重点),vuex,vue Router, localStorage系列
props
1.方式一:使用数组
props:['msg']
2.方式二:使用对象
props:[msg:String]
3.方式三:使用对象,默认值和必填
props:{
    msg:{
        type:String, // 类型
        required:true,  // 必要性
        default:'老张'   // 默认值
    }
}
混入mixin
可以把多个组件共同的配置提取成一个混入对象
使用方法:
第一步定义混入:
export const xiao = {
    data(){
        return{
            age:19
        }
    },
    methods:{
        showName(){
            alert(this.name);
        }
    },
    mounted(){
        console.log('那好,挂载正在执行')
    }
}
第二步:使用混入(全局)
<template>
<div class="home">
  <h3>混入的使用</h3>
  <button @click="showName">看名字</button>
  <h3>{{age}}</h3>
</div>
</template>

<script>
import {xiao} from '@/mixin'
export default {
  name: "index",
  data(){
    return{
      name:'张昕'
    }
  },
  mixins:[xiao]
}
</script>

全局混入:
在main.js中写入
import {hunhe} from "@/mixin";
Vue.mixin(hunhe)
第三步:使用混入(局部)
<template>
  <div class="home">
    <h1>混入的使用</h1>
    <button @click="showName">点我,看名字</button>
    <h2>{{age}}</h2>
  </div>
</template>
<script>
// 导入混入对象
import {lqz} from '@/mixin'

export default {
  name: 'HomeView',
  data() {
    return {
      name: '张昕'
    }
  },
  mixins: [lqz]
}
</script>

局部混入:
1.新建一个文件夹mixin
2.在mixin里新建一个index.js文件(使用index这个名字的话就是在导入的时候只需要导入到文件夹就可以了)
3.里面可以放一些公用的东西
4.export const hunhe = {
    methods:{
    handlePrintName(){
      alert(this.name)
    }
  },
}
5.在需要使用的地方只需要写入:
	import {hunhe} from "@/mixin";
	mixins:[hunhe,]  // 列表可以写多个
插件
功能:用于增强vue
本质:包含install方法的一个对象,install的第一个参数是Vue,第二个以后的参数是插件使用者传递的数据
import Vue from "vue";
import axios from "axios";
export default {
    install(vue,name) {
        console.log(name)
        console.log('执行了插件', vue)
        // 可以做的事
        // 1 了解,自定义指令(不了解没关系)
        Vue.directive("fbind", {
            //指令与元素成功绑定时(一上来)
            bind(element, binding) {
                element.value = binding.value;
            },
            //指令所在元素被插入页面时
            inserted(element, binding) {
                element.focus();
            },
            //指令所在的模板被重新解析时
            update(element, binding) {
                element.value = binding.value;
            },
        })

        // 2 定义全局变量,以后在任何组件中都可以使用到,借助于Vue.prototype往里放 ,以后所有组件只要this.$ajax  就是axios对象
        Vue.prototype.$name = '彭于晏'
        Vue.prototype.$add = (a, b) => {
            return a + b
        }
        Vue.prototype.$ajax=axios

        // 3 使用全局混入
         Vue.mixin({
            data() {
                return {
                    name: '彭于晏',
                    age: 19,
                };
            },
        });

        // 4 自定义全局组件
        // Vue.component('child',{
        //
        // })

    }
}
elementui使用(重点)
vue样式组件库:
vant ,element ,mintui ,materia vue ui,ant ui,iconic,iconfont.cn火箭
    -elementui        做网页端 样式用的多  vue2的 饿了吗团队开发的
    -elementui-plus   第三方团队继续基于vue3写的
    -vant             做app的样式
    -iview            pc端用www.iviewui.com

#  移动端用 vant,pc端用 elementui
elementui快速上手指南:https://blog.csdn.net/weixin_45525630/article/details/119383414
Vuex 的使用
	在Vue中实现集中式状态(数据)管理的一个Vue插件,对vue应用中多个组件的共享状态进行集中式的管理(读/写),也是一种组件间通信的方式,且适用于任意组件间通信。
	在Vue中实现集中式状态(数据)管理的一个Vue插件,对vue应用中多个组件的共享状态进行集中式的管理(读/写),也是一种组件间通信的方式,且适用于任意组件间通信
Vuex的使用流程
-status:存数据的地方,菜
-actions:中转站,服务员
-mutations:真正改state数据的地方,厨师
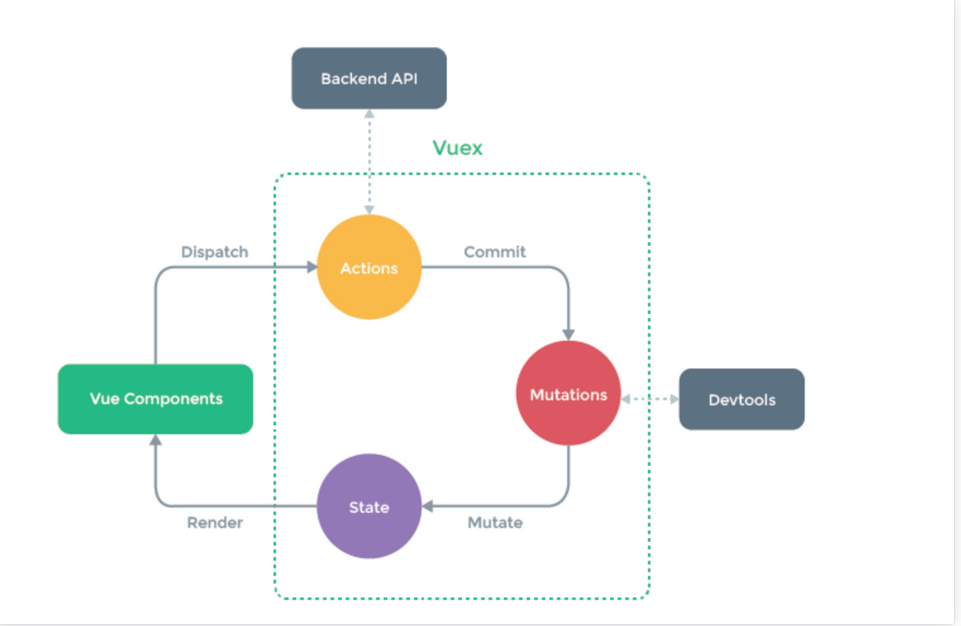
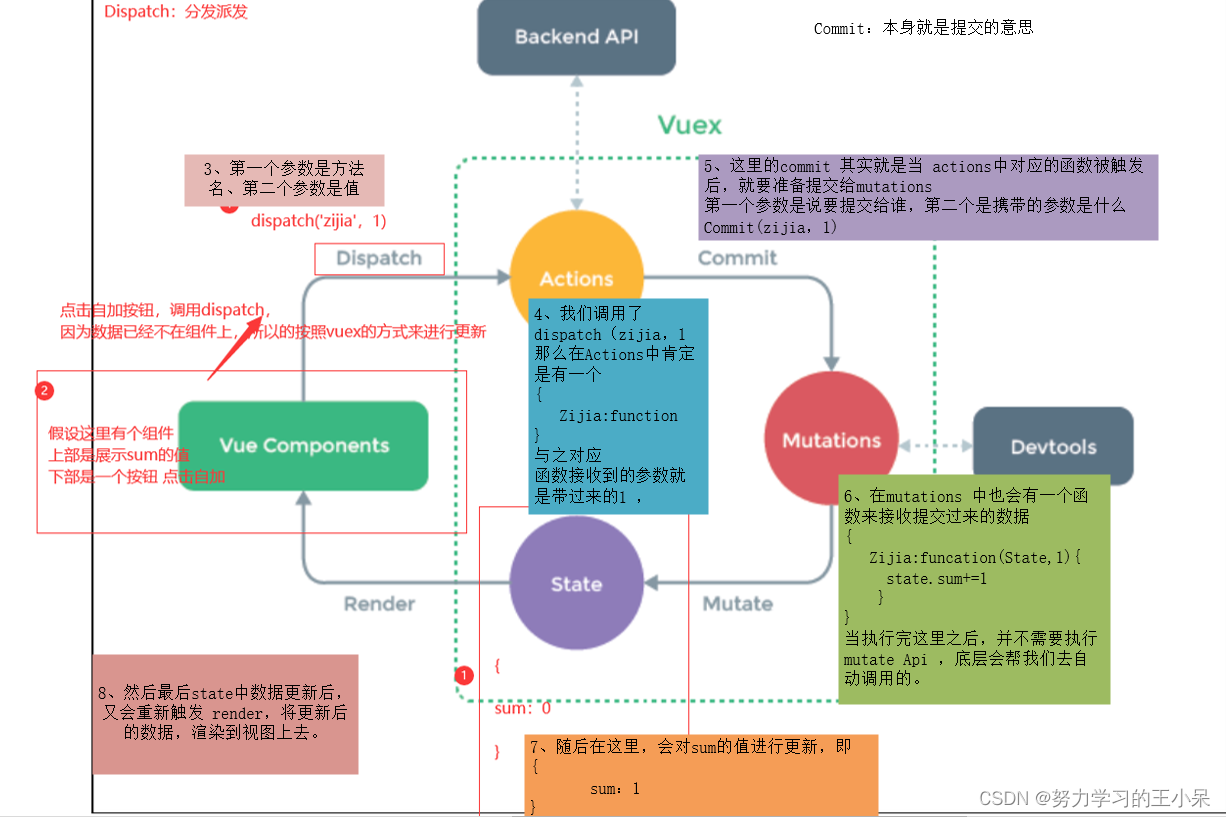
1 在state中定义变量
2 在组件中通过this.$store.dispatch('actions中定义的函数'),触发actions中得函数执行
3 在actions中得函数中,调用 context.commit('mutations中定义的函数')
4 在mutations中定义的函数实现真正的修改state中得数据
5 页面中只要使用$store.state.变量,变量变化,页面就变化  实现了组件间通信
6 注意:
      -在组件中可以直接调用commit触发【mutations中定义的函数】
      -在组件中可以直接修改state中定义变量
Vue-router的使用
官方提供的用来实现SPA 的vue 插件:有了它以后,我们可以写很多页面组件,通过地址栏不同的路径显示不同的页面组件
https://router.vuejs.org/zh/index.html
基本使用
1 新建router/index.js
    const routes = [配置路由1,配置路由2]
2 main.js中使用:之前已经写好了
    import router from './router'
    new Vue({
        ...
          router,
        ...
        }).$mount('#app')

3 只需要写页面组件,配置路由即可
4 在App.vue中加入
    <router-view>  // 用来显示当前路由组件界面

    </router-view>
5 在浏览器访问const routes中配置的路径,就能看到对应的页面组件了
路由的跳转
在html中使用
    <router-link :to="path">去登录</router-link>

在js中使用
    this.$router.push('goods')
路由跳转携带参数
# 两种情况
    -带在请求地址中以 ?name=lqz&age=19
    -在地址中类似于django的分组  /goods/1/


# 情况1:请求地址中
    -<router-link to="/login/?name=lqz&age=19">去登录</router-link>
    -组件中接受:this.$route.query.取

# 情况2:地址中
    <router-link to="/login/lyf">去登录</router-link>
    -组件中接受:this.$route.params.取
区分this.$route this.$router
this.$router #   new VueRouter对象,实例,可以实现路由的跳转
this.$route  #   是当前路由对象,内部有传入的参数
路由嵌套
1 router/index.js 相应的路由中
    {
        path: '/goods',
        name: 'goods',
        component: Goods,
        children: [
            {
                path: 'list',
                component: GoodList
            },
            {
                path: 'detail',
                component: GoodDetail
            }
        ]
    },
2 必须要在Goods组件中,写<router-view></router-view>
3 使用router-link标签跳转
4 只会变更Goods下router-view包裹的位置
相关API
this.$router.push(path): 相当于点击路由链接(可以返回到当前路由界面)
this.$router.replace(path): 用新路由替换当前路由(不可以返回到当前路由界面)
this.$router.back(): 请求(返回)上一个记录路由
this.$router.go(-1): 请求(返回)上一个记录路由
this.$router.go(1): 请求下一个记录路由
路由守卫
作用:对路由进行权限控制
# 前置路由守卫
router.beforeEach((to, from, next) => {
    console.log('前置路由守卫', to, from)

    if (to.name == 'shoppingcart') {
        let name = localStorage.getItem('name')
        if (name) {
            next()
        } else {
            alert('不好意思没有权限')
        }
    } else {
        next()
    }

})
# 后置路由守卫
router.afterEach((to,from)=>{
    console.log('后置路由守卫',to,from)
    document.title = to.name
})
全局守卫
// 该文件专门用于创建整个应用的路由器
import VueRouter from 'vue-router'
//引入组件
import About from '../pages/About'
import Home from '../pages/Home'
import News from '../pages/News'
import Message from '../pages/Message'
import Detail from '../pages/Detail'

//创建并暴露一个路由器
const router =  new VueRouter({
	routes:[
		{
			name:'guanyu',
			path:'/about',
			component:About,
			meta:{title:'关于'}
		},
		{
			name:'zhuye',
			path:'/home',
			component:Home,
			meta:{title:'主页'},
			children:[
				{
					name:'xinwen',
					path:'news',
					component:News,
					meta:{isAuth:true,title:'新闻'}
				},
				{
					name:'xiaoxi',
					path:'message',
					component:Message,
					meta:{isAuth:true,title:'消息'},
					children:[
						{
							name:'xiangqing',
							path:'detail',
							component:Detail,
							meta:{isAuth:true,title:'详情'},

							//props的第一种写法,值为对象,该对象中的所有key-value都会以props的形式传给Detail组件。
							// props:{a:1,b:'hello'}

							//props的第二种写法,值为布尔值,若布尔值为真,就会把该路由组件收到的所有params参数,以props的形式传给Detail组件。
							// props:true

							//props的第三种写法,值为函数
							props($route){
								return {
									id:$route.query.id,
									title:$route.query.title,
									a:1,
									b:'hello'
								}
							}

						}
					]
				}
			]
		}
	]
})

//全局前置路由守卫————初始化的时候被调用、每次路由切换之前被调用
router.beforeEach((to,from,next)=>{
	console.log('前置路由守卫',to,from)
	if(to.meta.isAuth){ //判断是否需要鉴权
		if(localStorage.getItem('name')==='lqz'){
			next()
		}else{
			alert('名不对,无权限查看!')
		}
	}else{
		next()
	}
})

//全局后置路由守卫————初始化的时候被调用、每次路由切换之后被调用
router.afterEach((to,from)=>{
	console.log('后置路由守卫',to,from)
	document.title = to.meta.title || 'lqz系统'
})

export default router
localStorage系列
localStorage和sessionStorage和cookies
window 浏览器对象有的东西,如果想在浏览器中存储数据,永久存储,关闭页面数据就没了(临时存储),设定一个时间,到时候就过期
永久存储:localStorage  不登录加购物车,关闭浏览器,购物车里面的东西依然在
临时存储:sessionStorage  关闭页面数据就没有了
设定一个时间,到时间就过期:cookies
localStorage
<template>
  <div id="app">
    <h1>localStorage操作</h1>
    <button @click="saveStorage">点我向localStorage放数据</button>
    <button @click="getStorage">点我获取localStorage数据</button>
    <button @click="removeStorage">点我删除localStorage放数据</button>
  </div>
</template>
<script>
import cookies from 'vue-cookies'

export default {
  name: 'App',
  data() {
    return {}
  },
  methods: {
    saveStorage() {
      var person = {
        name: '彭于晏',
        age: 38
      }
      localStorage.setItem('userinfo', JSON.stringify(person))
    },
    getStorage() {
      let userinfo = localStorage.getItem('userinfo')
      console.log(userinfo)
      console.log(typeof userinfo)
    },
    removeStorage() {
      // localStorage.clear()
      localStorage.removeItem('userinfo')
    },
}
</script>

<style scoped>
h1 {
  background-color: aqua;
}
</style>
sessionStorage
<template>
  <div id="app">
    <h1>sessionStorage操作</h1>
    <button @click="saveSessionStorage">点我向localStorage放数据</button>
    <button @click="getSessionStorage">点我获取localStorage数据</button>
    <button @click="removeSessionStorage">点我删除localStorage放数据</button>
  </div>
</template>
<script>
import cookies from 'vue-cookies'

export default {
  name: 'App',
  data() {
    return {}
  },
  methods: {
    saveSessionStorage() {
      var person = {
        name: '彭于晏',
        age: 38
      }
      sessionStorage.setItem('userinfo', JSON.stringify(person))
    },
    getSessionStorage() {
      let userinfo = sessionStorage.getItem('userinfo')
      console.log(userinfo)
      console.log(typeof userinfo)
    },
    removeSessionStorage() {
      // localStorage.clear()
      sessionStorage.removeItem('userinfo')
    },
}
</script>

<style scoped>
h1 {
  background-color: aqua;
}
</style>
cookies
npm install vue-cookies

<template>
  <div id="app">
    <h1>cookie操作</h1>
    <button @click="saveCookie">点我向cookie放数据</button>
    <button @click="getCookie">点我获取cookie数据</button>
    <button @click="removeCookie">点我删除cookie放数据</button>
  </div>
</template>
<script>
import cookies from 'vue-cookies'

export default {
  name: 'App',
  data() {
    return {}
  },
  methods: {
    saveCookie() {
      cookies.set('name','zxr','7d')  // 按秒计
    },
    getCookie() {
      console.log(cookies.get('name'))
    },
    removeCookie() {

      cookies.remove('name')
    }
  }
}
</script>
<style scoped>
h1 {
  background-color: aqua;
}
</style>
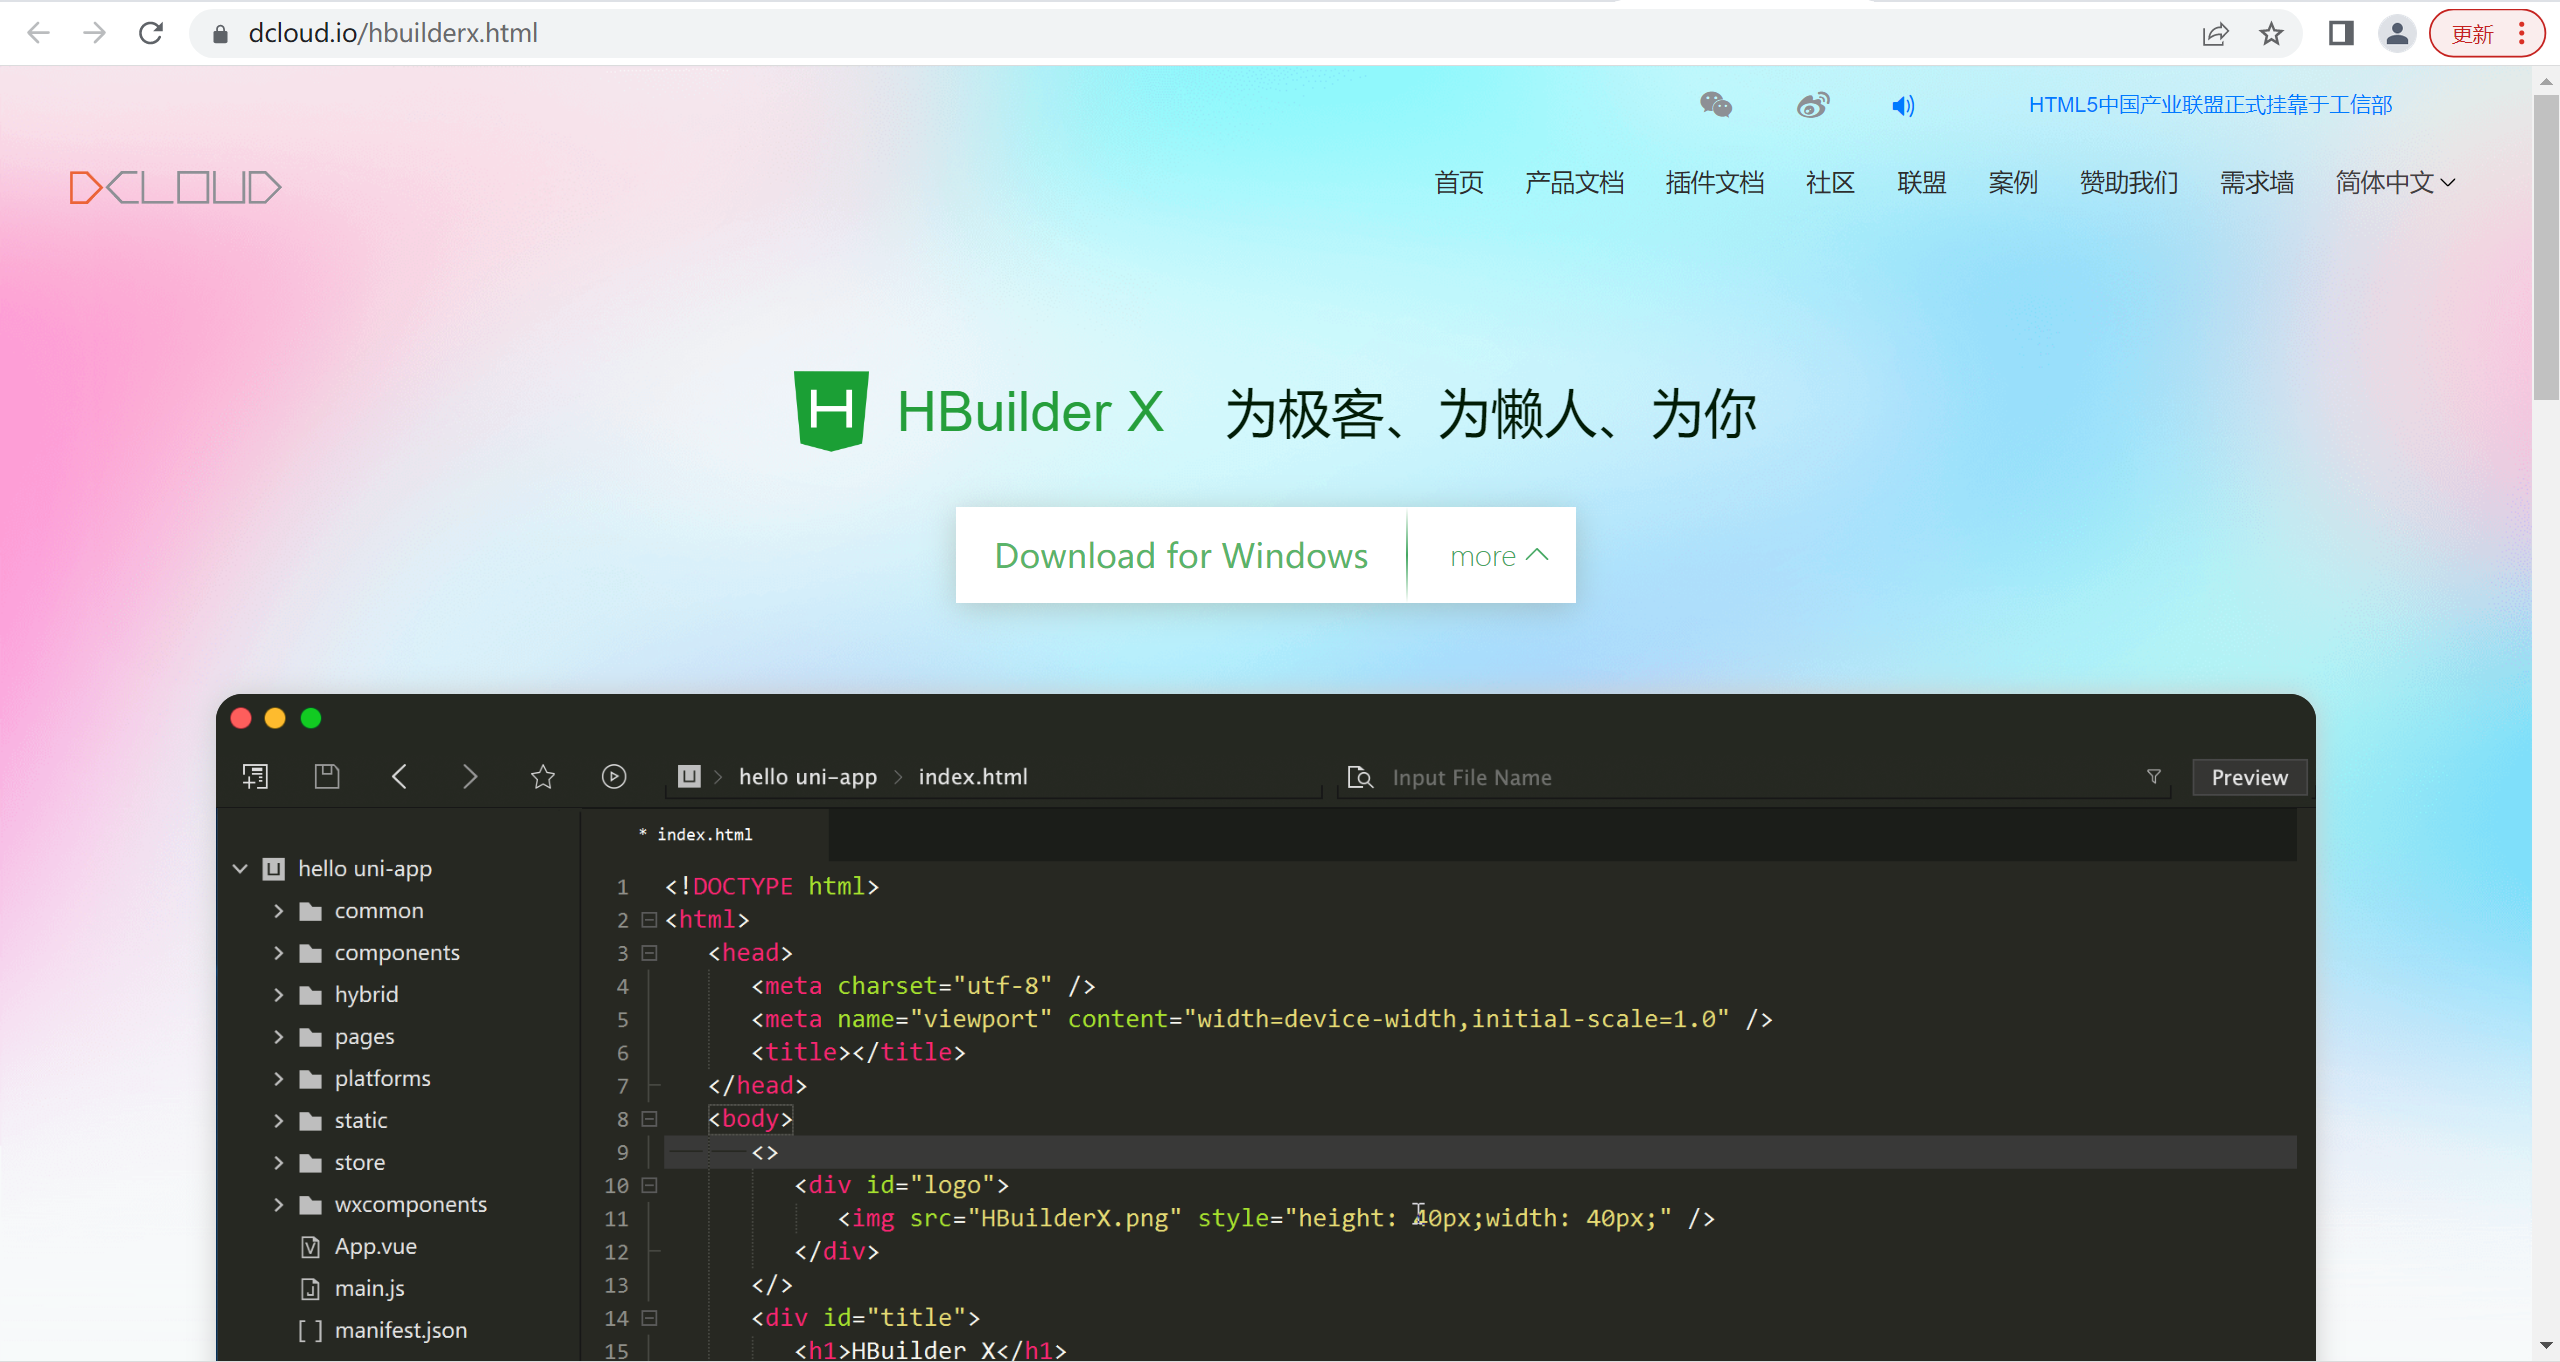
HBuilderX
HBuilder是DCloud(数字天堂)推出的一款支持HTML5的Web开发IDE。HBuilder的编写用到了Java、C、Web和Ruby。HBuilder本身主体是由Java编写。快,是HBuilder的最大优势,通过完整的语法提示和代码输入法、代码块等,大幅提升HTML、js、css的开发效率。