linux下capabilities 应用实例
书接上两回,本文的目的就是想要通过几个实例应用,再次加深一下对于capabilities这种权限控制机制的理解。以便于后续的学习。
为可执行文件分配capabilities
环境Ubuntu22.04、centos7
我们还是以ping程序作为例子进行讲解,我们之前了解到由于ping具有自我感知能力,即就是可以自行将p集合中的权限移动到e集合中,用于程序执行。我们先来验证这一点:
1.查看ping的权限
root@ubuntubstone:~# which ping
/usr/bin/ping
root@ubuntubstone:~# ll /usr/bin/ping
-rwxr-xr-x 1 root root 76672  2月  5  2022 /usr/bin/ping*

root@ubuntubstone:~# getcap /usr/bin/ping
/usr/bin/ping cap_net_raw=ep
我们清楚的看到,22.04版本下早已废弃了先前的suid的赋权方式,转为capabilities的赋权模式,但是此处赋权为ep,我们对其进行进一步测试
2.删除ping的ep权限,测试普通用户是否可以进行操作
root@ubuntubstone:~# setcap cap_net_raw-ep /usr/bin/ping
root@ubuntubstone:~# getcap /usr/bin/ping
/usr/bin/ping =
到这里我们是很费解的,明明没有任何权限,但是却可以ping通?这很离谱。经过查询一些资料,这里可能是由于在新版的Ubuntu里面对ping程序做了优化,内置了权限,从而使得它可以不需要赋权进行使用。
此时我们只得更换操作系统进行测试,这次使用centos7
#权限分配方式和Ubuntu很像,但是在ping这里仅仅添加了p集合
[root@blackstone ~]# which ping
/bin/ping
[root@blackstone ~]# ll /bin/ping
-rwxr-xr-x. 1 root root 66176 Aug  4  2017 /bin/ping
[root@blackstone ~]# getcap /bin/ping
/bin/ping = cap_net_admin,cap_net_raw+p
#尝试去除p权限测试普通用户的使用情况
[root@blackstone ~]# setcap cap_net_raw-p /bin/ping
[root@blackstone ~]# getcap /bin/ping
/bin/ping =

[batman@blackstone ~]$ ping www.baidu.com
ping: socket: Operation not permitted
3.权限归还继续测试
此时,就出现了因为权限不足导致无法运行,我们把权限再添加回去
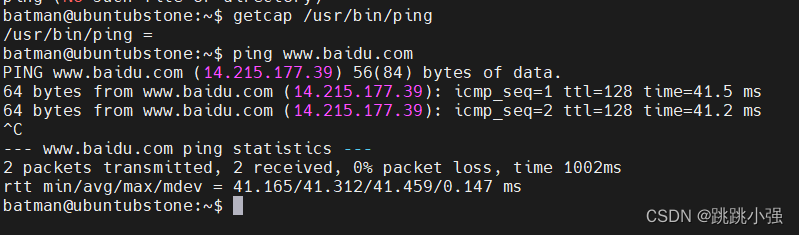
[root@blackstone ~]# setcap cap_net_raw+p /bin/ping
[root@blackstone ~]# getcap /bin/ping
/bin/ping = cap_net_raw+p

查看运行时的权限:
[batman@blackstone ~]$ ping www.baidu.com > /dev/null&
[1] 33822
[batman@blackstone ~]$ grep Cat /proc/33822/status
[batman@blackstone ~]$ grep Cap /proc/33822/status
CapInh: 0000000000000000
CapPrm: 0000000000002000
CapEff: 0000000000000000
CapBnd: 0000001fffffffff
CapAmb: 0000000000000000
[batman@blackstone ~]$ capsh --decode=0000000000002000
0x0000000000002000=cap_net_raw
此时发现了,普通用户在运行ping时,仅仅保有p集合中的capabilitie,而并未在e中添加。为什么可以运行呢?原因其实是该程序具有自我感知能力.
其实 ping 在执行过程中会将 Permitted 集合中的 CAP_NET_RAW capabilities 加入 Effective 集合中,打开 Socket 之后再将该 capabilities 从 Effective 集合中移除,所以 grep 是看不到的。
这里使用strace跟踪系统调用可以大致看到这一过程:
[batman@blackstone ~]$ sudo strace ping www.baidu.com -c 1

4.总结
感知能力说白了就是程序能够自己将P集合中的权限移动到自己的E集合中去进行使用,即拥有capset()和capget()的能力。但是针对于无法使用感知能力的程序我们在进行权限分配时,一定要同时给到ep集合中去,这在先前的权限变化表中有所体现:
P’(effective) = F(effective) ? P’(permitted) : P’(ambient)
利用capabilities构建半特权环境
前文中只用到了 Permitted 和 Effective 集合,下面再来聊聊 Ambient 和 Inheritable 集合。这两个集合的意义就在于可以帮助我们在进程树的 namespace 的范围内创建一个允许任意进程使用某些 capabilities 的环境。
例如,我们可以在 Ambient 集合中加入 CAP_NET_BIND_SERVICE capabilities 来创建一个可以绑定到 80 端口的 “webserver” 环境,不需要额外的 capabilities,也不需要以 root 用户身份运行。webserver 可以通过解释器或辅助脚本启动,并且不需要给可执行文件设置 capabilities。如果不明白为什么,再看十分钟这两个公式:
P’(ambient) = (file is privileged) ? 0 : P(ambient)
P’(effective) = F(effective) ? P’(permitted) : P’(ambient)
解释:我们把权限给到特权环境进程手里,即就是这里的P(ambient)有了程序运行所需的权限,那么此时即使文件没有开启E,我们依旧可以从环境进程中获取我们要的权限。
这里有国外的专业人士写的一份C程序 set_ambient,核心功能是使用 cap-ng library 将 CAP_NET_BIND_SERVICE capabilities 添加到新进程的 Ambient 集合中。编译完成后,需要给二进制文件添加该 capabilities(我们需要半特权环境具有的权限),如果它自己没有这个 capabilities,是无法将其添加到新进程中的:
1.获取所需程序
这里的源程序帮大家收集好了:
/*
 * Simple program to start the given process with CAP_NET_BIND_SERVICE in the
 * ambient capabilities.
 *
 * Based on test program by Christoph Lameter.
 *
 * (C) 2015 Christoph Lameter <cl@linux.com>
 * (C) 2019 Adrian Mouat <adrian.mouat@container-solutions.com>
 *
 * Released under: GPL v3 or later.
 *
 *
 * Compile using:
 *
 *      gcc ./set_ambient.c -o set_ambient -lcap-ng
 *
 * (requires cap-ng headers, which is in libcap-ng-dev in debian)
 *
 * This program must have the CAP_NET_BIND_SERVICE capability in the permitted
 * set to run properly.
 *
 * This can be set on the file with:
 *
 *	sudo setcap cap_net_bind_service+p set_ambient
 *
 * To get a shell with CAP_NET_BIND_SERVICE that can be inherited by other
 * processes:
 *
 *	./set_ambient /bin/bash
 *
 * Verifying that it works:
 *
 * From the bash spawed by set_ambient run
 *
 *	cat /proc/$$/status
 *
 * and have a look at the capabilities (use capsh --decode to interpret the
 * hex).
 */

#include <stdlib.h>
#include <stdio.h>
#include <errno.h>
#include <cap-ng.h>
#include <sys/prctl.h>
#include <linux/capability.h>

/*
 * Definitions from the kernel header files. These are going to be removed
 * when the /usr/include files have these defined.
 *
 * AM: This should be updated, I was just being lazy.
 */
#define PR_CAP_AMBIENT 47
#define PR_CAP_AMBIENT_IS_SET 1
#define PR_CAP_AMBIENT_RAISE 2
#define PR_CAP_AMBIENT_LOWER 3
#define PR_CAP_AMBIENT_CLEAR_ALL 4

static void set_ambient_cap(int cap)
{
	int rc;

	capng_get_caps_process();
	rc = capng_update(CAPNG_ADD, CAPNG_INHERITABLE, cap);
	if (rc) {
		printf("Cannot add inheritable cap\n");
		exit(2);
	}
	capng_apply(CAPNG_SELECT_CAPS);

	/* Note the two 0s at the end. Kernel checks for these */
	if (prctl(PR_CAP_AMBIENT, PR_CAP_AMBIENT_RAISE, cap, 0, 0)) {
		perror("Cannot set cap");
		exit(1);
	}
}

int main(int argc, char **argv)
{
	int rc;

	set_ambient_cap(CAP_NET_BIND_SERVICE);

	printf("Starting process with CAP_NET_BIND_SERVICE in ambient\n");
	if (execv(argv[1], argv + 1))
		perror("Cannot exec");

	return 0;
}
程序编译:
#1.安装依赖库---本文件依赖libcap-ng-devel库
#https://pkgs.org/download/libcap-ng-devel
#选择对应的系统,可以查看到对应的包名,对此进行下载就行

yum install libcap-ng-devel

#编译
 gcc ./set_ambient.c -o set_ambient -lcap-ng
2.程序授权以及运行
2.1 程序授权
[batman@blackstone ~]$ sudo setcap cap_net_bind_service+p set_ambient
[sudo] password for batman:
[batman@blackstone ~]$ getcap ./set_ambient
./set_ambient = cap_net_bind_service+p
2.2 程序运行
[batman@blackstone ~]$ ./set_ambient /bin/bash
Starting process with CAP_NET_BIND_SERVICE in ambient

[batman@blackstone ~]$ grep Cap /proc/$BASHPID/status
CapInh: 0000000000000400
CapPrm: 0000000000000400
CapEff: 0000000000000400
CapBnd: 0000001fffffffff
CapAmb: 0000000000000400

[batman@blackstone ~]$ capsh --decode=0000000000000400
0x0000000000000400=cap_net_bind_service
可以看到 CAP_NET_BIND_SERVICE capabilities 被添加到 bash 环境的 Ambient 集合中,同时也会添加到 Permitted 和 Inheritable 集合中,
3.尝试半特权模式下运行go web服务
这里使用go做测试:安装go的教程
这里测试的还是国外专业人士的Go Web 服务
同样,给大家写到这里:
package main

// Simple webserver that responds to http request on port 80.

// Based on web server code in https://golang.org/doc/articles/wiki/

import (
    "fmt"
    "log"
    "net/http"
)

func handler(w http.ResponseWriter, r *http.Request) {
    fmt.Fprintf(w, "Successfully serving on port 80\n")
}

func main() {
    http.HandleFunc("/", handler)
    log.Fatal(http.ListenAndServe(":80", nil))
}
编译运行:
[batman@blackstone ~]$ go build server.go
[batman@blackstone ~]$ ./server
2022/11/23 03:17:48 listen tcp :80: bind: permission denied
可以看到,此时的权限并不允许我们访问80端口,那么此时启动半特权环境
[batman@blackstone ~]$ ./set_ambient /bin/bash
Starting process with CAP_NET_BIND_SERVICE in ambient
[batman@blackstone ~]$ ./server
Successfully serving on port 80
4.半特权环境中运行python
#1.普通用户正常运行尝试绑定80端口
[batman@blackstone ~]$ python3 -m http.server 80
...
PermissionError: [Errno 13] Permission denied

#2.启动半特权环境运行
[batman@blackstone ~]$ ./set_ambient /bin/bash
Starting process with CAP_NET_BIND_SERVICE in ambient
[batman@blackstone ~]$ python3 -m http.server 80
Serving HTTP on 0.0.0.0 port 80 (http://0.0.0.0:80/) ...
5.总结
最后讲一下 Inheritable 与 Ambient 集合的区别,如果想使用 Inheritable 达到上述目的,需要将 CAP_NET_BIND_SERVICE capabilities 添加到 Go web 服务可执行文件的 Inheritable 集合中,同时还需要开启 Effective 标志位。
看起来很有道理,但有一个问题:如果可执行文件的有效用户是普通用户,且没有 Inheritable 集合,即 F(inheritable) = 0,那么 P(inheritable) 将会被忽略(P(inheritable) & F(inheritable))。由于绝大多数可执行文件都是这种情况,因此 Inheritable 集合的可用性受到了限制。
容器中的capabilities应用
本小节我们需要使用作者做好的镜像对docker容器中的capabilities进行一个简单的测试,并从中总结出容器中如何安全的运行一些服务。
1.容器中的capabilities
我们尝试拉取镜像,在其内部查看相关capabilities
[root@blackstone ~]# docker run -it amouat/caps

root@78b1e225dff0:/# capsh --print
Current: = cap_chown,cap_dac_override,cap_fowner,cap_fsetid,cap_kill,cap_setgid,cap_setuid,cap_setpcap,cap_net_bind_service,cap_net_raw,cap_sys_chroot,cap_mknod,cap_audit_write,cap_setfcap+eip
Bounding set =cap_chown,cap_dac_override,cap_fowner,cap_fsetid,cap_kill,cap_setgid,cap_setuid,cap_setpcap,cap_net_bind_service,cap_net_raw,cap_sys_chroot,cap_mknod,cap_audit_write,cap_setfcap
Securebits: 00/0x0/1'b0
 secure-noroot: no (unlocked)
 secure-no-suid-fixup: no (unlocked)
 secure-keep-caps: no (unlocked)
uid=0(root)
gid=0(root)
groups=
root@78b1e225dff0:/# grep Cap /proc/$$/status
CapInh: 00000000a80425fb
CapPrm: 00000000a80425fb
CapEff: 00000000a80425fb
CapBnd: 00000000a80425fb
CapAmb: 0000000000000000
和宿主机还是有些区别的,容器中的 root 用户并没有包含所有的 capabilities,比如 SYS_TIME。如果你可以在容器中修改系统时间,那么宿主机和其他容器中的系统时间都会被改变。但是其权限分布却遍布了IPEB四个集合。
另外需要注意的是,容器中的 Ambient 集合是空的,目前在 Docker 和 Kubernetes 中还无法配置 Ambient 集合,过在底层的 runc 运行时中是可以配置的。
当我们指定用户运行docker容器时,又会是另一种结果:
[root@blackstone ~]# docker run -it --user=nobody amouat/caps
nobody@10916a3d5710:/$ grep Cap /proc/$$/status
CapInh: 00000000a80425fb
CapPrm: 0000000000000000
CapEff: 0000000000000000
CapBnd: 00000000a80425fb
CapAmb: 0000000000000000
Permitted 和 Effective 集合被清空了,从 root 用户切换到普通用户, Permitted 和 Effective 集合中的 capabilities 都会被清空。
2.在普通用户的docker下运行程序
可以通过将 capabilities 添加到可执行文件的 Inheritable 集合中,同时开启 Effective 标志位来使一些程序获得它的最小权限。amouat/caps 已经包含了一个具备此条件的可执行文件,可以用来测试一下:
#1.查看docker镜像内的文件,其确实已经有了ie集合
[root@blackstone ~]# docker run --user nobody amouat/caps getcap /inh_server
/inh_server = cap_net_bind_service+ei

#2.尝试运行将其80端口映射到8000本地端口
[root@blackstone ~]# docker run -d -p 8000:80 --user nobody amouat/caps /inh_server
4efabd5d6cc0e3f57307acbc7953f44d4a377210d590ae11160ccf9d6dbad5bb

#3.进行测试
[root@blackstone ~]# curl localhost:8000
Successfully serving on port 80
总结:程序提前对应权限给到ie,在放进去
3.容器中半特权环境的构建
我们如果想要在容器中使用我们之前的set_ambient程序创建一个半特权环境的话我们可以这样做:
#将set程序放到容器内部进行运行即可,作者已经事先放了进去,
#当然这看起来确实有点麻烦

#1.测试普通情况
[root@blackstone ~]# docker run -p 8000:80 --user nobody amouat/caps /server
2022/11/23 10:08:21 listen tcp :80: bind: permission denied

#2.使用了set_ambient程序后
[root@blackstone ~]# docker run -d -p 8000:80 --user nobody amouat/caps /set_ambient /server
86c8c695e690aefd1b3186fd7922b5155c013310939ca09926a2c31d486314ef
[root@blackstone ~]# curl localhost:8000
Successfully serving on port 80
总结:往内部放一个set_ambient程序,也是提前给好权限。capabilities+p即可
4.正常选手的安全运行操作
前面几种做法,无疑过分复杂,作为专业的docker软件,自身就提供了相应的参数用于capabilities的控制。我们来看看:
4.1 用参数放开容器的capabilities
在容器中限制 capabilities 最简单最常见的方法是 --cap-drop 和 --cap-add 参数,这些参数只会影响所有用户的 Bounding 集合,包括 root 用户。安全的做法是移除所有的 capabilities,只添加需要的 capabilities,比如:
#1.仅放开net_bind的capabilities
[root@blackstone ~]# docker run --cap-drop all --cap-add NET_BIND_SERVICE -it amouat/caps capsh --print
Current: = cap_net_bind_service+eip
Bounding set =cap_net_bind_service
Securebits: 00/0x0/1'b0
 secure-noroot: no (unlocked)
 secure-no-suid-fixup: no (unlocked)
 secure-keep-caps: no (unlocked)
uid=0(root)
gid=0(root)
groups=

#2.放开capabilities运行http服务
[root@blackstone ~]# docker run --cap-drop all --cap-add NET_BIND_SERVICE \
> -d -p 8000:80 --user nobody amouat/caps /set_ambient /server
f7fca473cad4d42407b73941803c04760c75bde1a842504b27b8c50011fd4b80

[root@blackstone ~]# curl localhost:8000
Successfully serving on port 80
现在容器中的进程只有单一的 NET_BIND_SERVICE capabilities,并且是以非 root 用户身份运行的。即使容器的进程被黑客攻击,攻击者只会拥有有限的文件系统权限,无法施展拳脚。
4.2 no_new_privileges
Docker 中还有一个选项可以防止容器中的用户获得新的 capabilities,它可以有效阻止攻击者提升权限来避免受到攻击,同时也阻止了在容器中执行 set_ambient 程序。例如:
[root@blackstone ~]# docker run -p 8000:80 --security-opt=no-new-privileges:true \
> --user nobody amouat/caps /set_ambient /server
Cannot set cap: Operation not permitted
我们可以看到,no_new_privileges直接阻断了我们使用set_ambient创建半特权环境,要了解这其中的原因我们还得在浅浅了解一下no_new_privileges这个东西。
一般情况下,
execve()系统调用能够赋予新启动的进程其父进程没有的权限,最常见的例子就是通过setuid和setgid来设置程序进程的 uid 和 gid 以及文件的访问权限。这就给不怀好意者钻了不少空子,可以直接通过 fork 来提升进程的权限,从而达到不可告人的目的。为了解决这个问题,Linux 内核从 3.5 版本开始,引入了
no_new_privs属性(实际上就是一个 bit,可以开启和关闭),提供给进程一种能够在execve()调用整个阶段都能持续有效且安全的方法。
- 开启了
no_new_privs之后,execve 函数可以确保所有操作都必须调用execve()判断并赋予权限后才能被执行。这就确保了线程及子线程都无法获得额外的权限,因为无法执行 setuid 和 setgid,也不能设置文件的权限。- 一旦当前线程的
no_new_privs被置位后,不论通过 fork,clone 或 execve 生成的子线程都无法将该位清零。
Docker 中可以通过参数 --security-opt 来开启 no_new_privs 属性,例如:docker run --security-opt=no_new_privs busybox。下面通过一个例子来体会一下 no_new_privs 属性的作用。
1.先写一段c代码用于显示当前的uid
#include <stdio.h>
#include <unistd.h>
#include <sys/types.h>

int main(int argc, char *argv[])
{
        printf("Effective uid: %d\n", geteuid());
        return 0;
}
对其进行编译:
[batman@blackstone nonewp]$ make testnp.c
make: Nothing to be done for `testnp.c'.
[batman@blackstone nonewp]$ gcc testnp.c -o testnnp
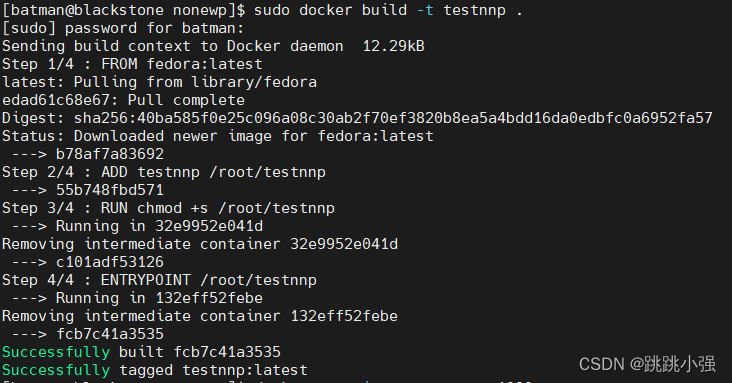
2.创建dockerfile,将可执行文件放入镜像中
[batman@blackstone nonewp]$ cat dockerfile
FROM fedora:latest
ADD testnnp /root/testnnp
RUN chmod +s /root/testnnp
ENTRYPOINT /root/testnnp
3.构建镜像进行测试
[batman@blackstone nonewp]$ sudo docker build -t testnnp .
先在没有开启 no-new-privileges 的情况下启动容器:
[batman@blackstone nonewp]$ sudo docker run -it --rm --user=1000  testnnp
Effective uid: 0
可以看到,该文件明显是在使用root权限运行。只要给可执行文件设置了 SUID 标识,即使我们使用普通用户(UID=1000)来运行容器,进程的有效用户也会变成 root。
接着在开启 no-new-privileges 的前提下启动容器,以防止执行设置了 SUID 标识的可执行文件进行 UID 转换:
[batman@blackstone nonewp]$ sudo docker run -it --rm --user=1000 --security-opt=no-new-privileges testnnp
Effective uid: 1000
此时,由于no-new-privileges的存在,已经限制住了可执行文件获取到root权限了。
可以看到,开启了 no_new_privs 属性之后,即使可执行文件设置了 SUID 标识,线程的有效用户 ID 也不会变成 root。这样即使镜像中的代码有安全风险,仍然可以通过防止其提升权限来避免受到攻击。
5.总结
按照作者的话来说:“我的最终建议是:移除所有非必要的 capabilities,并以非 root 身份运行。 使用 Ambient 集合与可执行文件的 capabilities 进行逻辑运算可以得到一个相对安全的容器环境,大部分情况下应该不需要使用 set_ambient 这样的辅助程序。”
总的来说,对于容器中运行的程序我们如果想让其安全稳定的运行,就需要让其所拥有的权限最小化,不能直接赋予过大的权限。那会导致很大的安全隐患。