1.什么是虚拟主机?
虚拟主机(英语:virtual hosting)或称 共享主机(shared web hosting),又称虚拟服务器,是一种在单一主机或主机群上,实现多网域服务的方法,可以运行多个网站或服务的技术。虚拟主机之间完全独立,并可由用户自行管理,虚拟并非指不存在,而是指空间是由实体的服务器延伸而来,其硬件系统可以是基于服务器群,或者单个服务器。
主流的操作有三种:
- 基于IP的虚拟主机
- 基于域名的虚拟主机
- 基于端口的虚拟主机
2.apache配置虚拟主机
演示环境:centos7
启动apache时可以用以下命令排查80端口占用情况:
[root@blackstone ~]# netstat -antlp | grep 80
使用此命令可以强制停止占用进程
[root@blackstone ~]# kill -9 33396
2.1 apache适配php环境
httpd主配置文件是/etc/httpd/conf/httpd.conf
直接编辑配置文件:
vim /etc/httpd/conf/httpd.conf
修改以下4个地方:
1.去掉ServerName那一行最前的注释
2.“Require all denied” 中denied改为granted,如果不改有时会拒绝访问(返回403)
3.在AddType开头的那几行下面添加一行:“AddType application/x-httpd-php .php”
4.在“DirectoryIndex index.html”后面添加“ index.php”
重启服务
[root@blackstone html]# systemctl restart httpd
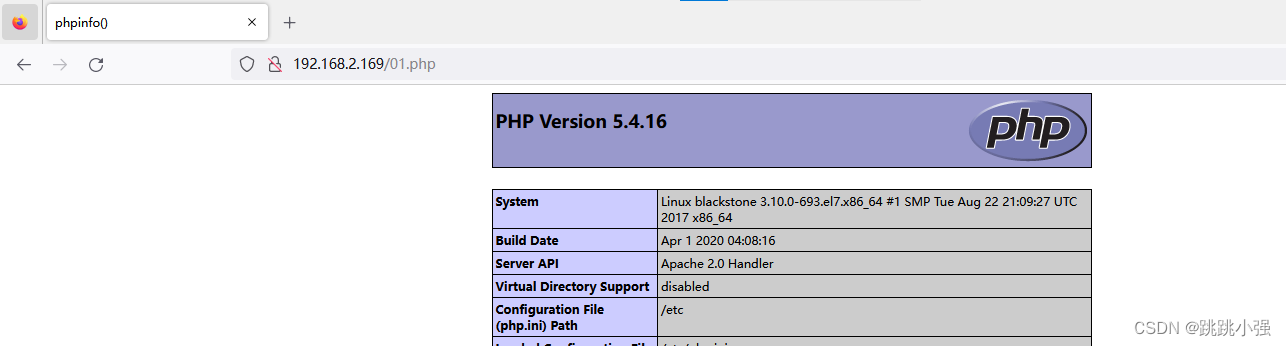
尝试向根目录下写入php文件测试访问情况:
[root@blackstone html]# cat 01.php
<?php phpinfo();
2.2 基于IP的虚拟主机
1.创建虚拟网卡的链接,并为其添加两个IP地址
#注意这里网卡硬件名称的一致性,使用nmcli connection device查看
[root@blackstone html]# nmcli connection add ifname ens33 con-name ens33-tes type ethernet
Connection 'ens33-tes' (6788f949-8035-40b8-8412-316453bf1eaa) successfully added.
[root@blackstone html]# nmcli connection
NAME       UUID                                  TYPE            DEVICE
docker0    cf8efaa5-0062-482b-b481-0f4019db624f  bridge          docker0
ens33      df079c21-1852-4edb-bff1-81b2896feede  802-3-ethernet  ens33
ens33-tes  6788f949-8035-40b8-8412-316453bf1eaa  802-3-ethernet  --
[root@blackstone html]#  nmcli connection modify ens33-tes ipv4.addresses 192.168.2.100/24 +ipv4.addresses 192.168.2.169/24 +ipv4.addresses 192.168.2.200/24 ipv4.gateway 192.168.2.2 ipv4.dns 192.168.2.2 ipv4.method manual
[root@blackstone html]# nmcli connection up ens33-tes
2.创建虚拟网页内容
[root@blackstone www]# mkdir -p /var/www/ip1
[root@blackstone www]# mkdir -p /var/www/ip2
[root@blackstone www]# echo 192.168.2.100 > /var/www/ip1/index.html
[root@blackstone www]# echo 192.168.2.200 > /var/www/ip2/index.html
[root@blackstone www]# tree /var/www/
/var/www/
├── cgi-bin
├── html
│   └── 01.php
├── ip1
│   └── index.html
└── ip2
    └── index.html
3.编辑配置文件,这里直接将vhost示例配置文件移动到此处
#1.查找.conf结尾的配置文件
[root@blackstone conf.d]# rpm -ql httpd | grep conf | grep -v etc

#2.讲配置文件移动到对应位置
[root@blackstone conf.d]# cp /usr/share/doc/httpd-2.4.6/httpd-vhosts.conf .
#3.修改配置文件内容
文件内容
# ip 100
<VirtualHost 192.168.2.100:80>
    DocumentRoot /var/www/ip1
    ServerName 192.168.2.100
    ErrorLog "/var/log/httpd/ip1-error_log"
    CustomLog "/var/log/httpd/ip1-access_log" common
</VirtualHost>
<directory /var/www/ip1>
allowoverride none
require all granted
</directory>
# ip 200
<VirtualHost 192.168.2.200:80>
    DocumentRoot /var/www/ip2
    ServerName 192.168.2.200
    ErrorLog "/var/log/httpd/ip2-error_log"
    CustomLog "/var/log/httpd/ip2-access_log" common
</VirtualHost>
<directory /var/www/ip2>
allowoverride none
require all granted
</directory>
4.重启服务进行测试
[root@blackstone conf.d]# systemctl restart httpd

2.3 基于端口的虚拟主机
1.创建测试网页
[root@blackstone www]# mkdir /var/www/port81
[root@blackstone www]# mkdir /var/www/port82
[root@blackstone www]# echo 'this is port 81' > /var/www/port81/index.html
[root@blackstone www]# echo 'this is port 82' > /var/www/port82/index.html
[root@blackstone www]# tree /var/www/
/var/www/
├── cgi-bin
├── html
│   └── 01.php
├── ip1
│   ├── 01.php
│   └── index.html
├── ip2
│   └── index.html
├── port81
│   └── index.html
└── port82
    └── index.html
2.修改配置文件
#port 81
listen 81
<VirtualHost 192.168.2.169:81>
    DocumentRoot /var/www/port81
    ServerName 192.168.2.169:81
    ErrorLog "/var/log/httpd/port81-error_log"
    CustomLog "/var/log/httpd/port81-access_log" common
</VirtualHost>
<directory /var/www/port81>
allowoverride none
require all granted
</directory>

#port 82
listen 82
<VirtualHost 192.168.2.169:82>
    DocumentRoot /var/www/port82
    ServerName 192.168.2.169:82
    ErrorLog "/var/log/httpd/port82-error_log"
    CustomLog "/var/log/httpd/port82-access_log" common
</VirtualHost>
<directory /var/www/port82>
allowoverride none
require all granted
</directory>
注意:端口绑定错误可以关闭这里的selinux安全机制
[root@blackstone www]# vim /etc/selinux/config
#SELINUX=enforcing #注释掉
#SELINUXTYPE=targeted #注释掉
SELINUX=disabled #增加

[root@blackstone www]# setenforce 0
[root@blackstone www]# getenforce
Permissive
3.测试
[root@blackstone ~]# vim /etc/httpd/conf.d/httpd-vhosts.conf
[root@blackstone ~]# systemctl restart httpd
[root@blackstone ~]# curl 192.168.2.169:82
this is port 82
[root@blackstone ~]# curl 192.168.2.169:81
this is port 81
2.4基于域名的虚拟主机
1.创建网页文件夹
[root@blackstone www]# mkdir /var/www/aaa
[root@blackstone www]# mkdir /var/www/bbb
[root@blackstone www]# echo 'this is aaa.com' > /var/www/aaa/index.html
[root@blackstone www]# echo 'this is bbb.com' > /var/www/bbb/index.html
2.配置文件
#domain aaa
<VirtualHost localhost:80>
    DocumentRoot /var/www/aaa
    ServerName www.aaa.com
    ErrorLog "/var/log/httpd/aaa-error_log"
    CustomLog "/var/log/httpd/aaa-access_log" common
</VirtualHost>
<directory /var/www/aaa>
allowoverride none
require all granted
</directory>
#domain bbb

<VirtualHost  localhost:80>
    DocumentRoot /var/www/bbb
    ServerName www.bbb.com
    ErrorLog "/var/log/httpd/bbb-error_log"
    CustomLog "/var/log/httpd/bbb-access_log" common
</VirtualHost>
<directory /var/www/bbb>
allowoverride none
require all granted
</directory>
3.测试
在本地修改host文件将两个域名指向192.168.2.169
host文件目录:C:\Windows\System32\drivers\etc\
192.168.2.169 www.bbb.com
192.168.2.169 www.aaa.com
或者在服务器上修改hosts文件均可,此处采用服务器上测试。
[root@blackstone ~]# curl www.bbb.com
this is bbb.com
[root@blackstone ~]# curl www.aaa.com
this is aaa.com
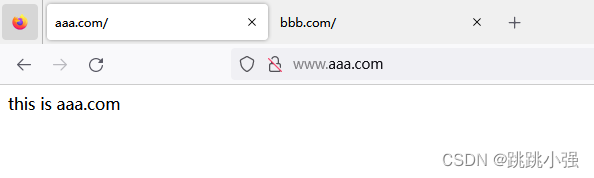

注意访问时使用http://www.aaa.com
3.ndinx配置虚拟主机
1.沿用上述的所有网卡配置以及目录配置
涉及2.2的地址添加、2.2-2.4的目录创建。
2.编辑nginx配置文件
关于nginx的配置其只需要在配置文件中的http模块内插入相应的server模块即可。
[root@blackstone nginx]# vim /usr/local/nginx/conf/nginx.conf
文件内容:
#user  nobody;
worker_processes  1;

#error_log  logs/error.log;
#error_log  logs/error.log  notice;
#error_log  logs/error.log  info;

#pid        logs/nginx.pid;


events {
    worker_connections  1024;
}


http {
    include       mime.types;
    default_type  application/octet-stream;

    #log_format  main  '$remote_addr - $remote_user [$time_local] "$request" '
    #                  '$status $body_bytes_sent "$http_referer" '
    #                  '"$http_user_agent" "$http_x_forwarded_for"';

    #access_log  logs/access.log  main;

    sendfile        on;
    #tcp_nopush     on;

    #keepalive_timeout  0;
    keepalive_timeout  65;

    #gzip  on;

    server {
        listen       80;
        server_name  localhost;

        #charset koi8-r;

        #access_log  logs/host.access.log  main;

        location / {
            root   html;
            index  index.html index.htm;
        }

        #error_page  404              /404.html;

        # redirect server error pages to the static page /50x.html
        #
        error_page   500 502 503 504  /50x.html;
        location = /50x.html {
            root   html;
        }

        # proxy the PHP scripts to Apache listening on 127.0.0.1:80
        #
        #location ~ \.php$ {
        #    proxy_pass   http://127.0.0.1;
        #}

        # pass the PHP scripts to FastCGI server listening on 127.0.0.1:9000
        #
        #location ~ \.php$ {
        #    root           html;
        #    fastcgi_pass   127.0.0.1:9000;
        #    fastcgi_index  index.php;
        #    fastcgi_param  SCRIPT_FILENAME  /scripts$fastcgi_script_name;
        #    include        fastcgi_params;
        #}

        # deny access to .htaccess files, if Apache's document root
        # concurs with nginx's one
        #
        #location ~ /\.ht {
        #    deny  all;
        #}
    }

    # another virtual host using mix of IP-, name-, and port-based configuration
    #
    #server {
    #    listen       8000;
    #    listen       somename:8080;
    #    server_name  somename  alias  another.alias;

    #    location / {
    #        root   html;
    #        index  index.html index.htm;
    #    }
    #}
#v-domain --- 基于域名的虚拟主机配置
    server {
        listen       80;
        server_name  www.aaa.com;

        location / {
            root   /var/www/aaa;
            index  index.html index.htm;
        }
    }

    server {
        listen       80;
        server_name  www.bbb.com;

        location / {
            root   /var/www/bbb;
            index  index.html index.htm;
        }
    }
#v-ip---基于IP的虚拟主机配置

    server {
        listen       80;
        server_name  192.168.2.100;

        location / {
            root   /var/www/ip1;
            index  index.html index.htm;
        }
    }

    server {
        listen       80;
        server_name  192.168.2.200;

        location / {
            root   /var/www/ip2;
            index  index.html index.htm;
        }
    }

#v-port---基于端口的虚拟主机配置
    server {
        listen       81;
        server_name  192.168.2.169;

        location / {
            root   /var/www/port81;
            index  index.html index.htm;
        }
    }

    server {
        listen       82;
        server_name  192.168.2.169;

        location / {
            root   /var/www/port82;
            index  index.html index.htm;
        }
    }

    #server {
    #    listen       443 ssl;
    #    server_name  localhost;

    #    ssl_certificate      cert.pem;
    #    ssl_certificate_key  cert.key;

    #    ssl_session_cache    shared:SSL:1m;
    #    ssl_session_timeout  5m;

    #    ssl_ciphers  HIGH:!aNULL:!MD5;
    #    ssl_prefer_server_ciphers  on;

    #    location / {
    #        root   html;
    #        index  index.html index.htm;
    #    }
    #}
}
3.全路径nginx重启+测试
#nginx语法检测 --- 注意这里一定要使用全路径
[root@blackstone conf]# /usr/local/nginx/sbin/nginx -t
nginx: the configuration file /usr/local/nginx/conf/nginx.conf syntax is ok
nginx: configuration file /usr/local/nginx/conf/nginx.conf test is successful
#nginx平滑重启
[root@blackstone conf]# /usr/local/nginx/sbin/nginx -s reload
#测试基于域名的虚拟主机
[root@blackstone conf]# curl www.aaa.com
this is aaa.com
[root@blackstone conf]# curl www.bbb.com
this is bbb.com
#测试基于IP的虚拟主机
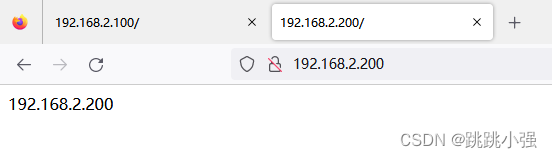
[root@blackstone conf]# curl http://192.168.2.100
192.168.2.100
[root@blackstone conf]# curl http://192.168.2.200
192.168.2.200
#测试基于端口的虚拟主机
[root@blackstone conf]# curl http://192.168.2.169:81
this is port 81
[root@blackstone conf]# curl http://192.168.2.169:82
this is port 82


![PGL图学习之图神经网络ERNIESage、UniMP进阶模型[系列八]](https://s2.51cto.com/images/blog/202211/25203528_6380b690980f951552.jpg?x-oss-process=image/watermark,size_14,text_QDUxQ1RP5Y2a5a6i,color_FFFFFF,t_100,g_se,x_10,y_10,shadow_20,type_ZmFuZ3poZW5naGVpdGk=)