1 前言
WMS启动流程 中介绍了 WindowManagerService 的启动流程,本文将介绍 View 的添加流程,按照进程分为以下2步:
- 应用进程:介绍从 WindowManagerImpl(addView 方法)到 Session(addToDisplay 方法)的调用流程;
- system_server 进程:介绍从 Session(addToDisplay 方法)到 SurfaceSession(构造方法)的调用流程;
为区分不同进程,将应用进程、system_server 进程分别标识为浅蓝色、深蓝色。
2 View 添加过程
2.1 从 WindowManagerImpl 到 Session
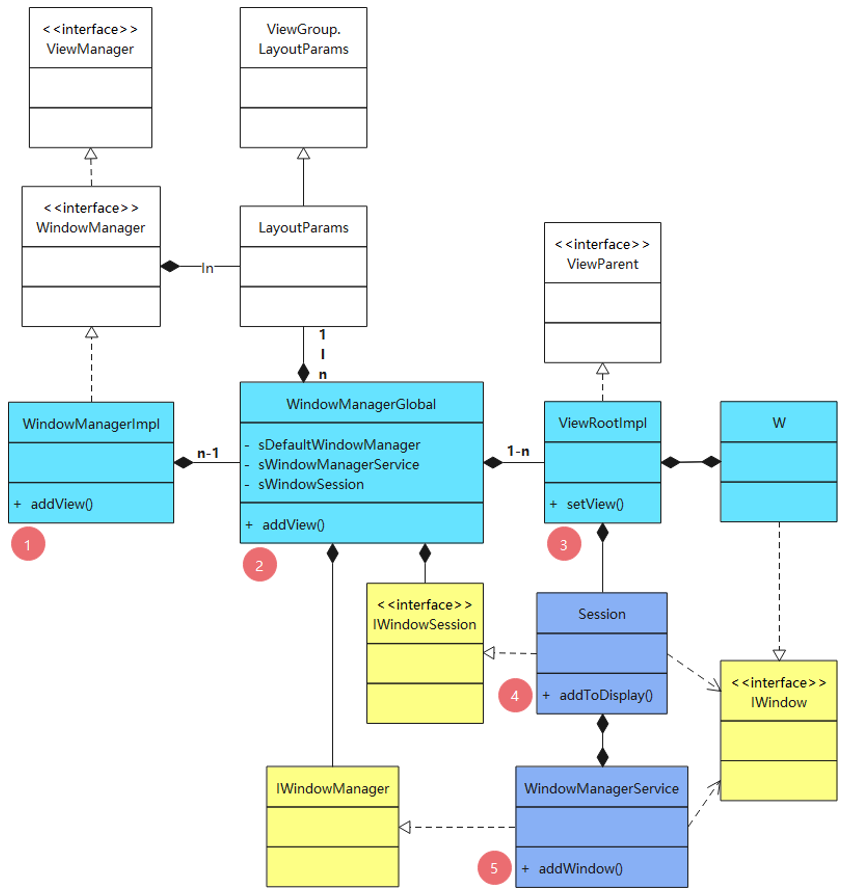
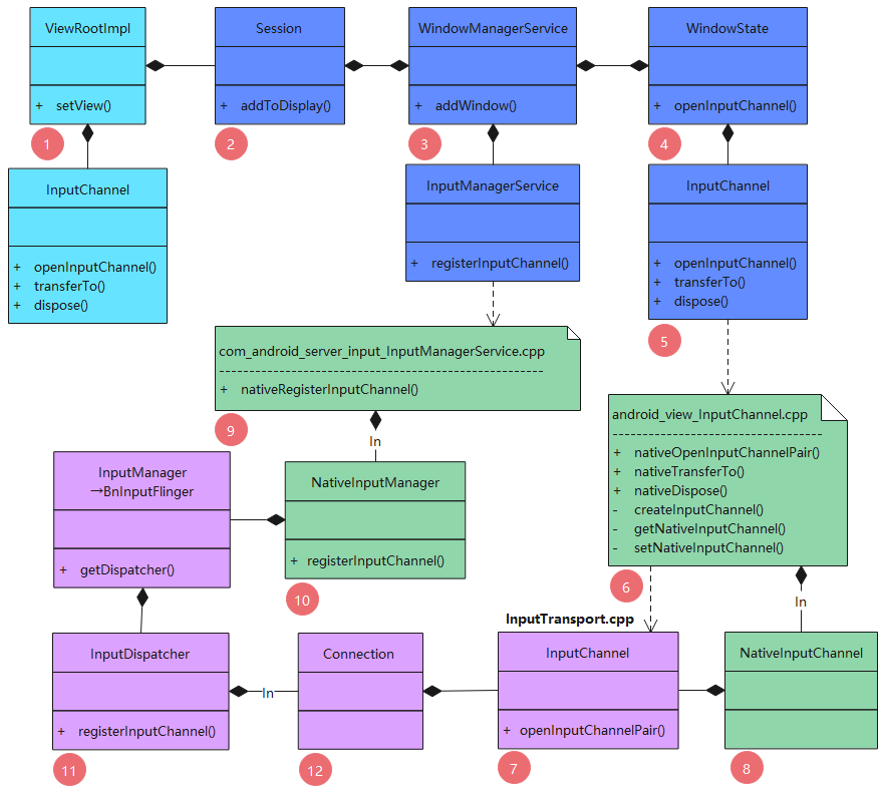
如图,浅蓝色的类是应用进程中执行的,深蓝色的类是在 system_server 进程中执行的,黄色的类是指 AIDL 文件生成的接口(用于跨进程)。
注意事项:
- WMS 在 system_server 进程中单例运行,WindowManagerGlobal 在应用进程中单例运行,但是应用进程一般有多个,而进程之间内存隔离,因此每个应用进程中有且仅一个 WindowManagerGlobal 对象,并且会与一个 Session 对象一一对应。
- 一个窗口对应一个根 View,在添加根 View 时,会创建一个 ViewRootImpl、W、WindowState 对象与之一一对应。
(1)addView
/frameworks/base/core/java/android/view/WindowManagerImpl.java
public void addView(View view, ViewGroup.LayoutParams params) {
	applyDefaultToken(params);
	mGlobal.addView(view, params, mContext.getDisplay(), mParentWindow);
}
(2)addView
/frameworks/base/core/java/android/view/WindowManagerGlobal.java
public void addView(View view, ViewGroup.LayoutParams params, Display display, Window parentWindow) {
	...
	final WindowManager.LayoutParams wparams = (WindowManager.LayoutParams) params;
	...

	ViewRootImpl root;
	View panelParentView = null; //父窗口的根 View

	synchronized (mLock) {
		...
		//如果是子窗口,则通过 token 寻找父窗口的根 View
		if (wparams.type >= WindowManager.LayoutParams.FIRST_SUB_WINDOW && wparams.type <= WindowManager.LayoutParams.LAST_SUB_WINDOW) {
			final int count = mViews.size();
			for (int i = 0; i < count; i++) {
				if (mRoots.get(i).mWindow.asBinder() == wparams.token) {
					panelParentView = mViews.get(i); //mViews = new ArrayList<View>(),存储了所有窗口的根 View
				}
			}
		}
		//每个窗口对应一个 ViewRootImpl 对象
		root = new ViewRootImpl(view.getContext(), display);
		view.setLayoutParams(wparams);
		//存留 view、root、params信息
		mViews.add(view);
		mRoots.add(root);
		mParams.add(wparams);
		try {
			root.setView(view, wparams, panelParentView);
		}
		...
	}
}
可以看到,每个根 View,都与一个 LayoutParams 和一个 ViewRootImpl 一一对应。
(3)setView
/frameworks/base/core/java/android/view/ViewRootImpl.java
在 WindowManagerGlobal 的 addView() 方法中创建了 ViewRootImpl 对象,因此,先看看 ViewRootImpl 的构造方法。
public ViewRootImpl(Context context, Display display) {
	mContext = context;
    //IWindowSession 类型,单例对象,getWindowSession() 方法调用 WMS 的 openSession() 方法,new 一个 Session 对象
	mWindowSession = WindowManagerGlobal.getWindowSession();
	mDisplay = display;
	...
	mWindow = new W(this); //IWindow.Stub 的实现类
	...
    mAttachInfo = new View.AttachInfo(mWindowSession, mWindow, display, this, mHandler, this, context); //View.AttachInfo 类型
    ...
	mDisplayManager = (DisplayManager)context.getSystemService(Context.DISPLAY_SERVICE);
    ...
}
注意:在创建 ViewRootImpl 时,也创建了 W,进一步说明每个 根 View 都与一个 W 一一对应,即 mWindow.asBinder() 可以作为 根 View (或窗口)的身份标识。
再看看 ViewRootImpl 的 setView 方法。
public void setView(View view, WindowManager.LayoutParams attrs, View panelParentView) {
	synchronized (this) {
		if (mView == null) {
			mView = view;
            ...
			mWindowAttributes.copyFrom(attrs);
			...
			mAttachInfo.mRootView = view;
			...
			if (panelParentView != null) {
				mAttachInfo.mPanelParentWindowToken = panelParentView.getApplicationWindowToken();
			}
            ...
			if ((mWindowAttributes.inputFeatures & WindowManager.LayoutParams.INPUT_FEATURE_NO_INPUT_CHANNEL) == 0) {
				mInputChannel = new InputChannel();
			}
			...
            //请求显示 View
            requestLayout();
            ...
			try {
				...
				res = mWindowSession.addToDisplay(mWindow, mSeq, mWindowAttributes, getHostVisibility(),
					mDisplay.getDisplayId(), mTmpFrame, mAttachInfo.mContentInsets, mAttachInfo.mStableInsets,
					mAttachInfo.mOutsets, mAttachInfo.mDisplayCutout, mInputChannel, mTempInsets);
				setFrame(mTmpFrame);
			}
			...
		}
	}
}
2.2 从 Session 到 SurfaceSession
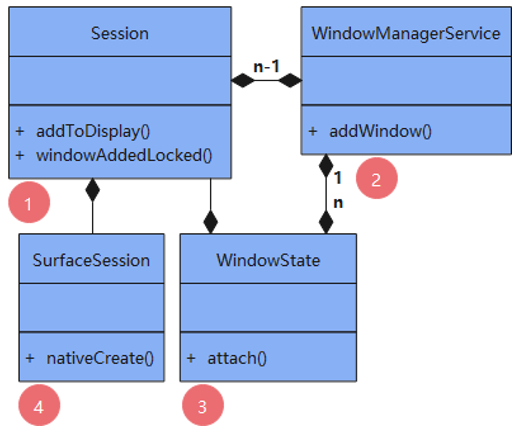
注意事项:每个应用进程对应一个 Session 对象和一个 SurfaceSession 对象, 每个窗口对应一个 WindowState 对象。
(1)Session 的创建过程
在 ViewRootImpl 的构造方法中,调用了 WindowManagerGlobal 的 getWindowSession() 方法中获取了 Session 对象,因此,先看看 Session 对象的创建过程。
/frameworks/base/core/java/android/view/WindowManagerGlobal.java
public static IWindowSession getWindowSession() {
	synchronized (WindowManagerGlobal.class) {
		if (sWindowSession == null) {
			try {
				...
				IWindowManager windowManager = getWindowManagerService(); //获取 WMS
				sWindowSession = windowManager.openSession(
						new IWindowSessionCallback.Stub() {
							@Override
							public void onAnimatorScaleChanged(float scale) {
								ValueAnimator.setDurationScale(scale);
							}
						});
			}
			...
		}
		return sWindowSession; //private static IWindowSession sWindowSession,单例对象
	}
}
/frameworks/base/services/core/java/com/android/server/wm/WindowManagerService.java
public IWindowSession openSession(IWindowSessionCallback callback) {
	return new Session(this, callback);
}
/frameworks/base/services/core/java/com/android/server/wm/Session.java
public Session(WindowManagerService service, IWindowSessionCallback callback) {
	mService = service;
	mCallback = callback;
	mUid = Binder.getCallingUid();
	mPid = Binder.getCallingPid();
	...
	try {
		mCallback.asBinder().linkToDeath(this, 0);
	}
	...
}
(2)addToDisplay
/frameworks/base/services/core/java/com/android/server/wm/Session.java
public int addToDisplay(IWindow window, int seq, WindowManager.LayoutParams attrs, int viewVisibility,
		int displayId, Rect outFrame, Rect outContentInsets, Rect outStableInsets, Rect outOutsets,
		DisplayCutout.ParcelableWrapper outDisplayCutout, InputChannel outInputChannel, InsetsState outInsetsState) {
    //mService 为 WMS
	return mService.addWindow(this, window, seq, attrs, viewVisibility, displayId, outFrame, outContentInsets,
			outStableInsets, outOutsets, outDisplayCutout, outInputChannel, outInsetsState);
}
(3)addWindow
/frameworks/base/services/core/java/com/android/server/wm/WindowManagerService.java
public int addWindow(Session session, IWindow client, int seq, LayoutParams attrs, int viewVisibility,
		int displayId, Rect outFrame, Rect outContentInsets, Rect outStableInsets, Rect outOutsets,
		DisplayCutout.ParcelableWrapper, InputChannel outInputChannel, InsetsState outInsetsState) {
	...
	//检查权限,不通过则直接返回
	...
	WindowState parentWindow = null; //父窗口的 WindowState
	...
	final int type = attrs.type;
	synchronized (mGlobalLock) {
		//获取 DisplayContent,不存在就创建,按照以下顺序创建,不为空就返回:
		//mRoot.getWindowToken(attrs.token).getDisplayContent()
		//mRoot.getDisplayContent(displayId)
		//mRoot.createDisplayContent(mDisplayManager.getDisplay(displayId), null)
		final DisplayContent displayContent = getDisplayContentOrCreate(displayId, attrs.token);
		...
		if (type >= FIRST_SUB_WINDOW && type <= LAST_SUB_WINDOW) { //待添加的窗口是 sub_win
			parentWindow = windowForClientLocked(null, attrs.token, false); //parentWindow = mWindowMap.get(attrs.token)
			...
		}
		...
		//过滤:1.type=sub_win、parentWindow=null; 2.type = sub_win = parentWindow 等
		...
		AppWindowToken atoken = null;
		final boolean hasParent = parentWindow != null;
		//获取 WindowToken(有父窗口,则获取父窗口的)
		WindowToken token = displayContent.getWindowToken(hasParent ? parentWindow.mAttrs.token : attrs.token);
		//获取窗口 type(有父窗口,则获取父窗口的)
		final int rootType = hasParent ? parentWindow.mAttrs.type : type;
		...
		if (token == null) { //如果 parentWindow != null, 则 token != null。因此,token = null,则 parentWindow = null,即此时的 token 和 rootType 是当前窗口的
			...
			//过滤:1.rootType=app_win; 2.rootType=ime_win; 3.rootType=wallpaper_win; rootType=toast_win 等,即不允许上述窗口的 token 为 null
			...
			final IBinder binder = attrs.token != null ? attrs.token : client.asBinder();
			...
			//前面没有过滤 sub_win,说明 sub_win 的 token 可以不用提前赋值,这里也会创建
			token = new WindowToken(this, binder, type, false, displayContent, session.mCanAddInternalSystemWindow, isRoundedCornerOverlay);
		} else if (rootType >= FIRST_APPLICATION_WINDOW && rootType <= LAST_APPLICATION_WINDOW) { //rootType=app_win
			atoken = token.asAppWindowToken(); //atoken 不能为空,否则会返回错误码
			...
		}
		...
		//过滤:1.rootType = ime_win != token.windowType; 2.rootType = wallpaper_win != oken.windowType 等
		...
		else if (type == TYPE_TOAST) {
			//若 token.windowType!=toast_win,可能会被过滤,即返回错误码
			...
		}
		...
		else if (token.asAppWindowToken() != null) { //AppWindowToken 是 WindowToken 的子类
			attrs.token = null;
			token = new WindowToken(this, client.asBinder(), type, false, displayContent, session.mCanAddInternalSystemWindow);
		}
		//创建 WindowState,说明每个根 View,都与一个 WindowState 一一对应
		final WindowState win = new WindowState(this, session, client, token, parentWindow, appOp[0],
				seq, attrs, viewVisibility, session.mUid, session.mCanAddInternalSystemWindow);
		...
		final DisplayPolicy displayPolicy = displayContent.getDisplayPolicy();
		displayPolicy.adjustWindowParamsLw(win, win.mAttrs, Binder.getCallingPid(), Binder.getCallingUid());
		win.setShowToOwnerOnlyLocked(mPolicy.checkShowToOwnerOnly(attrs));
		//前面已排除一些异常可能,接下来的代码不会有异常情况
		res = displayPolicy.prepareAddWindowLw(win, attrs);
		...
		win.attach(); //mSessions.add(win.mSession)
		mWindowMap.put(client.asBinder(), win);
		...
		win.mToken.addWindow(win); //win.mToken.addChild(win, mWindowComparator)
		...
	}
	...
	return res;
}
特别提醒:请重点关注 WindowToken、WindowState 的创建过程。
(4)构造方法
/frameworks/base/services/core/java/com/android/server/wm/WindowState.java
WindowState(WindowManagerService service, Session s, IWindow c, WindowToken token, WindowState parentWindow, int appOp,
		int seq, WindowManager.LayoutParams a, int viewVisibility, int ownerId, boolean ownerCanAddInternalSystemWindow) {
	this(service, s, c, token, parentWindow, appOp, seq, a, viewVisibility, ownerId,
			ownerCanAddInternalSystemWindow, new PowerManagerWrapper(){...});
}

WindowState(WindowManagerService service, Session s, IWindow c, WindowToken token, WindowState parentWindow, int appOp,
		int seq, WindowManager.LayoutParams a, int viewVisibility, int ownerId, boolean ownerCanAddInternalSystemWindow,
		PowerManagerWrapper powerManagerWrapper) {
	super(service); //mWmService = service
	mSession = s;
	mClient = c;
	...
	mToken = token;
	mAppToken = mToken.asAppWindowToken();
	...
	mAttrs.copyFrom(a);
	...
	mPolicy = mWmService.mPolicy;
	mContext = mWmService.mContext;
	...
	if (mAttrs.type >= FIRST_SUB_WINDOW && mAttrs.type <= LAST_SUB_WINDOW) { //计算子窗口图层
		mBaseLayer = mPolicy.getWindowLayerLw(parentWindow) * TYPE_LAYER_MULTIPLIER + TYPE_LAYER_OFFSET;
		mSubLayer = mPolicy.getSubWindowLayerFromTypeLw(a.type);
		...
		parentWindow.addChild(this, sWindowSubLayerComparator);
		...
	} else { //计算窗口图层
		mBaseLayer = mPolicy.getWindowLayerLw(this) * TYPE_LAYER_MULTIPLIER + TYPE_LAYER_OFFSET;
		mSubLayer = 0;
		...
	}
	...
    mWinAnimator = new WindowStateAnimator(this);
    ...
}
(5)attach
/frameworks/base/services/core/java/com/android/server/wm/WindowState.java
void attach() {
	...
	mSession.windowAddedLocked(mAttrs.packageName);
}
(6)windowAddedLocked
/frameworks/base/services/core/java/com/android/server/wm/Session.java
void windowAddedLocked(String packageName) {
    //绑定应用进程包名
	mPackageName = packageName;
	...
	if (mSurfaceSession == null) {
		...
		mSurfaceSession = new SurfaceSession();
		...
		//将 Session 添加到 WMS 中
		mService.mSessions.add(this);
		...
	}
	mNumWindow++;
}
说明: Session 和 SurfaceSession 都与应用进程一一对应,SurfaceSession 持有 SurfaceComposerClient,作为跟 SurfaceFlinger 通信的代理对象。
(7)SurfaceSession
/frameworks/base/core/java/android/view/SurfaceSession.java
public final class SurfaceSession {
	// SurfaceComposerClient
	private long mNativeClient;
	...

	public SurfaceSession() {
        //创建 SurfaceComposerClient
		mNativeClient = nativeCreate();
	}

    ...
}
说明: SurfaceComposerClient 是 ISurfaceComposer 的代理类,SurfaceFlinger 是 ISurfaceComposer 的实现类,它们通过 Binder 实现跨进程通讯。
3 添加 View 的场景
看到这里,读者也许会疑惑,什么样的 View 会通过 WindowManager 的 addView() 走完上述流程?布局中的 TextView 组件的添加会走上述流程么?带着这些疑问,笔者列举了系统中 3 个 View的添加场景应用,分别是:Activity、Dialog、Toast 中 View 的添加,这些 View 一般命名为 mDecor(也有例外),它们一般是根 View。
(1)Activity
/frameworks/base/core/java/android/app/Activity.java
Activity extends ContextThemeWrapper implements ... {
    private WindowManager mWindowManager;
    private Window mWindow
    View mDecor = null;

	void makeVisible() {
		if (!mWindowAdded) {
			ViewManager wm = getWindowManager(); //mWindowManager
			//通过 WindowManager 添加 View
			wm.addView(mDecor, getWindow().getAttributes());
			...
		}
		...
    }
}
(2)Dialog.java
/frameworks/base/core/java/android/app/Dialog.java
public class Dialog implements DialogInterface ... {
	private final WindowManager mWindowManager;
	final Window mWindow;
    View mDecor;

	public void show() {
        ...
        mDecor = mWindow.getDecorView();
		...
        WindowManager.LayoutParams l = mWindow.getAttributes();
        ...
        //通过 WindowManager 添加 View
        mWindowManager.addView(mDecor, l);
        ...
    }
}
(3)Toast
/frameworks/base/core/java/android/widget/Toast.java
public class Toast {
	WindowManager mWM;
	View mView;

	public void handleShow(IBinder windowToken) {
		...
		if (mView != mNextView) {
			...
			mWM = (WindowManager)context.getSystemService(Context.WINDOW_SERVICE);
			...
			try {
                //通过 WindowManager 添加 View
				mWM.addView(mView, mParams);
				...
			}
			...
		}
	}
}
4 WindowManager
WindowManager 是 View 添加的起点,其具体实现是 WindowManagerImpl。在获取 WindowManager 对象时,一般使用如下代码:
//Context 的具体实现是 ContextImpl
WindowManager wm = (WindowManager)context.getSystemService(Context.WINDOW_SERVICE); //"window"
下面跟踪一下上述代码。
/frameworks/base/core/java/android/app/ContextImpl.java
public Object getSystemService(String name) {
	return SystemServiceRegistry.getSystemService(this, name);
}
/frameworks/base/core/java/android/app/SystemServiceRegistry.java
final class SystemServiceRegistry {
	...
	//<serviceName, serviceFetcher>
    private static final Map<String, ServiceFetcher<?>> SYSTEM_SERVICE_FETCHERS = new ArrayMap<String, ServiceFetcher<?>>();
	//服务缓存个数,每调用一次 registerService,服务个数+1,sServiceCacheSize 未被初始化,默认初值为 0
	private static int sServiceCacheSize;

	//在类被加载时,注册服务
    static {
		...
        registerService(Context.WINDOW_SERVICE, WindowManager.class,
                new CachedServiceFetcher<WindowManager>() {
            @Override
            public WindowManager createService(ContextImpl ctx) {
                return new WindowManagerImpl(ctx);
            }});
    }

	//创建缓存,在 ContextImpl 类初始化时调用:final Object[] mServiceCache = SystemServiceRegistry.createServiceCache()
	public static Object[] createServiceCache() {
        return new Object[sServiceCacheSize];
    }

    //获取服务
    public static Object getSystemService(ContextImpl ctx, String name) {
        ServiceFetcher<?> fetcher = SYSTEM_SERVICE_FETCHERS.get(name);
        return fetcher != null ? fetcher.getService(ctx) : null;
    }

    //注册服务
    private static <T> void registerService(String serviceName, Class<T> serviceClass, ServiceFetcher<T> serviceFetcher) {
        ...
        SYSTEM_SERVICE_FETCHERS.put(serviceName, serviceFetcher);
    }
	...
}
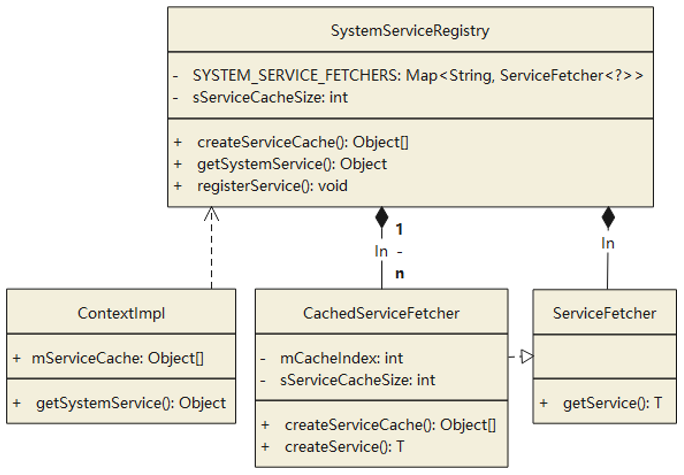
说明:CachedServiceFetcher 是 SystemServiceRegistry 的内部类,负责创建和缓存服务,每个服务对应一个缓存编号和 ServiceFetcher。在静态代码块里调用了 registerService() 方法,说明在 SystemServiceRegistry 类加载时就创建了一系列 ServiceFetcher,但是此时还没有创建服务,在第一次请求服务时才开始创建服务。
注意:SystemServiceRegistry 类被应用进程加载,系统中可能同时存在多个应用进程,而应用之间内存隔离,因此,每个应用进程在加载 SystemServiceRegistry 类时,都创建了一系列 ServiceFetcher。
/frameworks/base/core/java/android/app/SystemServiceRegistry.CachedServiceFetcher.java
static abstract interface ServiceFetcher<T> {
	T getService(ContextImpl ctx);
}

//服务拾取器(每个 service 对应一个 cacheIndex 和 serviceFetcher)
static abstract class CachedServiceFetcher<T> implements ServiceFetcher<T> {
	private final int mCacheIndex; //服务编号

	CachedServiceFetcher() {
		mCacheIndex = sServiceCacheSize++;
	}

	public final T getService(ContextImpl ctx) {
        //获取服务缓存数组,mServiceCache 属性在定义时就被初始化:mServiceCache = SystemServiceRegistry.createServiceCache()
		final Object[] cache = ctx.mServiceCache;
		...
		for (;;) {
			...
			synchronized (cache) {
				T service = (T) cache[mCacheIndex];
				if (service != null || gates[mCacheIndex] == ContextImpl.STATE_NOT_FOUND) {
					return service; //服务已存在,无需创建
				}
				...
			}

			if (doInitialize) {
				T service = null;
				...
				try {
					//创建服务
					service = createService(ctx);
					...
				}
				...
                } finally {
					synchronized (cache) {
						//缓存服务,保证服务在同一应用进程中以单例存在
						cache[mCacheIndex] = service;
						...
					}
				}
				return service;
			}
			...
		}
	}

	public abstract T createService(ContextImpl ctx) throws ServiceNotFoundException;
}
每个 ContextImpl 对象在初始化时创建了一个用于缓存服务的数组,每个服务在第一次请求时才被创建并缓存,因此,每个 Context 中都可能存在一个单例的 WindowManager 对象。
声明:本文转自【framework】View添加过程




![[apue] linux 文件系统那些事儿](https://blog.xiaobaicai.fun/wp-content/uploads/2023/01/1b363ddd36f89929fc08f10dbaf9b2a6.png)

