本文主要内容
- Kaptcha在SpringBoot环境下的用法实例
- 后端生成的验证码图片以Base64和流的形式响应给前端,渲染到HTML
内容导览
完整的项目实例:https://github.com/HackyleShawe/JavaDemos/tree/master/Examples/kaptcha-demo
Kaptcha
Kaptcha 是一个Google开源、可自由配置的图片验证码生成工具
验证码的一般流程
后端:
- 随机生成四位数字的验证码图片和数字
- 结合随机生成的UUID作为Key,验证码值作为Value保存验证码到Redis中
- 将UUID和验证码图片响应给用户,等用户提交后验证校验码是否有效
前端:
- 进入登录/注册页面时,获取验证码图片
- 对用户输入的验证码进行简单的规则校验
- 返回登录结果
- 提供刷新验证码的动作,防止出现用户难以辨识的识别码
基本的使用步骤
- 导入POM依赖
- 定义生成验证码图片时的一系列参数:图片的宽高、字符内容、干扰类型等
- 调用com.google.code.kaptcha.impl.DefaultKaptcha#createText()创建验证码值
- 调用com.google.code.kaptcha.impl.DefaultKaptcha#createText(kaptchaText)创建验证图片(BufferedImage)
- 将图片BufferedImage转换为目标流
<dependency>
    <groupId>com.github.penggle</groupId>
    <artifactId>kaptcha</artifactId>
    <version>2.3.2</version>
</dependency>
配置参数说明
对于一张验证码图片来说,我们如何控制验证码图片的样式呢?这就是kaptcha提供的配置参数的意义。
- 首先,它本质是一张图片,所以将会涉及图片的边框、宽高、背景颜色
- 验证码是字符,这将会涉及到字体类型、字体大小、字体颜色、字体间距、字体数量
- 验证码的另一个重要功能是干扰,这将会涉及干扰类型、干扰样式
|
属性 |
说明 |
默认值 |
|
kaptcha.border |
图片边框,合法值:yes , no |
yes |
|
kaptcha.border.color |
边框颜色,合法值: r,g,b (and optional alpha) 或者 white,black,blue. |
black |
|
kaptcha.image.width |
图片宽 |
200 |
|
kaptcha.image.height |
图片高 |
50 |
|
kaptcha.producer.impl |
图片实现类 |
com.google.code.kaptcha.impl.DefaultKaptcha |
|
kaptcha.textproducer.impl |
文本实现类 |
com.google.code.kaptcha.text.impl.DefaultTextCreator |
|
kaptcha.textproducer.char.string |
文本集合,验证码值从此集合中获取 |
abcde2345678gfynmnpwx |
|
kaptcha.textproducer.char.length |
验证码长度 |
5 |
|
kaptcha.textproducer.font.names |
字体 |
Arial, Courier |
|
kaptcha.textproducer.font.size |
字体大小 |
40px. |
|
kaptcha.textproducer.font.color |
字体颜色,合法值: r,g,b 或者 white,black,blue. |
black |
|
kaptcha.textproducer.char.space |
文字间隔 |
2 |
|
kaptcha.noise.impl |
干扰实现类 |
com.google.code.kaptcha.impl.DefaultNoise |
|
kaptcha.noise.color |
干扰 颜色,合法值: r,g,b 或者 white,black,blue. |
black |
|
kaptcha.obscurificator.impl |
图片样式:<br />水纹 com.google.code.kaptcha.impl.WaterRipple <br /> 鱼眼 com.google.code.kaptcha.impl.FishEyeGimpy <br /> 阴影 com.google.code.kaptcha.impl.ShadowGimpy |
com.google.code.kaptcha.impl.WaterRipple |
|
kaptcha.background.impl |
背景实现类 |
com.google.code.kaptcha.impl.DefaultBackground |
|
kaptcha.background.clear.from |
背景颜色渐变,开始颜色 |
light grey |
|
kaptcha.background.clear.to |
背景颜色渐变, 结束颜色 |
white |
|
kaptcha.word.impl |
文字渲染器 |
com.google.code.kaptcha.text.impl.DefaultWordRenderer |
|
kaptcha.session.key |
session key |
KAPTCHA_SESSION_KEY |
|
kaptcha.session.date |
session date |
KAPTCHA_SESSION_DATE |
配置类KaptchaConfig
将上文中的配置参数,传递给Kaptcha
import com.google.code.kaptcha.impl.DefaultKaptcha;
import com.google.code.kaptcha.util.Config;
import org.springframework.context.annotation.Bean;
import org.springframework.context.annotation.Configuration;

import java.util.Properties;

/**
 * 验证码配置
 */
@Configuration
public class KaptchaConfig {

    @Bean
    public DefaultKaptcha getDefaultKaptcha(){
        DefaultKaptcha defaultKaptcha=new DefaultKaptcha();
        Properties properties=new Properties();
        properties.setProperty("kaptcha.border", "no");
        properties.setProperty("kaptcha.border.color", "34,114,200");
        properties.setProperty("kaptcha.image.width", "200");
        properties.setProperty("kaptcha.image.height", "50");
        //properties.setProperty("kaptcha.textproducer.char.string", "0123456789");
        properties.setProperty("kaptcha.textproducer.char.length", "6");
        properties.setProperty("kaptcha.textproducer.font.names", "Arial,Arial Narrow,Serif,Helvetica,Tahoma,Times New Roman,Verdana");
        properties.setProperty("kaptcha.textproducer.font.size", "38");

        properties.setProperty("kaptcha.background.clear.from", "white");
        properties.setProperty("kaptcha.background.clear.to", "white");

        Config config=new Config(properties);
        defaultKaptcha.setConfig(config);
        return defaultKaptcha;
    }

}
整合Redis
使用Redis暂存验证码值
<dependency>
    <groupId>org.springframework.boot</groupId>
    <artifactId>spring-boot-starter-data-redis</artifactId>
</dependency>
application.yml
server:
  port: 9696
  servlet:
    context-path: /

spring:
  redis:
    host: 127.0.0.1
    port: 6379
    password:  #Redis服务器连接密码(默认为空)
    timeout: 30000 #连接超时时间(毫秒)
    jedis:
      pool:
        max-active: 20 # 连接池最大连接数(使用负值表示没有限制)
        max-wait: -1 # 连接池最大阻塞等待时间(使用负值表示没有限制)
        max-idle: 10 # 连接池中的最大空闲连接
        min-idle: 0 # 连接池中的最小空闲连接
Redis配置类
@Configuration
public class RedisConfig {
    @Autowired
    private RedisConnectionFactory factory;

    @Bean
    public RedisTemplate<String, Object> redisTemplate() {
        //使用Jackson2JsonRedisSerializer来序列化和反序列化redis的value值(默认使用JDK的序列化方式)
        Jackson2JsonRedisSerializer<Object> jackson2JsonRedisSerializer = new Jackson2JsonRedisSerializer<Object>(Object.class);
        ObjectMapper om = new ObjectMapper();
        // 指定要序列化的域,field,get和set,以及修饰符范围,ANY是都有包括private和public
        om.setVisibility(PropertyAccessor.ALL, JsonAutoDetect.Visibility.ANY);
        // 指定序列化输入的类型,类必须是非final修饰的,final修饰的类,比如String,Integer等会跑出异常
        //om.enableDefaultTyping(ObjectMapper.DefaultTyping.NON_FINAL);
        om.activateDefaultTyping(LaissezFaireSubTypeValidator.instance, ObjectMapper.DefaultTyping.NON_FINAL, JsonTypeInfo.As.PROPERTY);
        jackson2JsonRedisSerializer.setObjectMapper(om);

        RedisTemplate<String, Object> template = new RedisTemplate<String, Object>();
        template.setConnectionFactory(factory);
        template.setKeySerializer(new StringRedisSerializer()); //指定Redis的Key序列化方式
        template.setValueSerializer(jackson2JsonRedisSerializer); //指定Value的序列化方式
        template.setHashKeySerializer(jackson2JsonRedisSerializer); //执行Hash的Key的序列化方式
        template.setHashValueSerializer(jackson2JsonRedisSerializer); //指定Hash的Value的序列化方式
        template.setDefaultSerializer(new StringRedisSerializer());
        template.afterPropertiesSet();
        return template;
    }

    @Bean
    public ValueOperations<String, String> valueOperations(RedisTemplate<String, String> redisTemplate) {
        return redisTemplate.opsForValue();
    }

}
后端
验证码图片响应为Base64
1、后端生成验证码图片的Base64、以及该验证码的唯一表示uuid,存于Redis
2、前端请求将图片的Base64和uuid传递过去
3、前端将用户输入的验证码和uuid传来,后端从Redis中取出,进行比对
验证码图片响应为Stream
1、前端请求该接口,携带一个uuid,表明本次生成验证码的唯一标识
2、后端生成验证码图片,以流的形式响应给前端,并将验证码信息存于Redis
3、前端将用户输入的验证码和uuid传来,后端从Redis中取出,进行比对
/**
 * 生成验证码
 * 1.使用Kaptcha获取到验证码的字符存于kaptchaText、图片存于BufferedImage
 * 2.图片转换成Base64的方式传递给前端
 * 3.kaptchaText放在Redis中,60s有效,使用UUID作为Redis的Key
 */
public Map<String, String> codeByBase64() {
    String kaptchaText = defaultKaptcha.createText();
    BufferedImage image = defaultKaptcha.createImage(kaptchaText);

    String base64Code = "";
    ByteArrayOutputStream outputStream = null;
    try {
        outputStream = new ByteArrayOutputStream();
        ImageIO.write(image, "jpg", outputStream);
        base64Code = Base64.encodeBase64String(outputStream.toByteArray());
    } catch (Exception e) {
        System.out.println("verificationCode exception: ");
    } finally {
        if (outputStream != null) {
            try {
                outputStream.close();
            } catch (Exception e) {
                System.out.println("verificationCode outputStream close exception: ");
            }
        }
    }

    //uuid; 唯一标识code
    //code; 验证码图片的Base64串
    Map<String, String> kaptchaVoMap = new HashMap<>();
    String uuid = UUID.randomUUID().toString();
    kaptchaVoMap.put("uuid", uuid);
    kaptchaVoMap.put("code", "data:image/png;base64," + base64Code);
    redisValueOperations.set(uuid, kaptchaText, 60L, TimeUnit.SECONDS);

    return kaptchaVoMap;
}

public void codeByStream(String uuid, HttpServletResponse response) {
    // 生成验证码
    String captcha = defaultKaptcha.createText();
    System.out.println("The captcha:" + captcha);

    // 保存到 redis中
    redisValueOperations.set(uuid, captcha, 60, TimeUnit.SECONDS);
    // 生成图片验证码
    BufferedImage image = defaultKaptcha.createImage(captcha);
    try {
        // 响应到页面
        ServletOutputStream out = response.getOutputStream();
        ImageIO.write(image, "jpg", out);
        out.close();
    } catch (IOException e) {
        e.printStackTrace();
    }

    response.setHeader("Cache-Control", "no-store, no-cache");
    response.setContentType("image/jpeg");
}
前端接收Base64的验证码图片
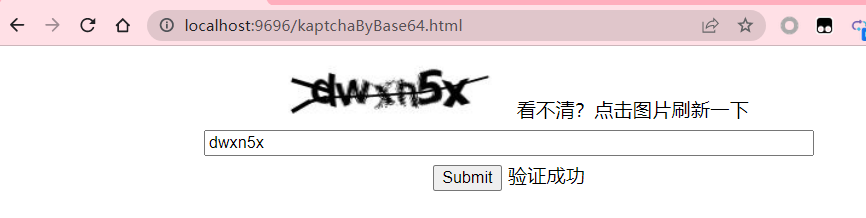
请求后端接口,获取验证码图片的Base64信息,将其塞入img标签的src属性中。为img标签添加onclick事件,每次点击,就重新请求验证码图片。
<div class="mainContainer">
  <div>
    <img alt="验证码" id="codeImg" src="" >
    <a>看不清?点击图片刷新一下</a>
  </div>
  <div><input type="text" id="code" placeholder="Input Verification Code Place" size="70"></div>
  <div>
    <button id="submit">Submit</button>
    <span id="verificationResult"></span>
  </div>
</div>
<script>
$(function () {
fetchCode()
})
//请求后端获取验证码图片
function fetchCode() {
$.get("/codeByBase64", function (data) {
//console.log(data)
$("#codeImg").attr("src", data.code)
//把UUID暂存起来,在请求后端的验证码正确性校验接口时需要携带
window.localStorage.setItem("uuid", data.uuid)
})
}
//点击刷新
$("#codeImg").click(function () {
fetchCode()
})
//提交
$("#submit").click(function () {
let uuid = window.localStorage.getItem("uuid")
$.get("/checkCode", {"code": $("#code").val(), "uuid":uuid},
function (data) {
$("#verificationResult").html(data)
}
)
});
</script>前端接收流式的验证码图片
<img alt="验证码" src="" onerror="this.src='/codeByStream?uuid='+uuid()" onclick="this.src='/codeByStream?uuid='+uuid()">- src为空,一定会出错,直接跳转到onerror
- onerror:当请求出错时调用。请求后端,获取验证码。为什么要使用onerror?因为在请求后端接口时要携带一个UUID,src属性内不支持调用函数
- onclick事件,每次点击,就重新请求验证码图片
测试

其他问题
问题:kaptcha在Windows平台正常生成验证码图片,但在linux系统上运行报错
org.springframework.web.util.NestedServletException: Handler dispatch failed; nested exception is java.lang.InternalError: java.lang.reflect.InvocationTargetException
原因:操作系统没有FontConfig组件
解决:安装相应字体配置组件
- yum install fontconfig
- fc-cache –force
Reference:https://www.cnblogs.com/qitian77/p/16405210.html


![原来你是这样的JAVA–[07]聊聊Integer和BigDecimal](https://img2024.cnblogs.com/blog/37001/202402/37001-20240224171021931-593439949.png)


![[Vue] CSS中的v-bind](https://fox-blog-image-1312870245.cos.ap-guangzhou.myqcloud.com/202402161730758.png)